Showing posts with label Linux. Show all posts

Oct 19, 2017

DumpsterFire Toolset - Security Incidents In A Box!

The DumpsterFire Toolset is a modular, menu-driven, cross-platform tool for building repeatable, time-delayed, distributed security events. Easily create custom event chains for Blue Team drills and sensor / alert mapping. Red Teams can create decoy incidents, distractions, and lures to support and scale their operations. Turn paper tabletop exercises into controlled "live fire" range events. Build event sequences ("narratives") to simulate realistic scenarios and generate corresponding network and filesystem artifacts.
The toolset is designed to be dynamically extensible, allowing you to create your own Fires (event modules) to add to the included collection of toolset Fires. Just write your own Fire module and drop it into the FireModules directory. The DumpsterFire toolset will auto-detect your custom Fires at startup and make them available for use.

Accountability

DumpsterFire creates a date-time stamped event log so that Red- and Blue teams can coordinate and track events, correlating them to what was detected (or not detected) by your sensors, which alerts did or did not trigger, etc. It also allows teams to confirm which events were part of your operation / exercise, keeping everyone out of trouble. All date-time tracking is performed in UTC, so your global operations can be easily correlated without worrying about conversions between timezones and international date lines.
The auto-generated date-time stamped event logs also provide an effortless value add to your engagements. Generate a collection of DumpsterFires for your client engagements, tailored to their attack surfaces. At the end of your operations you can hand over the logs as a bonus Purple Team deliverable to your client for post-engagement analysis.

Overview

The DumpsterFire toolset workflow is designed to be user-friendly and robust. Everything can be done from within the menu-driven dumpsterFireFactory.py script. Launch the script and the tool will guide you as you go. You can start by browsing the existing Fire modules and saved DumpsterFires. When you're ready to create your own DumpsterFires, the tool will lead through the workflow to get the job done. Finally it will be time to ignite your DumpsterFire. After selecting the DumpsterFire of your choice, you'll review the DumpsterFire's Fire modules and settings. If everything looks good, light it up!

When you're building a DumpsterFire, after you've chosen all of the Fire modules you wish to include, the tool will loop through the list of Fires. If a Fire has options for custom settings, the tool will call that Fire's Configure() method to present you with prompts for its settings (e.g. a target network's IP address).

Once all of the Fires have been configured, you'll then be given the option to assign individual time delays to your Fires. This allows the DumpsterFire to better mimic real operations when executing its chain of events. For example, the first Fire may visit various hacking Websites, the next Fire then downloads a few common hacking tools before launching the third Fire which starts scanning the local network. If this all happened within seconds of each other, no SOC analyst is going to believe it was a human. By adding several minutes or even hours between those events, you create a more realistic chain of events.

After all of the Fires have been configured and optional individual Fire delays assigned, you'll be asked to name your DumpsterFire. Do not use spaces or odd special characterse, just stick to letters, numbers, underscores, and hyphens.

Voila! You have now created your first DumpsterFire. Time to light one up!

When you're ready to ignite a DumpsterFire, the tool will first show you the DumpsterFire's settings. If everything looks good, you'll be asked if you want to assign a date-time delay before igniting. All date-time processing is done in UTC to ensure consistent execution regardless of your DumpsterFire's location of execution. Otherwise you can decline the date-time delay and execution will begin immediately after you give final confirmation.

As the DumpsterFire executes, you'll be given regular date-time stamped feedback on each Fire's status and critical events. This not only helps you track progress, but also provides a chronological record of your DumpsterFire's activities - critical in coordinating and deconflicting your events from the general background noise that floods every SOC. You can also hand over the chronological record to your external clients after your operations are complete, as a value-added record of your activites that they can use to review their sensor and alert settings. All with no extra effort on your part.

Shenanigans

April 1st happens! So do cyber wargames or your best friend's birthday. Some circumstances call for a little extra something. Finally infiltrate your opponent's perimeter in that net wars competition? Celebrate with Shenanigans while locking in your victory! Best friend leave their screen unlocked on game night? Sharing is caring! DumpsterFire's Shenanigans let you add some flavor to your operation.
Want to open the system's default browser and stream all of that Rick Astley awesomeness? After setting their system volume to maximum? How about opening any URL you choose? Or setting the system's shell aliases to pretend the filesystem is corrupted?

Files & Directories

dumpsterFireFactory.py - Menu-driven tool for creating, configuring, scheduling, and executing DumpsterFires

FireModules/ - Directory that contains subdirectories of Fires, each subdirectory is a specific Category of Fires to keep your Fire modules organized. Fires are added to a DumpsterFire to create a chain of events and actions.

DumpsterFires/ - Directory containing your collection of DumpsterFires

igniteDumpsterFire.py - Headless script, invoked at command line with the filename of the DumpsterFire you wish to execute. Useful for igniting distributed DumpsterFires.

testFireModule.py - Utility script for unit testing the Class methods of your custom Fire modules, without the hassle of running through the entire DumpsterFire Factory process to debug. Also useful for running a single Fire to check your settings. testFireModule.py will prompt you for configuration settings were applicable.

__init__.py files - Required to make Python treat directories as containing Python packages, allows DumpsterFire toolset to find and load Fire modules.

Requirements

Python 2.7.x

Run DumpsterFire Factory

./dumpsterFireFactory.py

Customizing Your Dumpster Fires

DumpsterFire's modular design gives you flexibility to create any number of event-chain narratives. Fire modules that have configurable settings allow you to set target networks or system, etc. There are a few Fire modules, however, that give you immediate flexibility to greatly expand your DumpsterFire event sequences.

Without creating any new FireModule classes, you can use these existing "custom" Fire modules to leverage and extend your DumpsterFires:
  • FireModules/Websurfing/custom_url.py
  • FireModules/FileDownloads/download_custom_url.py
  • FireModules/OSCommand/os_linux_unix_command.py
  • FireModules/OSCommand/os_win_cmd_command.py
  • FireModules/OSCommand/os_osx_applescript_command.py
You can add any number of these to your DumpsterFire, each with its own custom actions. For example, you could chain together a dozen 'custom_url.py' Fire modules to build a complete, tailored browsing narrative. You could then have various 'OSCommand/' Fire instances that execute system commands to further reinforce your desired narrative of events. The 'OSCommand/' Fires in particular give you incredible flexbility. Each individual Fire in your DumpsterFire event chain takes any shell commands that are appropriate for the host's OS:

Example: Linux/Unix (& OSX terminal)
find /home -name '*.bash_history' -exec cat {} ; ; echo "Never gonna give you up" > rickroll.txt ; wall rickroll.txt
Sep 29, 2017

BloodHound - Six Degrees of Domain Admin

Six Degrees of Domain Admin
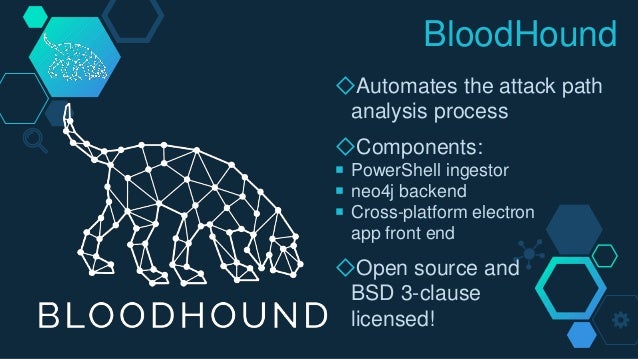
BloodHound is a single page Javascript web application, built on top of Linkurious, compiled with http://electron.atom.io/, with a Neo4j database fed by a PowerShell ingestor.

BloodHound uses graph theory to reveal the hidden and often unintended relationships within an Active Directory environment. Attackers can use BloodHound to easily identify highly complex attack paths that would otherwise be impossible to quickly identify. Defenders can use BloodHound to identify and eliminate those same attack paths. Both blue and red teams can use BloodHound to easily gain a deeper understanding of privilege relationships in an Active Directory environment.

Sep 28, 2017

Radare2 - unix-like Reverse Engineering Framework

Reverse Engineering Framework

Introduction

r2 is a rewrite from scratch of radare in order to provide a set of libraries and tools to work with binary files.

Radare project started as a forensics tool, a scriptable commandline hexadecimal editor able to open disk files, but later support for analyzing binaries, disassembling code, debugging programs, attaching to remote gdb servers, ..

radare2 is portable.

Architectures:
6502, 8051, CRIS, H8/300, LH5801, T8200, arc, arm, avr, bf, blackfin, xap, dalvik, dcpu16, gameboy, i386, i4004, i8080, m68k, malbolge, mips, msil, msp430, nios II, powerpc, rar, sh, snes, sparc, tms320 (c54x c55x c55+), V810, x86-64, zimg, risc-v.

File Formats:
bios, CGC, dex, elf, elf64, filesystem, java, fatmach0, mach0, mach0-64, MZ, PE, PE+, TE, COFF, plan9, dyldcache, Commodore VICE emulator, Game Boy (Advance), Nintendo DS ROMs and Nintendo 3DS FIRMs.

Operating Systems:
Android, GNU/Linux, [Net|Free|Open]BSD, iOS, OSX, QNX, w32, w64, Solaris, Haiku, FirefoxOS

Bindings:

Vala/Genie, Python (2, 3), NodeJS, Lua, Go, Perl, Guile, php5, newlisp, Ruby, Java, OCaml, ...

Dependencies

radare2 can be built without any special dependency, just use make and get a working toolchain (gcc, clang, tcc, ..)

Optionally you can use libewf for loading EnCase disk images.

To build the bindings you need latest valabind, g++ and swig2.

Install

The easiest way to install radare2 from git is by running the following command:
sys/install.sh
If you want to install radare2 in the home directory without using root privileges and sudo, simply run:
sys/user.sh

Update

To update Radare2 you don't need to uninstall or pull, just re-run:
sys/install.sh

Uninstall

In case of a polluted filesystem you can uninstall the current version or remove all previous installations:
make uninstall
make purge

Package manager

Radare2 has its own package manager - r2pm. It's packages repository is on GitHub too. To start to use it for the first time you need to initialize packages:
r2pm init
Refresh the packages database before installing any package:
r2pm update
To install a package use the following command:
r2pm install [package name]

Bindings

All language bindings are under the r2-bindings directory. You will need to install swig and valabind in order to build the bindings for Python, Lua, etc..

APIs are defined in vapi files which are then translated to swig interfaces, nodejs-ffi or other and then compiled.

The easiest way to install the python bindings is to run:
r2pm install lang-python2 #lang-python3 for python3 bindings
r2pm install r2api-python
r2pm install r2pipe-python
In addition there are r2pipe bindings, which are an API interface to interact with the prompt, passing commands and receivent the output as a string, many commands support JSON output, so it's integrated easily with many languages in order to deserialize it into native objects.
npm install r2pipe   # NodeJS
gem install r2pipe   # Ruby
pip install r2pipe   # Python
opam install radare2 # OCaml
And also for Go, Rust, Swift, D, .NET, Java, NewLisp, Perl, Haskell, Vala, OCaml, and many more to come!

Webserver

radare2 comes with an embedded webserver that serves a pure html/js interface that sends ajax queries to the core and aims to implement an usable UI for phones, tablets and desktops.
r2 -c=H /bin/ls
To use the webserver on Windows, you require a cmd instance with administrator rights. To start the webserver use command in the project root.
>> radare2.exe -c=H rax2.exe

Sep 21, 2017

DorkBot - Scan Google search results for Vulnerabilities

dorkbot is a modular command-line tool for performing vulnerability scans against a set of webpages returned by Google search queries in a given Google Custom Search Engine. It is broken up into two sets of modules:
  • Indexers - modules that issue a search query and return the results as targets
  • Scanners - modules that perform a vulnerability scan against each target
Targets are stored in a local database upon being indexed. Once scanned, any vulnerabilities found by the chosen scanner are written to a standard JSON report file. Indexing and scanning processes can be run separately or combined in a single command.

Quickstart

  1. Download PhantomJS and either Arachni or Wapiti for your platform, and make sure you have installed any required dependencies for each.
  2. Extract each tool into the tools directory and rename the directory after the tool (dorkbot/tools/phantomjs/, dorkbot/tools/arachni/, etc).
  3. Create a Google Custom Search Engine and note the search engine ID, e.g. 012345678901234567891:abc12defg3h.
  4. Install python-dateutil (e.g.: pip install python-dateutil)
Example: use arachni to scan php pages that contain the string "id" in the url:
python ./dorkbot.py -i google -o engine=012345678901234567891:abc12defg3h,query="filetype:php inurl:id" -s arachni

Indexer Modules

google

Search for targets in a Google Custom Search Engine (CSE) via custom search element.
Requirements: PhantomJS
Options:
engine - CSE id
query - search query
phantomjs_dir - phantomjs base directory containing bin/phantomjs (default: tools/phantomjs/)
domain - limit searches to specified domain
google_api

Search for targets in a Google Custom Search Engine (CSE) via JSON API.
Requirements: none
Options:
key - API key
engine - CSE id
query - search query
domain - limit searches to specified domain
stdin

Read targets from standard input, one per line.
Requirements: none
Options: none

Scanner Modules
arachni
Scan targets with Arachni command-line scanner.
Requirements: Arachni
Options:
arachni_dir - arachni base directory containing bin/arachni and bin/arachni_reporter (default: tools/arachni/)
report_dir - directory to save arachni scan binary and JSON scan report output (default: reports/)
checks - which vulnerability checks to perform (default: active/*,-csrf,-unvalidated_redirect,-source_code_disclosure,-response_splitting,-no_sql_injection_differential
wapiti

Scan targets with Wapiti command-line scanner.
Requirements: Wapiti
Options:
wapiti_dir - wapiti base directory containing bin/wapiti (default: tools/wapiti/)
report_dir - directory to save wapiti JSON scan report (default: reports/)

Sep 17, 2017

LaZagne Project - Retrieve lots of Passwords

The LaZagne project is an open source application used to retrieve lots of passwords stored on a local computer. Each software stores its passwords using different techniques (plaintext, APIs, custom algorithms, databases, etc.). This tool has been developed for the purpose of finding these passwords for the most commonly-used software.
Passwords
This project has been added to pupy as a post-exploitation module. Python code will be interpreted in memory without touching the disk and it works on Windows and Linux host. The last Linux release is not up to date so I recommend to use pupy to use it.

Usage

Retrieve version
laZagne.py --version
Launch all modules
laZagne.py all
Launch only a specific module
laZagne.py browsers
Launch only a specific software script
laZagne.py browsers -f (for firefox)
Write all passwords found into a file (-oN for Normal txt, -oJ for Json, -oA for All)
laZagne.py all -oN
Get help
laZagne.py -h
laZagne.py browsers -h
Use a file for dictionary attacks (used only when it's necessary: mozilla masterpassword, system hahes, etc.). The file has to be a wordlist in cleartext (no rainbow), it has not been optmized to be fast but could useful for basic passwords.
laZagne.py all -path file.txt
Change verbosity mode (2 different levels)
laZagne.py all -vv

Downloads

Sep 15, 2017

Crowbar - Brute forcing tool supported by thc-hydra and Other Popular

Crowbar is brute forcing tool that can be used during penetration tests. It is developed to support protocols that are not currently supported by thc-hydra and other popular brute forcing tools.

Crowbar (formally known as Levye) is a brute forcing tool that can be used during penetration tests. It was developed to brute force some protocols in a different manner according to other popular brute forcing tools. As an example, while most brute forcing tools use username and password for SSH brute force, Crowbar uses SSH key(s). This allows for any private keys that have been obtained during penetration tests, to be used to attack other SSH servers.

Currently Crowbar supports:
  • OpenVPN (-b openvpn)
  • Remote Desktop Protocol (RDP) with NLA support (-b rdp)
  • SSH private key authentication (-b sshkey)
  • VNC key authentication (-b vpn)

Installation

Install all the dependencies:
apt-get -y install openvpn freerdp-x11 vncviewer
Then get latest version from GitHub:
git clone https://github.com/101Scratch/crowbar.git
Note: The RDP client package depends on your OS:
  • Debian 7/8 & Kali 1/2 uses freerdp-x11 package.
  • Else you can try xfreerdp.
  • Else you may need to compile & tweak freerdp by following: http://opentechnotes.blogspot.co.uk/2015/02/compile-headless-freerdp-credential-checking.html
Don't forget to edit the script to point to the new binary!
Brute forcing tool
./crowbar.py -b rdp -u DOMAIN\\gokhan alkan -c Aa123456 -s 10.68.35.150/32
2015-03-28 11:03:39 RDP-SUCCESS : 10.68.35.150:3389 - "DOMAIN\gokhan alkan":Aa123456
./crowbar.py -b rdp -u gokhan alkan@ornek -c Aa123456 -s 10.68.35.150/32
2015-03-28 11:04:00 RDP-SUCCESS : 10.68.35.150:3389 - "gokhan alkan@DOMAIN":Aa123456
./crowbar.py -b rdp -s 192.168.2.182/32 -u admin -c Aa123456
./crowbar.py -b openvpn -s 198.7.62.204/32 -p 443 -m /root/Desktop/vpnbook.ovpn -k /root/Desktop/vpnbook_ca.crt -u vpnbook -c cr2hudaF

Sep 14, 2017

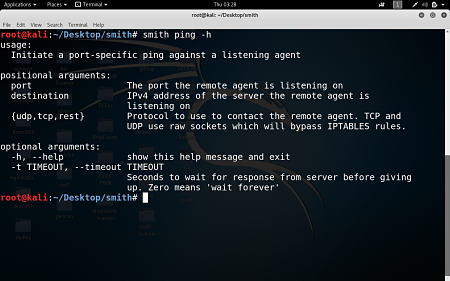
Smith - A client/server style agent meant for testing

smith

A client/server style agent meant for testing connectivity to and from a machine on a network.
client/server style agent meant for testing

Installation

python setup.py install or pip install . should install smith. Note: If you want to use the tcp/udp protocol options, you'll need to install scapy and it's dependencies. Ubuntu has 'apt-get install python-scapy'. You can also pip install scapy, but I don't know if that installs all dependencies on all OS's. I didn't include scapy in the requires because the 'rest' option doesn't utilize it, and is sufficient for a lot of usecases on its own.

listen

$: smith listen -h
usage:
 Server-side: listen for incoming ping requests from remote client.

positional arguments:
  port            The port the remote client is pinging
  {TCP,UDP,REST}  Protocol to use to contact the remote agent.TCP and UDP use
                  raw sockets which will bypass IPTABLES rules.

optional arguments:
 '-t', '--timeout'Seconds to wait for request from client before giving up. Zero (default) means 'wait forever'
  -h, --help      show this help message and exit

FIR - Fast Incident Response

What is FIR? Who is it for?

FIR (Fast Incident Response) is an cybersecurity incident management platform designed with agility and speed in mind. It allows for easy creation, tracking, and reporting of cybersecurity incidents.

FIR is for anyone needing to track cybersecurity incidents (CSIRTs, CERTs, SOCs, etc.). It's was tailored to suit our needs and our team's habits, but we put a great deal of effort into making it as generic as possible before releasing it so that other teams around the world may also use it and customize it as they see fit.
Fast Incident Response

Installation

There are two ways to install FIR. If you want to take it for a test-drive, just follow the instructions for setting up a development environment in the Wiki.

If you like it and want to set it up for production, here's how to do it.

A dockerfile for running a dev-quality FIR setup is also available in docker/Dockerfile.

Deploy to Heroku via fir/heroku_settings.py

Technical specs

FIR is written in Python (but you probably already knew that), using Django 1.9. It uses Bootstrap 3 and some Ajax and d3js to make it pretty. We use it with a MySQL back-end, but feel free to use any other DB adaptor you might want - as long as it's compatible with Django, you shouldn't run into any major issues.

FIR is not greedy performance-wise. It will run smoothly on a Ubuntu 14.04 virtual machine with 1 core, a 40 GB disk and 1 GB RAM.

Downloads Source

Sep 13, 2017

SigThief - Stealing Signatures and Making One Invalid Signature at a Time

Stealing Signatures and Making One Invalid Signature at a Time
SigThief.
I've noticed during testing against Anti-Virus over the years that each is different and each prioritize PE signatures differently, whether the signature is valid or not. There are some Anti-Virus vendors that give priority to certain certificate authorities without checking that the signature is actually valid, and there are those that just check to see that the certTable is populated with some value. It's a mess.

In short it will rip a signature off a signed PE file and append it to another one, fixing up the certificate table to sign the file. Of course it's not a valid signature and that's the point!

How to use

Usage


Usage: sigthief.py [options]

Options:
  -h, --help            show this help message and exit
  -i FILE, --file=FILE  file still signature from
  -r, --rip             rip signature off inputfile
  -a, --add             add signautre to targetfile
  -o OUTPUTFILE, --output=OUTPUTFILE
                        output file
  -s SIGFILE, --sig=SIGFILE
                        binary signature from disk
  -t TARGETFILE, --target=TARGETFILE
                        file to append signature too
  -c, --checksig        file to check if signed; does not verify signature
  -T, --truncate        truncate signature (i.e. remove sig)
Take a Signature from a binary and add it to another binary

$ ./sigthief.py -i tcpview.exe -t x86_meterpreter_stager.exe -o /tmp/msftesting_tcpview.exe
Output file: /tmp/msftesting_tcpview.exe
Signature appended.
FIN.
Save Signature to disk for use later

$ ./sigthief.py -i tcpview.exe -r                                                       
Ripping signature to file!
Output file: tcpview.exe_sig
Signature ripped.
FIN.
Use the ripped signature

$ ./sigthief.py -s tcpview.exe_sig -t x86_meterpreter_stager.exe                             
Output file: x86_meterpreter_stager.exe_signed
Signature appended.
FIN.

Truncate (remove) signature

This has really interesting results actually, can help you find AVs that value Signatures over functionality of code. Unsign putty.exe ;)

$ ./sigthief.py -i tcpview.exe -T   
Inputfile is signed!
Output file: tcpview.exe_nosig
Overwriting certificate table pointer and truncating binary
Signature removed.
FIN.
Check if there is a signature (does not check validity)

$ ./sigthief.py -i tcpview.exe -c
Inputfile is signed!

Downloads

Aug 31, 2017

Malicious Traffic Detection System 101Scratch

Introduction

Maltrail is a malicious traffic detection system, utilizing publicly available (black)lists containing malicious and/or generally suspicious trails, along with static trails compiled from various AV reports and custom user defined lists, where trail can be anything from domain name (e.g. zvpprsensinaix.com for Banjori malware), URL (e.g. http://109.162.38.120/harsh02.exe for known malicious executable), IP address (e.g. 185.130.5.231 for known attacker) or HTTP User-Agent header value (e.g. sqlmap for automatic SQL injection and database takeover tool). Also, it uses (optional) advanced heuristic mechanisms that can help in discovery of unknown threats (e.g. new malware).
Malicious Traffic Detection System
Malicious Traffic Detection System.
The following (black)lists (i.e. feeds) are being utilized:
alienvault, autoshun, badips, bambenekconsultingc2dns,
bambenekconsultingc2ip, bambenekconsultingdga, bitcoinnodes,
blocklist, botscout, bruteforceblocker, ciarmy, cruzit,
cybercrimetracker, deepviz, dataplanesipinvitation,
dataplanesipquery, dataplane, dshielddns, dshieldip,
emergingthreatsbot, emergingthreatscip, emergingthreatsdns,
feodotrackerdns, malwaredomainlist, malwaredomains, malwarepatrol,
maxmind, myip, nothink, openbl, openphish, packetmailcarisirt,
packetmailramnode, palevotracker, policeman, proxylists, proxyrss,
proxy, ransomwaretrackerdns, ransomwaretrackerip,
ransomwaretrackerurl, riproxies, rutgers, sblam, securityresearch,
snort, socksproxy, sslipbl, sslproxies, torproject, torstatus,
turris, urlvir, voipbl, vxvault, zeustrackerdns, zeustrackerip,
zeustrackermonitor, zeustrackerurl, etc.
As of static entries, the trails for the following malicious entities (e.g. malware C&Cs or sinkholes) have been manually included (from various AV reports and personal research):
aboc, adwind, alienspy, almalocker, alureon, android_acecard,
android_adrd, android_alienspy, android_arspam,
android_backflash, android_basebridge, android_boxer,
android_chuli, android_claco, android_coolreaper,
android_counterclank, android_cyberwurx, android_dendoroid,
android_dougalek, android_droidjack, android_droidkungfu,
android_enesoluty, android_ewalls, android_exprespam,
android_fakebanco, android_fakedown, android_fakeinst,
android_fakelog, android_fakemart, android_fakemrat,
android_fakeneflic, android_fakesecsuit, android_feabme,
android_flexispy, android_frogonal, android_geinimi,
android_ghostpush, android_ginmaster, android_gmaster,
android_godwon, android_golddream, android_gonesixty,
android_ibanking, android_kemoge, android_lockdroid,
android_lovetrap, android_maistealer, android_maxit,
android_oneclickfraud, android_opfake, android_ozotshielder,
android_pikspam, android_pjapps, android_qdplugin,
android_repane, android_roidsec, android_samsapo,
android_sandorat, android_selfmite, android_simplocker,
android_skullkey, android_sndapps, android_spytekcell,
android_stealer, android_stels, android_teelog, android_tetus,
android_tonclank, android_torec, android_uracto,
android_usbcleaver, android_walkinwat, android_windseeker,
android_zertsecurity, androm, andromem, angler, anuna, arec,
aridviper, artro, autoit, avalanche, avrecon, axpergle, babar,
bachosens, badblock, balamid, bamital, bankapol, bankpatch,
banloa, banprox, bayrob, bedep, blackenergy, blackvine,
blockbuster, bredolab, bubnix, bucriv, buterat, camerashy,
carbanak, carberp, careto, casper, cerber, changeup, chanitor,
chekua, cheshire, chewbacca, chisbur, cleaver, cloud_atlas,
conficker, contopee, copykittens, corebot, cosmicduke,
couponarific, criakl, cridex, crilock, cryakl, cryptinfinite,
cryptodefense, cryptolocker, cryptowall, ctblocker, cutwail,
darkhotel, defru, desertfalcon, destory, dnschanger,
dnsmessenger, dnstrojan, dorifel, dorkbot, drapion, dridex,
dukes, dursg, dyreza, elf_aidra, elf_billgates, elf_darlloz,
elf_ekoms, elf_fysbis, elf_groundhog, elf_hacked_mint,
elf_mayhem, elf_mokes, elf_pinscan, elf_rekoobe, elf_shelldos,
elf_sshscan, elf_themoon, elf_turla, elf_xnote, elf_xorddos,
elpman, emogen, emotet, equation, evilbunny, ewind, expiro,
fakeav, fakeran, fantom, fareit, fbi_ransomware, fiexp,
fignotok, fin4, finfisher, fraudload, fynloski, fysna, gamarue,
gauss, gbot, generic, golroted, gozi, groundbait, harnig,
hawkeye, helompy, hiloti, hinired, htran, immortal, injecto,
ios_keyraider, ios_muda, ios_oneclickfraud, ios_specter,
ismdoor, jenxcus, kegotip, keydnap, kingslayer, kolab,
koobface, korgo, korplug, kovter, kradellsh, kulekmoko,
lazarus, locky, lollipop, lotus_blossom, luckycat, majikpos,
malwaremustdie, marsjoke, mdrop, mebroot, mestep, mhretriev,
miniduke, misogow, modpos, morto, nanocor, nbot, necurs,
nemeot, neshuta, nettraveler, netwire, neurevt, nexlogger,
nivdort, nonbolqu, nuqel, nwt, nymaim, odcodc, oficla, onkods,
optima, osx_keranger, osx_keydnap, osx_salgorea,
osx_wirelurker, palevo, pdfjsc, pegasus, pepperat, phytob,
picgoo, pift, plagent, plugx, ponmocup, poshcoder, potao,
powelike, proslikefan, pushdo, pykspa, qakbot, quasar, ramnit,
ransirac, reactorbot, redoctober, redsip, remcos, renocide,
reveton, revetrat, rovnix, runforestrun, russian_doll, rustock,
sakurel, sality, satana, sathurbot, scarcruft, scarletmimic,
scieron, seaduke, sednit, sefnit, selfdel, shifu, shylock,
siesta, silentbrute, silly, simda, sinkhole_abuse,
sinkhole_anubis, sinkhole_arbor, sinkhole_bitdefender,
sinkhole_blacklab, sinkhole_botnethunter, sinkhole_certgovau,
sinkhole_certpl, sinkhole_checkpoint, sinkhole_cirtdk,
sinkhole_conficker, sinkhole_cryptolocker, sinkhole_drweb,
sinkhole_dynadot, sinkhole_dyre, sinkhole_farsight,
sinkhole_fbizeus, sinkhole_fitsec, sinkhole_fnord,
sinkhole_gameoverzeus, sinkhole_georgiatech, sinkhole_gladtech,
sinkhole_honeybot, sinkhole_kaspersky, sinkhole_microsoft,
sinkhole_rsa, sinkhole_secureworks, sinkhole_shadowserver,
sinkhole_sidnlabs, sinkhole_sinkdns, sinkhole_sofacy,
sinkhole_sugarbucket, sinkhole_tech, sinkhole_unknown,
sinkhole_virustracker, sinkhole_wapacklabs, sinkhole_zinkhole,
skeeyah, skynet, skyper, smsfakesky, snake, snifula, snort,
sockrat, sofacy, sohanad, spyeye, stabuniq, stonedrill,
stuxnet, synolocker, tdss, teamspy, teerac, teslacrypt,
themida, tibet, tinba, torpig, torrentlocker, troldesh, turla,
unruy, upatre, utoti, vawtrak, vbcheman, vinderuf, virtum,
virut, vittalia, vobfus, volatilecedar, vundo, waledac,
waterbug, wecorl, wndred, xadupi, xcodeghost, xtrat, yenibot,
yimfoca, zaletelly, zcrypt, zemot, zeroaccess, zeus, zherotee,
zlader, zlob, zombrari, zxshell, etc.

Architecture

Maltrail is based on the Traffic -> Sensor <-> Server <-> Client architecture. Sensor(s) is a standalone component running on the monitoring node (e.g. Linux platform connected passively to the SPAN/mirroring port or transparently inline on a Linux bridge) or at the standalone machine (e.g. Honeypot) where it "monitors" the passing Traffic for blacklisted items/trails (i.e. domain names, URLs and/or IPs). In case of a positive match, it sends the event details to the (central) Server where they are being stored inside the appropriate logging directory (i.e. LOG_DIR described in the Configuration section). If Sensor is being run on the same machine as Server (default configuration), logs are stored directly into the local logging directory. Otherwise, they are being sent via UDP messages to the remote server (i.e. LOG_SERVER described in the Configuration section).
Server's primary role is to store the event details and provide back-end support for the reporting web application. In default configuration, server and sensor will run on the same machine. So, to prevent potential disruptions in sensor activities, the front-end reporting part is based on the "Fat client" architecture (i.e. all data post-processing is being done inside the client's web browser instance). Events (i.e. log entries) for the chosen (24h) period are transferred to the Client, where the reporting web application is solely responsible for the presentation part. Data is sent toward the client in compressed chunks, where they are processed sequentially. The final report is created in a highly condensed form, practically allowing presentation of virtually unlimited number of events.
Note: Server component can be skipped altogether, and just use the standalone Sensor. In such case, all events would be stored in the local logging directory, while the log entries could be examined either manually or by some CSV reading application.

Quick start

The following set of commands should get your Maltrail Sensor up and running (out of the box with default settings and monitoring interface "any"):
sudo apt-get install git python-pcapy
git clone https://github.com/stamparm/maltrail.git
cd maltrail
sudo python sensor.py
To start the (optional) Server on same machine, open a new terminal and execute the following:
[[ -d maltrail ]] || git clone https://github.com/stamparm/maltrail.git
cd maltrail
python server.py
To test that everything is up and running execute the following:
ping -c 1 136.161.101.53
cat /var/log/maltrail/$(date +"%Y-%m-%d").log
To stop Sensor and Server instances (if running in background) execute the following:
sudo pkill -f sensor.py
pkill -f server.py
Access the reporting interface (i.e. Client) by visiting the http://127.0.0.1:8338 (default credentials: admin:changeme!) from your web browser:
Malicious Traffic Detection System
Malicious Traffic Detection System 101Scratch

Aug 30, 2017

Disable IPv6 Permantly

this tutorial is how to disable ipv6 on linux, for the first go to /etc/sysctl.conf and add the following script:

sudo nano /etc/sysctl.conf and add following lines

net.ipv6.conf.all.disable_ipv6 = 1
net.ipv6.conf.default.disable_ipv6 = 1
net.ipv6.conf.lo.disable_ipv6 = 1
Disable IPv6 Permantly On Linux
Disable IPv6 Permantly.
Now run following command:
sudo sysctl -p
then your ipv6 automatically disabled by sysctl, to open it again simply delete the script above and do update sysctl back :)

Aug 29, 2017

Splitting and Re-Assembling Files in Linux

Linux has several utilities for splitting up files.
So why would you want to split your files? One use case is to split a large file into smaller sizes so that it fits on smaller media, like USB sticks. This is also a good trick to transfer files via USB sticks when you're stuck with FAT32, which has a maximum file size of 4GB, and your files are bigger than that. Another use case is to speed up network file transfers, because parallel transfers of small files are usually faster.

We'll learn how to use csplit, split, and cat to chop up and then put files back together. These work on any file type: text, image, audio, .iso, you name it.

Split Files With csplit

csplit is one of those funny little commands that has been around forever, and when you discover it you wonder how you ever made it through life without it. csplit divides single files into multiple files. This example demonstrates its simplest invocation, which divides the file foo.txt into three files, split at line numbers 1 and 3:
$ csplit foo.txt 1
0
15
csplit creates three new files in the current directory, and prints the sizes of your new files in bytes. By default, each new file is named xxnn:
Splitting and Re-Assembling Files in Linux
Splitting and Re-Assembling.
You can view the first ten lines of each of your new files all at once with the head command:
$ head xx0*
==> xx00 <==

==> xx01 <==
2591
3889
2359
What if you want to split a file into several files all containing the same number of lines? Specify the number of lines, and then enclose the number of repetitions in curly braces. This example repeats the split 4 times, and dumps the leftover in the last file:
$ csplit foo.txt 1 {3}
0
5
5
5
You may use the asterisk wildcard to tell csplit to repeat your split as many times as possible. Which sounds cool, but it fails if the file does not divide evenly:
$ csplit foo.txt 1 {*}
0
5
5
5
The default behavior is to delete the output files on errors. You can foil this with the -k option, which will not remove the output files when there are errors. Another gotcha is every time you run csplit it overwrites the previous files it created, so give your splits new filenames to save them. Use --prefix=prefix to set a different file prefix:
Splitting and Re-Assembling Files in Linux
Splitting and Re-Assembling.

Splitting Files into Sizes

split is similar to csplit. It splits files into specific sizes, which is fabulous when you're splitting large files to copy to small media, or for network transfers. The default size is 1000 lines:
$ split foo.txt
$ ls
foo.txt  mine00  mine01  xaa
They come out to a similar size, but you can specify any size you want. This example is 20 megabytes:
$ split -b 20M foo.txt
The size abbreviations are K, M, G, T, P, E, Z, Y (powers of 1024), or KB, MB, GB, and so on for powers of 1000.
Choose your own prefix and suffix for the filenames:
$ split -a 3 --numeric-suffixes=9 --additional-suffix=mine foo.txt SB
240K Aug 21 17:44 SB009mine
214K Aug 21 17:44 SB010mine
220K Aug 21 17:44 SB011mine
The -a controls how many numeric digits there are. --numeric-suffixes sets the starting point for numbering. The default prefix is x, and you can set a different prefix by typing it after the filename.
Nara: Here


AdBlock Detected!

Like this blog? Keep us running by whitelisting this blog in your ad blocker.

This is how to whitelisting this blog in your ad blocker.

Thank you!

×