The first step is to download the latest version of GParted Live. GParted is distributed as a CD image, or ISO, file that needs to be burned onto a CD. The latest version of GParted as of this writing is 0.4.1-2 and can be downloaded from the following link:
GParted Live Download Link
Once the file is downloaded please burn the image to a CD and then store the CD in a safe place. We first need to perform some basic maintenance on the hard drive before we use GParted. These steps will make the entire process safer, smoother, and faster.
The first maintenance task is to run chkdsk or fsck to repair any errors that may currently be present in the file system. Even under ordinary use your average file system gets errors. Normally, operating systems such as Windows or Linux are able to either correct these errors silently, or ignore them altogether. When this is not the case, though, chkdsk for Windows or or fsck for Linux will be forced to run at boot time in order to attempt to repair these errors. Another important reasons to do a disk check before we run GParted is that GParted will usually refuse to do anything to a partition whose file system has errors or is damaged.
Note: You may need to change the boot sequence in you BIOS to boot from the CD drive.
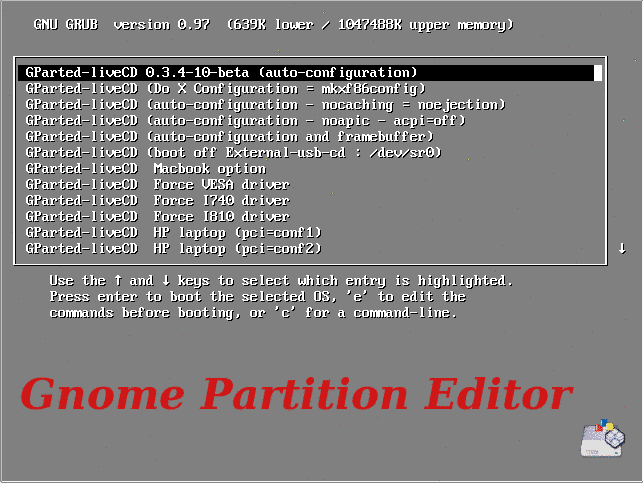
Once you boot from the CD, you'll see the GParted boot menu, as shown in the Figure below.
For most computers, you can simply press the Enter key here to accept the defaults.
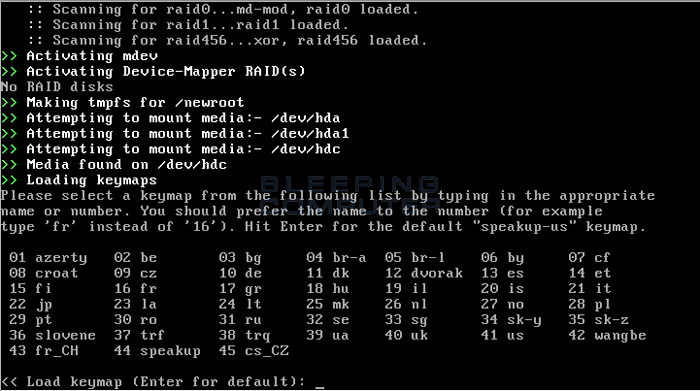
From here GParted gets to work on creating a mini-Linux setup that runs entirely in memory and from the CD itself. You'll be asked about two things during this period: your keymap and language.
The default settings for these are a standard QWERTY keyboard and US English respectively. To use these, simple press Enter when asked (see Figures 5 and 6.)
Next, it will ask you for your language.
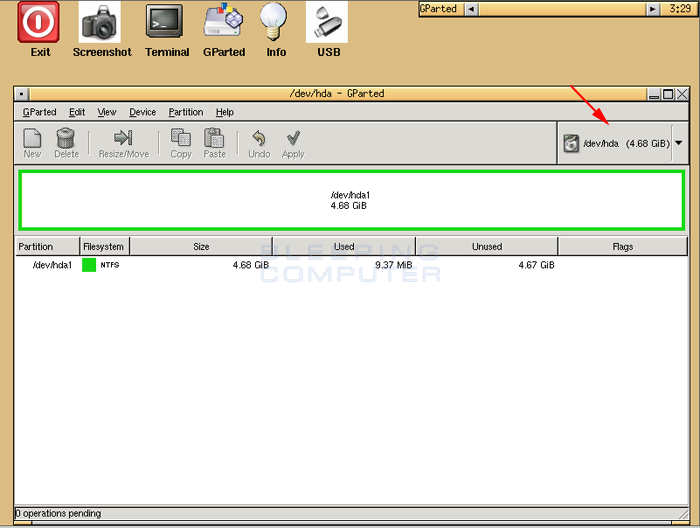
After selecting your keymap and language preferences, wait for GParted to finish booting. When it's finished, you should see a screen similar to Figure 7 below.
This is the main screen of GParted. Note the green-edged box. This represents the Primary Master hard drive (hda) and all the partitions currently on it. At this point, there is only one partition on our example drive. Your drive may have more.
Note: If you are going to be working on a disk other than the Primary Master, you should select the appropriate drive from the drop-down menu on the upper right as shown designated by the red arrow. On a standard system with two drives connected to the Primary IDE channel, the drives should be labeled hda (master) and hdb (slave). For more information on determining which drive is which, see here.
Now that you have selected the drive you want to work on, it's time to get to work.
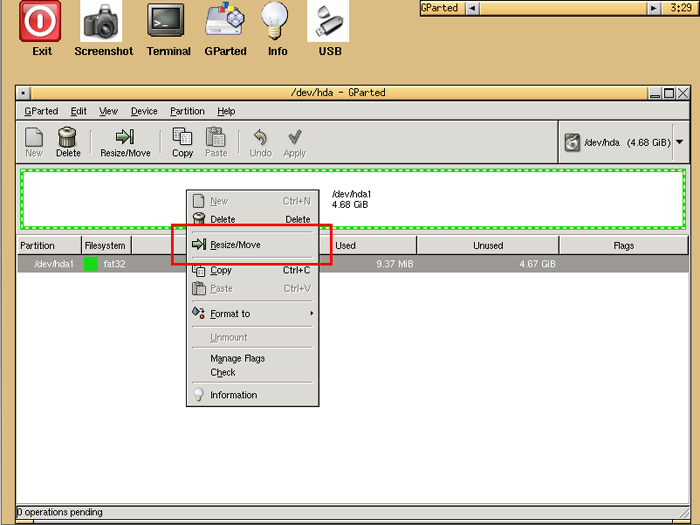
Unless your hard drive is brand new, your hard drive likely already has one or more partitions on it. In order to add a partition, or enlarge an existing one, you must first shrink one to create some free space. Right-click on the partition you want to shrink, as shown in figure 8 below, and select Resize/Move.
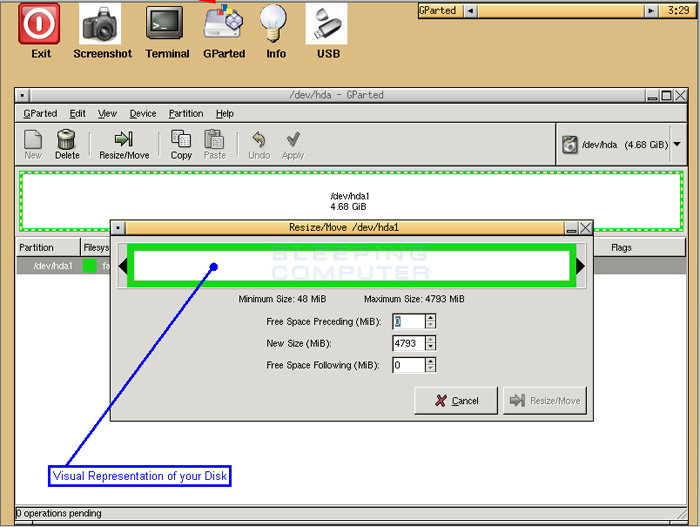
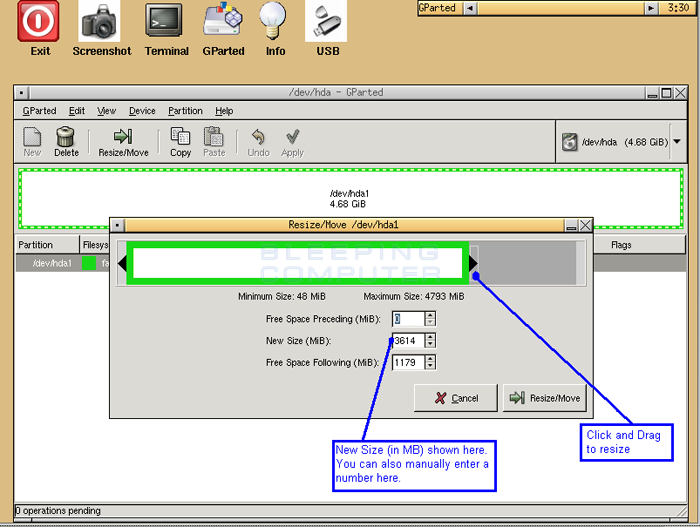
At this screen there are two ways in which you can change the size of the existing partition. The first is by by clicking and dragging either of the black arrows to make the partition smaller or larger, or by manually entering the new size of the partition. in the New Size (MiB) field. These methods are shown in Figure 10 below.
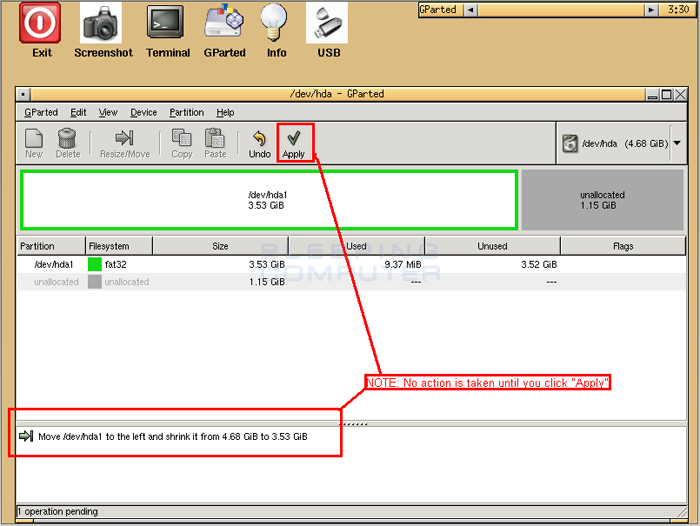
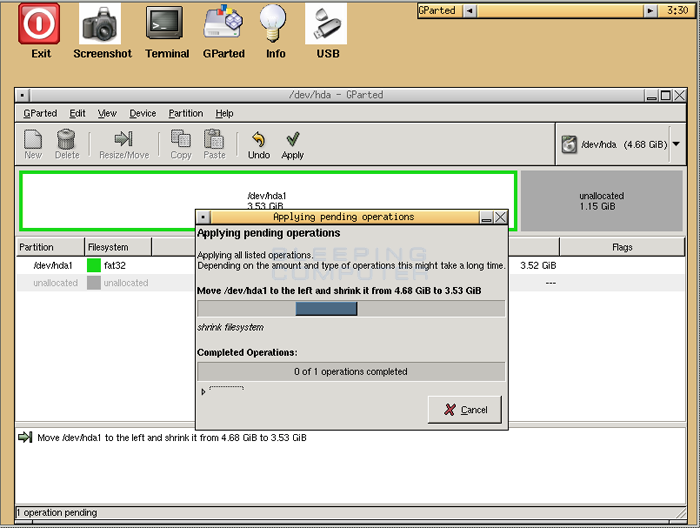
When you have finished adjusting the size, click the Resize/Move button. This will close the Resizing window and bring you back to the main window. At this point, no changes have been made. In order to make these changes effective you must first click on the Apply button. Notice, in the example above we are shrinking the existing partition from 4,793 MB to 3,614 MB. When it has completed, this will give us an additional 1,179 MB to use as we see fit.
The resize process can take a while depending on how big your drive is and how much the partition's size was changed. So, you may want to go and get a nice cup of tea and relax.
Now that there is some free space on the drive we can either make another partition larger, or we can add a new partition to it.
GParted Live Download Link
Once the file is downloaded please burn the image to a CD and then store the CD in a safe place. We first need to perform some basic maintenance on the hard drive before we use GParted. These steps will make the entire process safer, smoother, and faster.
The first maintenance task is to run chkdsk or fsck to repair any errors that may currently be present in the file system. Even under ordinary use your average file system gets errors. Normally, operating systems such as Windows or Linux are able to either correct these errors silently, or ignore them altogether. When this is not the case, though, chkdsk for Windows or or fsck for Linux will be forced to run at boot time in order to attempt to repair these errors. Another important reasons to do a disk check before we run GParted is that GParted will usually refuse to do anything to a partition whose file system has errors or is damaged.
Using the GParted Live CD to resize your partitions
By now you should have defragmented and run checkdisk on the hard drives you want to resize. You should now insert the GParted Live CD you created in the previous steps into your CD/DVD drive and restart your computer.Note: You may need to change the boot sequence in you BIOS to boot from the CD drive.
Once you boot from the CD, you'll see the GParted boot menu, as shown in the Figure below.
For most computers, you can simply press the Enter key here to accept the defaults.
From here GParted gets to work on creating a mini-Linux setup that runs entirely in memory and from the CD itself. You'll be asked about two things during this period: your keymap and language.
The default settings for these are a standard QWERTY keyboard and US English respectively. To use these, simple press Enter when asked (see Figures 5 and 6.)
Next, it will ask you for your language.
After selecting your keymap and language preferences, wait for GParted to finish booting. When it's finished, you should see a screen similar to Figure 7 below.
This is the main screen of GParted. Note the green-edged box. This represents the Primary Master hard drive (hda) and all the partitions currently on it. At this point, there is only one partition on our example drive. Your drive may have more.
Note: If you are going to be working on a disk other than the Primary Master, you should select the appropriate drive from the drop-down menu on the upper right as shown designated by the red arrow. On a standard system with two drives connected to the Primary IDE channel, the drives should be labeled hda (master) and hdb (slave). For more information on determining which drive is which, see here.
Now that you have selected the drive you want to work on, it's time to get to work.
Unless your hard drive is brand new, your hard drive likely already has one or more partitions on it. In order to add a partition, or enlarge an existing one, you must first shrink one to create some free space. Right-click on the partition you want to shrink, as shown in figure 8 below, and select Resize/Move.
At this screen there are two ways in which you can change the size of the existing partition. The first is by by clicking and dragging either of the black arrows to make the partition smaller or larger, or by manually entering the new size of the partition. in the New Size (MiB) field. These methods are shown in Figure 10 below.
When you have finished adjusting the size, click the Resize/Move button. This will close the Resizing window and bring you back to the main window. At this point, no changes have been made. In order to make these changes effective you must first click on the Apply button. Notice, in the example above we are shrinking the existing partition from 4,793 MB to 3,614 MB. When it has completed, this will give us an additional 1,179 MB to use as we see fit.
The resize process can take a while depending on how big your drive is and how much the partition's size was changed. So, you may want to go and get a nice cup of tea and relax.
Now that there is some free space on the drive we can either make another partition larger, or we can add a new partition to it.


