Showing posts with label Open Source. Show all posts

Oct 2, 2017

Ironsquirrel - Encrypted exploit delivery for the masses

This project aims at delivering browser exploits to the victim browser in an encrypted fashion. Ellyptic-curve Diffie-Hellman (secp256k1) is used for key agreement and AES is used for encryption.
Encrypted exploit delivery for the masses
By delivering the exploit code (and shellcode) to the victim in an encrypted way, the attack can not be replayed. Meanwhile the HTML/JS source is encrypted thus reverse engineering the exploit is significantly harder.

If you have no idea what I am talking about, Google for "How to hide your browser 0-days", and check my presentation. Or check out it on Youtube: https://www.youtube.com/watch?v=eyMDd98uljI Or slides on Slideshare: https://www.slideshare.net/bz98/how-to-hide-your-browser-0days

Getting Started

These instructions will get you a copy of the project up and running on your local machine for development and testing purposes.

Prerequisites

Mandatory dependencies - clone the IRONSQUIRREL project, cd into the project directory, and run the following commands:
sudo apt-get install ruby-dev
bundle install
Actually nokogiri and gibberish gems will be installed.
Optional dependency (for Powershell based environment aware encrypted payload delivery): Ebowla https://github.com/Genetic-Malware/Ebowla

Installing

  • Clone the IRONSQUIRREL project
  • Install the prerequisites
  • (Optional) Edit IRONSQUIRREL.rb
  • Change the listen port
  • If Ebowla is used, configure the paths
  • (Optional) If Ebowla is used, configure genetic.config.ecdh in the Ebowla install directory
  • Run IRONSQUIRREL.rb
ruby IRONSQUIRREL.rb --exploit full_path_to_exploit

Example

ruby IRONSQUIRREL.rb --exploit /home/myawesomeusername/IRONSQUIRREL/exploits/alert.html
After that, visit the webserver from a browser. Example output:
Listening on 2345
GET / HTTP/1.1
GET /sjcl.js HTTP/1.1
GET /dh.js HTTP/1.1
GET /client_pub.html?cl=SOifQJetphU2CvFzZl239nKPYWRGEH23ermGMszo9oqOgqIsH5XxXi1vw4P4YFWDqK6v4o4jIpAVSNZD1x5NTw%3D%3D HTTP/1.1
GET /final.html HTTP/1.1
GET /sjcl.js HTTP/1.1
The end

Deployment instructions for production environments
Let me know if you use this for real
Spend at least 2 weeks to figure out what could go wrong

Sep 28, 2017

Radare2 - unix-like Reverse Engineering Framework

Reverse Engineering Framework

Introduction

r2 is a rewrite from scratch of radare in order to provide a set of libraries and tools to work with binary files.

Radare project started as a forensics tool, a scriptable commandline hexadecimal editor able to open disk files, but later support for analyzing binaries, disassembling code, debugging programs, attaching to remote gdb servers, ..

radare2 is portable.

Architectures:
6502, 8051, CRIS, H8/300, LH5801, T8200, arc, arm, avr, bf, blackfin, xap, dalvik, dcpu16, gameboy, i386, i4004, i8080, m68k, malbolge, mips, msil, msp430, nios II, powerpc, rar, sh, snes, sparc, tms320 (c54x c55x c55+), V810, x86-64, zimg, risc-v.

File Formats:
bios, CGC, dex, elf, elf64, filesystem, java, fatmach0, mach0, mach0-64, MZ, PE, PE+, TE, COFF, plan9, dyldcache, Commodore VICE emulator, Game Boy (Advance), Nintendo DS ROMs and Nintendo 3DS FIRMs.

Operating Systems:
Android, GNU/Linux, [Net|Free|Open]BSD, iOS, OSX, QNX, w32, w64, Solaris, Haiku, FirefoxOS

Bindings:

Vala/Genie, Python (2, 3), NodeJS, Lua, Go, Perl, Guile, php5, newlisp, Ruby, Java, OCaml, ...

Dependencies

radare2 can be built without any special dependency, just use make and get a working toolchain (gcc, clang, tcc, ..)

Optionally you can use libewf for loading EnCase disk images.

To build the bindings you need latest valabind, g++ and swig2.

Install

The easiest way to install radare2 from git is by running the following command:
sys/install.sh
If you want to install radare2 in the home directory without using root privileges and sudo, simply run:
sys/user.sh

Update

To update Radare2 you don't need to uninstall or pull, just re-run:
sys/install.sh

Uninstall

In case of a polluted filesystem you can uninstall the current version or remove all previous installations:
make uninstall
make purge

Package manager

Radare2 has its own package manager - r2pm. It's packages repository is on GitHub too. To start to use it for the first time you need to initialize packages:
r2pm init
Refresh the packages database before installing any package:
r2pm update
To install a package use the following command:
r2pm install [package name]

Bindings

All language bindings are under the r2-bindings directory. You will need to install swig and valabind in order to build the bindings for Python, Lua, etc..

APIs are defined in vapi files which are then translated to swig interfaces, nodejs-ffi or other and then compiled.

The easiest way to install the python bindings is to run:
r2pm install lang-python2 #lang-python3 for python3 bindings
r2pm install r2api-python
r2pm install r2pipe-python
In addition there are r2pipe bindings, which are an API interface to interact with the prompt, passing commands and receivent the output as a string, many commands support JSON output, so it's integrated easily with many languages in order to deserialize it into native objects.
npm install r2pipe   # NodeJS
gem install r2pipe   # Ruby
pip install r2pipe   # Python
opam install radare2 # OCaml
And also for Go, Rust, Swift, D, .NET, Java, NewLisp, Perl, Haskell, Vala, OCaml, and many more to come!

Webserver

radare2 comes with an embedded webserver that serves a pure html/js interface that sends ajax queries to the core and aims to implement an usable UI for phones, tablets and desktops.
r2 -c=H /bin/ls
To use the webserver on Windows, you require a cmd instance with administrator rights. To start the webserver use command in the project root.
>> radare2.exe -c=H rax2.exe

Sep 15, 2017

Resizing Partitions using GParted Live

The first step is to download the latest version of GParted Live. GParted is distributed as a CD image, or ISO, file that needs to be burned onto a CD. The latest version of GParted as of this writing is 0.4.1-2 and can be downloaded from the following link:

GParted Live Download Link
Once the file is downloaded please burn the image to a CD and then store the CD in a safe place. We first need to perform some basic maintenance on the hard drive before we use GParted. These steps will make the entire process safer, smoother, and faster.

The first maintenance task is to run chkdsk or fsck to repair any errors that may currently be present in the file system. Even under ordinary use your average file system gets errors. Normally, operating systems such as Windows or Linux are able to either correct these errors silently, or ignore them altogether. When this is not the case, though, chkdsk for Windows or or fsck for Linux will be forced to run at boot time in order to attempt to repair these errors. Another important reasons to do a disk check before we run GParted is that GParted will usually refuse to do anything to a partition whose file system has errors or is damaged.

Using the GParted Live CD to resize your partitions

By now you should have defragmented and run checkdisk on the hard drives you want to resize. You should now insert the GParted Live CD you created in the previous steps into your CD/DVD drive and restart your computer.

Note: You may need to change the boot sequence in you BIOS to boot from the CD drive.

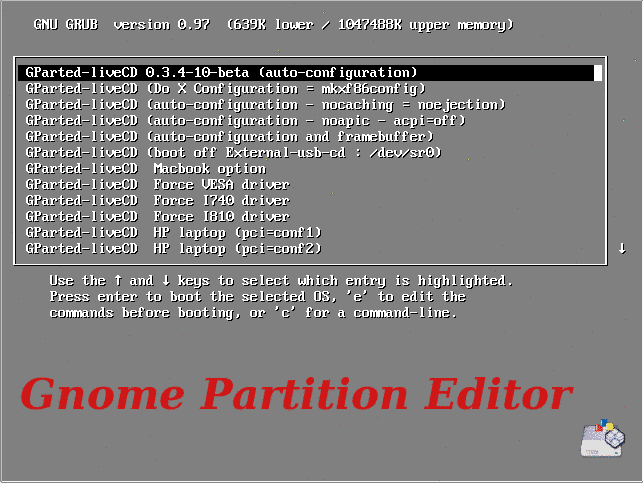
Once you boot from the CD, you'll see the GParted boot menu, as shown in the Figure below.
Resizing Partitions using GParted Live
For most computers, you can simply press the Enter key here to accept the defaults.

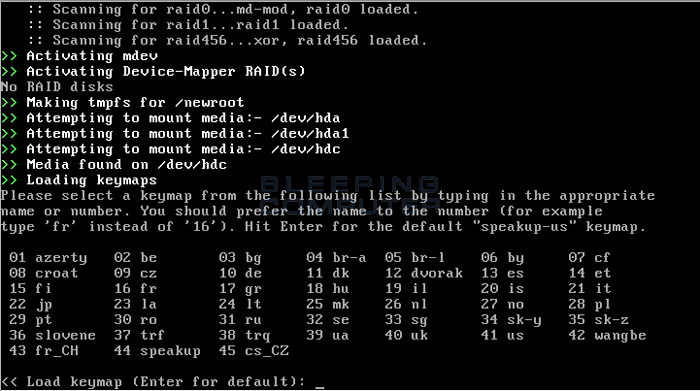
From here GParted gets to work on creating a mini-Linux setup that runs entirely in memory and from the CD itself. You'll be asked about two things during this period: your keymap and language.

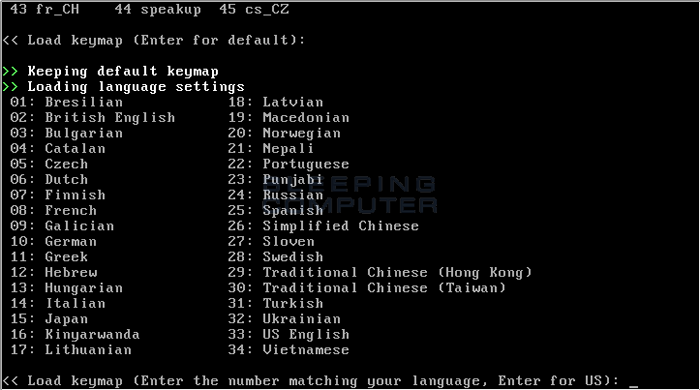
The default settings for these are a standard QWERTY keyboard and US English respectively. To use these, simple press Enter when asked (see Figures 5 and 6.)
Selecting the keymap
Next, it will ask you for your language.
Resizing Partitions using GParted Live
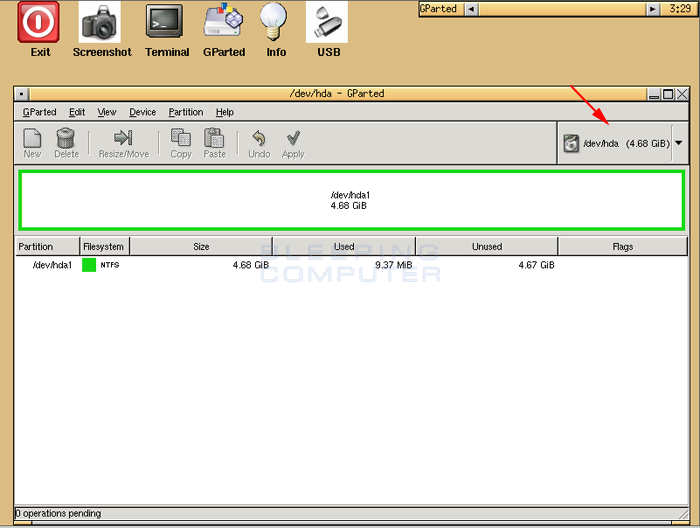
After selecting your keymap and language preferences, wait for GParted to finish booting. When it's finished, you should see a screen similar to Figure 7 below.
Resizing Partitions using GParted Live
This is the main screen of GParted. Note the green-edged box. This represents the Primary Master hard drive (hda) and all the partitions currently on it. At this point, there is only one partition on our example drive. Your drive may have more.

Note: If you are going to be working on a disk other than the Primary Master, you should select the appropriate drive from the drop-down menu on the upper right as shown designated by the red arrow. On a standard system with two drives connected to the Primary IDE channel, the drives should be labeled hda (master) and hdb (slave). For more information on determining which drive is which, see here.

Now that you have selected the drive you want to work on, it's time to get to work.

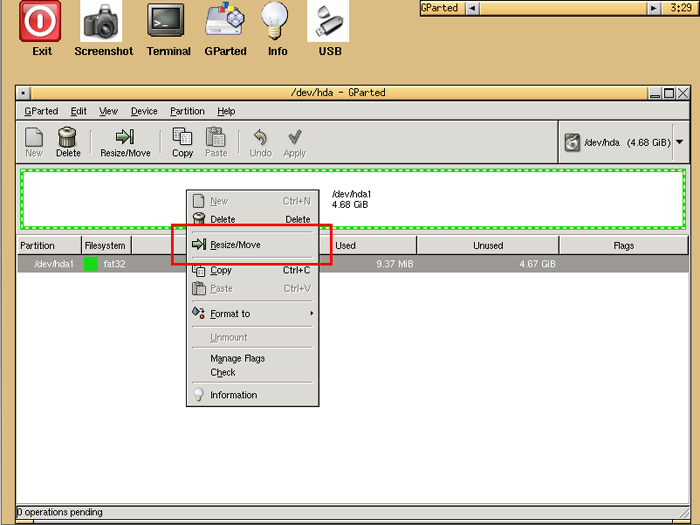
Unless your hard drive is brand new, your hard drive likely already has one or more partitions on it. In order to add a partition, or enlarge an existing one, you must first shrink one to create some free space. Right-click on the partition you want to shrink, as shown in figure 8 below, and select Resize/Move.
Resizing Partitions using GParted Live
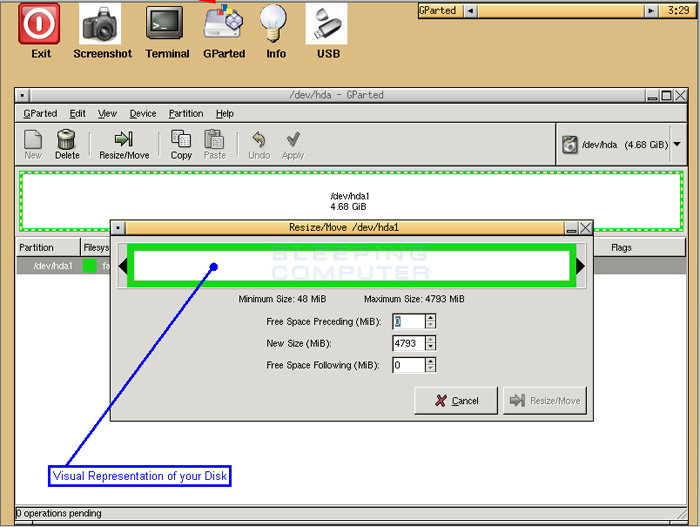
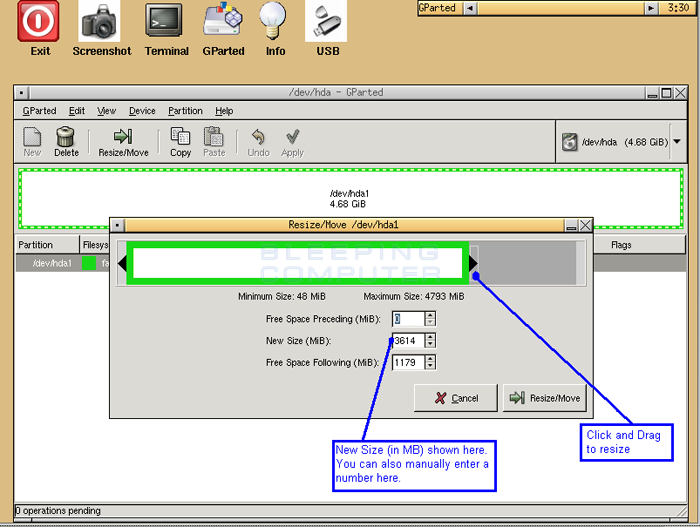
At this screen there are two ways in which you can change the size of the existing partition. The first is by by clicking and dragging either of the black arrows to make the partition smaller or larger, or by manually entering the new size of the partition. in the New Size (MiB) field. These methods are shown in Figure 10 below.
Resizing Partitions using GParted Live
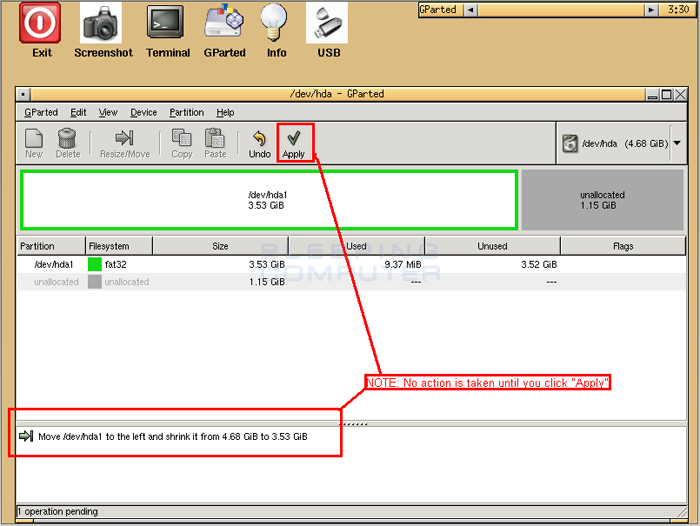
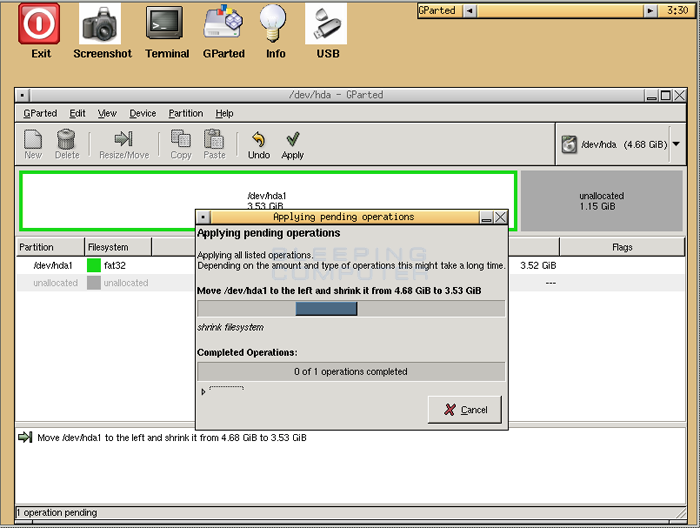
When you have finished adjusting the size, click the Resize/Move button. This will close the Resizing window and bring you back to the main window. At this point, no changes have been made. In order to make these changes effective you must first click on the Apply button. Notice, in the example above we are shrinking the existing partition from 4,793 MB to 3,614 MB. When it has completed, this will give us an additional 1,179 MB to use as we see fit.
Resizing Partitions using GParted Live
The resize process can take a while depending on how big your drive is and how much the partition's size was changed. So, you may want to go and get a nice cup of tea and relax.

Now that there is some free space on the drive we can either make another partition larger, or we can add a new partition to it.

Sep 14, 2017

Smith - A client/server style agent meant for testing

smith

A client/server style agent meant for testing connectivity to and from a machine on a network.
client/server style agent meant for testing

Installation

python setup.py install or pip install . should install smith. Note: If you want to use the tcp/udp protocol options, you'll need to install scapy and it's dependencies. Ubuntu has 'apt-get install python-scapy'. You can also pip install scapy, but I don't know if that installs all dependencies on all OS's. I didn't include scapy in the requires because the 'rest' option doesn't utilize it, and is sufficient for a lot of usecases on its own.

listen

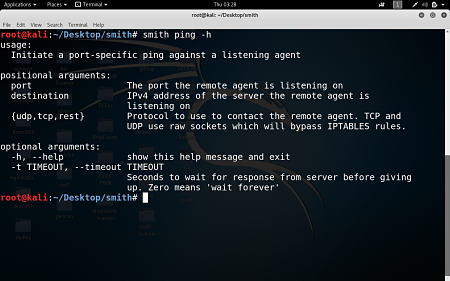
$: smith listen -h
usage:
 Server-side: listen for incoming ping requests from remote client.

positional arguments:
  port            The port the remote client is pinging
  {TCP,UDP,REST}  Protocol to use to contact the remote agent.TCP and UDP use
                  raw sockets which will bypass IPTABLES rules.

optional arguments:
 '-t', '--timeout'Seconds to wait for request from client before giving up. Zero (default) means 'wait forever'
  -h, --help      show this help message and exit

FIR - Fast Incident Response

What is FIR? Who is it for?

FIR (Fast Incident Response) is an cybersecurity incident management platform designed with agility and speed in mind. It allows for easy creation, tracking, and reporting of cybersecurity incidents.

FIR is for anyone needing to track cybersecurity incidents (CSIRTs, CERTs, SOCs, etc.). It's was tailored to suit our needs and our team's habits, but we put a great deal of effort into making it as generic as possible before releasing it so that other teams around the world may also use it and customize it as they see fit.
Fast Incident Response

Installation

There are two ways to install FIR. If you want to take it for a test-drive, just follow the instructions for setting up a development environment in the Wiki.

If you like it and want to set it up for production, here's how to do it.

A dockerfile for running a dev-quality FIR setup is also available in docker/Dockerfile.

Deploy to Heroku via fir/heroku_settings.py

Technical specs

FIR is written in Python (but you probably already knew that), using Django 1.9. It uses Bootstrap 3 and some Ajax and d3js to make it pretty. We use it with a MySQL back-end, but feel free to use any other DB adaptor you might want - as long as it's compatible with Django, you shouldn't run into any major issues.

FIR is not greedy performance-wise. It will run smoothly on a Ubuntu 14.04 virtual machine with 1 core, a 40 GB disk and 1 GB RAM.

Downloads Source

Sep 13, 2017

BARF : Binary Analysis and Reverse engineering Framework

Binary Analysis and Reverse engineering Framework
BARF.
The analysis of binary code is a crucial activity in many areas of the computer sciences and software engineering disciplines ranging from software security and program analysis to reverse engineering. Manual binary analysis is a difficult and time-consuming task and there are software tools that seek to automate or assist human analysts. However, most of these tools have several technical and commercial restrictions that limit access and use by a large portion of the academic and practitioner communities. BARF is an open source binary analysis framework that aims to support a wide range of binary code analysis tasks that are common in the information security discipline. It is a scriptable platform that supports instruction lifting from multiple architectures, binary translation to an intermediate representation, an extensible framework for code analysis plugins and interoperation with external tools such as debuggers, SMT solvers and instrumentation tools. The framework is designed primarily for human-assisted analysis but it can be fully automated.

The BARF project includes BARF and related tools and packages. So far the project is composed of the following items:
  • BARF : A multiplatform open source Binary Analysis and Reverse engineering Framework
  • PyAsmJIT : A JIT for the Intel x86_64 and ARM architecture.
  • Tools built upon BARF:
  • BARFgadgets : Lets you search, classifiy and verify ROP gadgets inside a binary program.
  • BARFcfg : Lets you recover the control-flow graph of the functions of a binary program.
  • BARFcg : Lets you recover the call graph of the functions of a binary program.
For more information, see:
  • BARF: A multiplatform open source Binary Analysis and Reverse engineering Framework (Whitepaper) [en]
  • BARFing Gadgets (ekoparty2014 presentation)
Downloads Master.zip | Demo Install

Quickstart

This is a very simple example which shows how to open a binary file and print each instruction with its translation to the intermediate language (REIL).
from barf import BARF

# Open binary file.
barf = BARF("examples/bin/x86/branch1")

# Print assembly instruction.
for addr, asm_instr, reil_instrs in barf.translate():
    print("0x{addr:08x} {instr}".format(addr=addr, instr=asm_instr))

    # Print REIL translation.
    for reil_instr in reil_instrs:
        print("{indent:11s} {instr}".format(indent="", instr=reil_instr))
We can also recover the CFG and save it to a .dot file.
# Recover CFG.
cfg = barf.recover_cfg()

# Save CFG to a .dot file.
cfg.save("branch1_cfg")
We can check restrictions on code using a SMT solver. For instance, suppose you have the following code:
 80483ed:       55                      push   ebp
 80483ee:       89 e5                   mov    ebp,esp
 80483f0:       83 ec 10                sub    esp,0x10
 80483f3:       8b 45 f8                mov    eax,DWORD PTR [ebp-0x8]
 80483f6:       8b 55 f4                mov    edx,DWORD PTR [ebp-0xc]
 80483f9:       01 d0                   add    eax,edx
 80483fb:       83 c0 05                add    eax,0x5
 80483fe:       89 45 fc                mov    DWORD PTR [ebp-0x4],eax
 8048401:       8b 45 fc                mov    eax,DWORD PTR [ebp-0x4]
 8048404:       c9                      leave
 8048405:       c3                      ret
And you want to know what values you have to assign to memory locations ebp-0x4, ebp-0x8 and ebp-0xc in order to obtain a specific value in eax register after executing the code.

First, we add the instructions to the analyzer component.
from barf import BARF

# Open ELF file
barf = BARF("examples/bin/x86/constraint1")

# Add instructions to analyze.
for addr, asm_instr, reil_instrs in barf.translate(0x80483ed, 0x8048401):
    for reil_instr in reil_instrs:
        barf.code_analyzer.add_instruction(reil_instr)
Then, we generate expressions for each variable of interest
# Get smt expression for eax and ebp registers
eap = barf.code_analyzer.get_register_expr("eax")
ebp = barf.code_analyzer.get_register_expr("ebp")

# Get smt expressions for memory locations (each one of 4 bytes)
a = barf.code_analyzer.get_memory_expr(ebp-0x8, 4)
b = barf.code_analyzer.get_memory_expr(ebp-0xc, 4)
c = barf.code_analyzer.get_memory_expr(ebp-0x4, 4)

And add the desired restrictions on them.
# Set range for variables
barf.code_analyzer.set_preconditions([a >= 2, a <= 100])
barf.code_analyzer.set_preconditions([b >= 2, b <= 100])

# Set desired value for the result
barf.code_analyzer.set_postcondition(c == 13)

Finally, we check is the restrictions we establish can be resolved.
# Check satisfiability.
if barf.code_analyzer.check() == 'sat':
    print("SAT!")

    # Get concrete value for expressions.
    eax_val = barf.code_analyzer.get_expr_value(eax)
    a_val = barf.code_analyzer.get_expr_value(a)
    b_val = barf.code_analyzer.get_expr_value(b)
    c_val = barf.code_analyzer.get_expr_value(c)

    # Print values.
    print("eax : 0x{0:%08x} ({0})".format(eax_val))
    print("ebp : 0x{0:%08x} ({0})".format(ebp_val))
    print("  a : 0x{0:%08x} ({0})".format(a_val))
    print("  b : 0x{0:%08x} ({0})".format(b_val))
    print("  c : 0x{0:%08x} ({0})".format(c_val))
else:
    print("UNSAT!")
You can see these and more examples in the examples directory.

Sep 12, 2017

WebFundamentals - Best practices for modern web development

Web Fundamentals on DevSite

new WebFundamentals! An effort to showcase best practices and tools for modern Web Development.
WebFundamentals
WebFundamentals

What's changed?

  • We're now using the DevSite infrastructure
  • New style guide
  • New widgets allow inline JavaScript, common links, related guide and more
  • Jekyll has been eliminated, instead pages are rendered at request time
  • Front-matter has been eliminated from the markdown, but files now require a simple set of tags

What stays the same?

Cloning the repo

If you have a high-bandwidth connection, I recommend starting with a fresh clone of the repo.
https://github.com/j00tesiD/WebFundamentals.git

Getting set up

The new DevSite infrastructure simplifies the dependencies a lot. Ensure you have a recent version of Node and the AppEngine SDK for Python already installed.

Run npm install (needed for the build process)

Build the auto-generated files

Some files (contributors includes, some pages for updates, showcases, etc) are automatically generated. The first time you clone the repo and run npm install, this is done for you. However, when you add a case study, update, etc., you'll need to re-build those files using:

npm run build

Update the code labs

To update the Code Labs, you'll need the claat tool, and access to the original Doc files. This will likely only work for Googlers.
  • Download the claat tool and place it in your tools directory.
  • Run tools/update-codelabs.sh
  • Check the latest changes into GitHub

Start the development server

Run npm start

Test your changes before submitting a PR

Please run your changes through npm test before submitting a PR. The test looks for things that may cause issues with DevSite and tries to keep our content consistent. It's part of the deployment process, so PRs will fail if there are any errors! To run:
npm test

Aug 31, 2017

Building a Blog With Next.js and Styled-Components

Next.js is an awesome new framework for building universal React applications. In simple terms, that means you can use React to render templates on the server, as well front-end components the way you’re most likely used to. The advantages of this are numerous (shared components, faster rendering, great tooling), but getting it all to work properly is generally a pain.

Next.js makes this process easy, and with the release of V3 I thought I’d whip up a blog to learn and demonstrate how it works. In this tutorial we’ll be using the following:
  • next (3.X)
  • styled-components (phenomenal css-in-js solution)
  • next-routes (middleware for expressive routes in next)
  • express (for serving our pages, although you can also do static exports)
I’d highly recommend you follow along with the github repo here https://github.com/timberio/next-go/, as some components are left out for the sake of brevity.
Building a Blog With Next.js and styled-components

1. Getting Started

Getting set up is simple, you can follow along in the docs but the gist of it is to install next, react, and react-dom, add a simple build script and create your index file.
yarn add next@beta react react-dom --save
Add the following scripts to your package.json
{
  "scripts": {
    "dev": "next",
    "build": "next build",
    "start": "next start"
  }
}
Then create an index.js file inside of a pages folder in the root
// ./pages/index.js

export default () => (
  <div>Welcome to next.js!</div>
)
Then you can just run yarn dev and you should be up and running on localhost:3000. Hot reloading is baked in by default, which you can peek at if you inspect the .next folder in your root directory.

2. Adding Some Style

Next up we’ll configure styled-components to style our blog.
First run
yarn add styled-components.
Then create a custom _document.js file in the root with the following:
https://gist.github.com/a8711187724db5ac96b4c4e391f245a5
The custom _document.js allows us to override the default page layout and inject our own styles and markup surrouding our react app.

3. Creating a Layout

Now let’s create a main layout which all of our blog views will use, put the following in layouts/Main.js:
/* layouts/Main.js */

import Head from 'next/head'
import Wrapper from './Wrapper'
import Nav from 'components/Nav'
import Footer from 'components/Footer'

export default ({ children, title = 'This is the default title' }) => (
  <Wrapper>
    <Head>
      <title>{ title }</title>
    </Head>
    <header>
      <Nav />
    </header>

    <main>
      { children }
    </main>

    <Footer>
      Footer
    </Footer>
  </Wrapper>
)
We’ll use this layout to wrap our pages, which can override the <Head> tags and render content into the { children } block.

4. Rendering Posts

Now that we have our layout set up, let’s modify our index.js page to take advantage of it, and also render some posts.
Update pages/index.js with the following:
import React from 'react'
import Layout from 'layouts/Main';
import { getPosts } from 'api/posts'
import { Link } from 'routes'

import Post from 'components/Post'

const IndexPage = ({ posts }) => (
  <Layout>
    <ul>
      {posts.map(p => (
        <Post key={p.title} post={p} />
      ))}
    </ul>
  </Layout>
)

IndexPage.getInitialProps = async ({ req }) => {
  const res = await getPosts()
  const json = await res.json()
  return { posts: json }
}

export default IndexPage
The key here is the getInitialProps on our IndexPage component, which fetches all of the required data needed for this page to render. When this page is accessed directly at localhost:3000, Next will take care of fetching the data before the page is rendered. If we're navigating to this page from another one, no additional page reloads will happen, Next's clientside routing will take over and fetch the data for us before rendering the component thanks to the Link component. You can even add the prefetch property to tell Next to prefetch that page for blazing fast page loads.
Now we’ll use some sample json and place the api in api/posts/index.js:
undefined
And add our Post component in components/Post/index.js:
import React from 'react'
import { Link } from 'routes'
import Wrapper from './Wrapper'

const PostItem = ({ post }) => (
  <Wrapper>
    <Link route='post' params={{ slug: post.title }}>
      <a>
        <h3>{post.title}</h3>
        <p>{post.body}</p>
      </a>
    </Link>
  </Wrapper>
)

export default PostItem
When you reload the page you should see a list of posts getting rendered by our index page like so (you can see the styles in the github repo https://github.com/timberio/next-go/).

5. Post Pages

Now that we have a list of posts, lets add a route to view each individual post. Create a new page in pages/Post.js like so:
import React from 'react'
import Link from 'next/link'
import styled from 'styled-components'
import Layout from 'layouts/Main';
import { getPost } from 'api/posts'

const PostPage = ({ post }) => (
  <Layout>
   <h1>{post.title}</h1>
   <p>{post.body}</p>
  </Layout>
)

PostPage.getInitialProps = async ({ query }) => {
  const res = await getPost(query.slug)
  const json = await res.json()
  return { post: json[0] }
}

export default PostPage
This page is reponsible for fetching and rendering individual posts, so let’s add a route to show it. We’ll be using next-routes for some nice expressive route definitions, so simply run:
yarn add next-routes
and add a routes.js folder in the root with the following:
const nextRoutes = require('next-routes')
const routes = module.exports = nextRoutes()

routes.add('index', '/')
routes.add('post', '/blog/:slug')
Then make sure to add this middleware in ./server.js
const express = require('express')
const next = require('next')
const routes = require('./routes')

const dev = process.env.NODE_ENV !== 'production'
const app = next({ dev })
const handle = app.getRequestHandler()
const handler = routes.getRequestHandler(app)

app.prepare()
.then(() => {
  const server = express()
  server.use(handler)

  server.get('*', (req, res) => {
    return handle(req, res)
  })

  server.listen(3000, (err) => {
    if (err) throw err
    console.log('> Ready on http://localhost:3000')
  })
})
Now our <Link route='post' params={{ slug: post.title }}> components in pages/index.js will map to this page with the proper params and if you click on one you should see something like this:
That’s it! You can easily sub in your own endpoints in api/posts/index.js to fetch from your API or CMS of choice.
You can see a working demo at https://next-go.now.sh/ and view the code at https://github.com/timberio/next-go. You can also learn more about Next at https://learnnextjs.com/.
published at https://timber.io/blog/building-a-blog-with-next-jshttps://medium.com/styled-components/building-a-blog-with-next-js-359cf1236574

Malicious Traffic Detection System 101Scratch

Introduction

Maltrail is a malicious traffic detection system, utilizing publicly available (black)lists containing malicious and/or generally suspicious trails, along with static trails compiled from various AV reports and custom user defined lists, where trail can be anything from domain name (e.g. zvpprsensinaix.com for Banjori malware), URL (e.g. http://109.162.38.120/harsh02.exe for known malicious executable), IP address (e.g. 185.130.5.231 for known attacker) or HTTP User-Agent header value (e.g. sqlmap for automatic SQL injection and database takeover tool). Also, it uses (optional) advanced heuristic mechanisms that can help in discovery of unknown threats (e.g. new malware).
Malicious Traffic Detection System
Malicious Traffic Detection System.
The following (black)lists (i.e. feeds) are being utilized:
alienvault, autoshun, badips, bambenekconsultingc2dns,
bambenekconsultingc2ip, bambenekconsultingdga, bitcoinnodes,
blocklist, botscout, bruteforceblocker, ciarmy, cruzit,
cybercrimetracker, deepviz, dataplanesipinvitation,
dataplanesipquery, dataplane, dshielddns, dshieldip,
emergingthreatsbot, emergingthreatscip, emergingthreatsdns,
feodotrackerdns, malwaredomainlist, malwaredomains, malwarepatrol,
maxmind, myip, nothink, openbl, openphish, packetmailcarisirt,
packetmailramnode, palevotracker, policeman, proxylists, proxyrss,
proxy, ransomwaretrackerdns, ransomwaretrackerip,
ransomwaretrackerurl, riproxies, rutgers, sblam, securityresearch,
snort, socksproxy, sslipbl, sslproxies, torproject, torstatus,
turris, urlvir, voipbl, vxvault, zeustrackerdns, zeustrackerip,
zeustrackermonitor, zeustrackerurl, etc.
As of static entries, the trails for the following malicious entities (e.g. malware C&Cs or sinkholes) have been manually included (from various AV reports and personal research):
aboc, adwind, alienspy, almalocker, alureon, android_acecard,
android_adrd, android_alienspy, android_arspam,
android_backflash, android_basebridge, android_boxer,
android_chuli, android_claco, android_coolreaper,
android_counterclank, android_cyberwurx, android_dendoroid,
android_dougalek, android_droidjack, android_droidkungfu,
android_enesoluty, android_ewalls, android_exprespam,
android_fakebanco, android_fakedown, android_fakeinst,
android_fakelog, android_fakemart, android_fakemrat,
android_fakeneflic, android_fakesecsuit, android_feabme,
android_flexispy, android_frogonal, android_geinimi,
android_ghostpush, android_ginmaster, android_gmaster,
android_godwon, android_golddream, android_gonesixty,
android_ibanking, android_kemoge, android_lockdroid,
android_lovetrap, android_maistealer, android_maxit,
android_oneclickfraud, android_opfake, android_ozotshielder,
android_pikspam, android_pjapps, android_qdplugin,
android_repane, android_roidsec, android_samsapo,
android_sandorat, android_selfmite, android_simplocker,
android_skullkey, android_sndapps, android_spytekcell,
android_stealer, android_stels, android_teelog, android_tetus,
android_tonclank, android_torec, android_uracto,
android_usbcleaver, android_walkinwat, android_windseeker,
android_zertsecurity, androm, andromem, angler, anuna, arec,
aridviper, artro, autoit, avalanche, avrecon, axpergle, babar,
bachosens, badblock, balamid, bamital, bankapol, bankpatch,
banloa, banprox, bayrob, bedep, blackenergy, blackvine,
blockbuster, bredolab, bubnix, bucriv, buterat, camerashy,
carbanak, carberp, careto, casper, cerber, changeup, chanitor,
chekua, cheshire, chewbacca, chisbur, cleaver, cloud_atlas,
conficker, contopee, copykittens, corebot, cosmicduke,
couponarific, criakl, cridex, crilock, cryakl, cryptinfinite,
cryptodefense, cryptolocker, cryptowall, ctblocker, cutwail,
darkhotel, defru, desertfalcon, destory, dnschanger,
dnsmessenger, dnstrojan, dorifel, dorkbot, drapion, dridex,
dukes, dursg, dyreza, elf_aidra, elf_billgates, elf_darlloz,
elf_ekoms, elf_fysbis, elf_groundhog, elf_hacked_mint,
elf_mayhem, elf_mokes, elf_pinscan, elf_rekoobe, elf_shelldos,
elf_sshscan, elf_themoon, elf_turla, elf_xnote, elf_xorddos,
elpman, emogen, emotet, equation, evilbunny, ewind, expiro,
fakeav, fakeran, fantom, fareit, fbi_ransomware, fiexp,
fignotok, fin4, finfisher, fraudload, fynloski, fysna, gamarue,
gauss, gbot, generic, golroted, gozi, groundbait, harnig,
hawkeye, helompy, hiloti, hinired, htran, immortal, injecto,
ios_keyraider, ios_muda, ios_oneclickfraud, ios_specter,
ismdoor, jenxcus, kegotip, keydnap, kingslayer, kolab,
koobface, korgo, korplug, kovter, kradellsh, kulekmoko,
lazarus, locky, lollipop, lotus_blossom, luckycat, majikpos,
malwaremustdie, marsjoke, mdrop, mebroot, mestep, mhretriev,
miniduke, misogow, modpos, morto, nanocor, nbot, necurs,
nemeot, neshuta, nettraveler, netwire, neurevt, nexlogger,
nivdort, nonbolqu, nuqel, nwt, nymaim, odcodc, oficla, onkods,
optima, osx_keranger, osx_keydnap, osx_salgorea,
osx_wirelurker, palevo, pdfjsc, pegasus, pepperat, phytob,
picgoo, pift, plagent, plugx, ponmocup, poshcoder, potao,
powelike, proslikefan, pushdo, pykspa, qakbot, quasar, ramnit,
ransirac, reactorbot, redoctober, redsip, remcos, renocide,
reveton, revetrat, rovnix, runforestrun, russian_doll, rustock,
sakurel, sality, satana, sathurbot, scarcruft, scarletmimic,
scieron, seaduke, sednit, sefnit, selfdel, shifu, shylock,
siesta, silentbrute, silly, simda, sinkhole_abuse,
sinkhole_anubis, sinkhole_arbor, sinkhole_bitdefender,
sinkhole_blacklab, sinkhole_botnethunter, sinkhole_certgovau,
sinkhole_certpl, sinkhole_checkpoint, sinkhole_cirtdk,
sinkhole_conficker, sinkhole_cryptolocker, sinkhole_drweb,
sinkhole_dynadot, sinkhole_dyre, sinkhole_farsight,
sinkhole_fbizeus, sinkhole_fitsec, sinkhole_fnord,
sinkhole_gameoverzeus, sinkhole_georgiatech, sinkhole_gladtech,
sinkhole_honeybot, sinkhole_kaspersky, sinkhole_microsoft,
sinkhole_rsa, sinkhole_secureworks, sinkhole_shadowserver,
sinkhole_sidnlabs, sinkhole_sinkdns, sinkhole_sofacy,
sinkhole_sugarbucket, sinkhole_tech, sinkhole_unknown,
sinkhole_virustracker, sinkhole_wapacklabs, sinkhole_zinkhole,
skeeyah, skynet, skyper, smsfakesky, snake, snifula, snort,
sockrat, sofacy, sohanad, spyeye, stabuniq, stonedrill,
stuxnet, synolocker, tdss, teamspy, teerac, teslacrypt,
themida, tibet, tinba, torpig, torrentlocker, troldesh, turla,
unruy, upatre, utoti, vawtrak, vbcheman, vinderuf, virtum,
virut, vittalia, vobfus, volatilecedar, vundo, waledac,
waterbug, wecorl, wndred, xadupi, xcodeghost, xtrat, yenibot,
yimfoca, zaletelly, zcrypt, zemot, zeroaccess, zeus, zherotee,
zlader, zlob, zombrari, zxshell, etc.

Architecture

Maltrail is based on the Traffic -> Sensor <-> Server <-> Client architecture. Sensor(s) is a standalone component running on the monitoring node (e.g. Linux platform connected passively to the SPAN/mirroring port or transparently inline on a Linux bridge) or at the standalone machine (e.g. Honeypot) where it "monitors" the passing Traffic for blacklisted items/trails (i.e. domain names, URLs and/or IPs). In case of a positive match, it sends the event details to the (central) Server where they are being stored inside the appropriate logging directory (i.e. LOG_DIR described in the Configuration section). If Sensor is being run on the same machine as Server (default configuration), logs are stored directly into the local logging directory. Otherwise, they are being sent via UDP messages to the remote server (i.e. LOG_SERVER described in the Configuration section).
Server's primary role is to store the event details and provide back-end support for the reporting web application. In default configuration, server and sensor will run on the same machine. So, to prevent potential disruptions in sensor activities, the front-end reporting part is based on the "Fat client" architecture (i.e. all data post-processing is being done inside the client's web browser instance). Events (i.e. log entries) for the chosen (24h) period are transferred to the Client, where the reporting web application is solely responsible for the presentation part. Data is sent toward the client in compressed chunks, where they are processed sequentially. The final report is created in a highly condensed form, practically allowing presentation of virtually unlimited number of events.
Note: Server component can be skipped altogether, and just use the standalone Sensor. In such case, all events would be stored in the local logging directory, while the log entries could be examined either manually or by some CSV reading application.

Quick start

The following set of commands should get your Maltrail Sensor up and running (out of the box with default settings and monitoring interface "any"):
sudo apt-get install git python-pcapy
git clone https://github.com/stamparm/maltrail.git
cd maltrail
sudo python sensor.py
To start the (optional) Server on same machine, open a new terminal and execute the following:
[[ -d maltrail ]] || git clone https://github.com/stamparm/maltrail.git
cd maltrail
python server.py
To test that everything is up and running execute the following:
ping -c 1 136.161.101.53
cat /var/log/maltrail/$(date +"%Y-%m-%d").log
To stop Sensor and Server instances (if running in background) execute the following:
sudo pkill -f sensor.py
pkill -f server.py
Access the reporting interface (i.e. Client) by visiting the http://127.0.0.1:8338 (default credentials: admin:changeme!) from your web browser:
Malicious Traffic Detection System
Malicious Traffic Detection System 101Scratch

Aug 30, 2017

How to Record Terminal Sessions

Install Asciinema

Record Terminal
How to Record Terminal Sessions.


Linux Distro

Fedora


sudo yum install asciinema

Ubuntu


sudo apt-add-repository ppa:zanchey/asciinema

sudo apt-get update

sudo apt-get install asciinema

Arch Linux


pacman -S asciinema

Gentoo Linux


emerge -av asciinema

openSUSE

zypper in asciinema

via Pip

asciinema is available on PyPI and can be installed with pip (Python 3 required):
sudo pip3 install asciinema
This is the universal installation method for all operating systems, which always provides the latest version.

Record terminal session

This is the single most important command in asciinema, since it is how you utilize this tool’s main job.

By running asciinema rec [filename] you start a new recording session. The command (process) that is recorded can be specified with -c option (see below), and defaults to $SHELL which is what you want in most cases.

Recording finishes when you exit the shell (hit Ctrl+D or type exit). If the recorded process is not a shell then recording finishes when the process exits.

If the filename argument is given then the resulting recording (called asciicast) is saved to a local file. It can later be replayed with asciinema play <filename> and/or uploaded to asciinema.org with asciinema upload <filename>. If the filename argument is omitted then (after asking for confirmation) the resulting asciicast is uploaded to asciinema.org for further playback in a web browser.

ASCIINEMA_REC=1 is added to recorded process environment variables. This can be used by your shell’s config file (.bashrc, .zshrc) to alter the prompt or play a sound when shell is being recorded.

Replay recorded asciicast in a terminal

This command replays given asciicast (as recorded by rec command) directly in your terminal.

Playing from a local file:
asciinema play /path/to/asciicast.json

Playing from HTTP(S) URL:
asciinema play https://asciinema.org/a/22124.json
asciinema play http://example.com/demo.json

Playing from asciicast page URL (requires <link rel="alternate" type="application/asciicast+json" href="....json"> in page’s HTML):
asciinema play https://asciinema.org/a/22124
asciinema play http://example.com/blog/post.html

Playing from stdin:
cat /path/to/asciicast.json | asciinema play -
ssh user@host cat asciicast.json | asciinema play -

Playing from IPFS:
asciinema play ipfs:/ipfs/QmcdXYJp6e4zNuimuGeWPwNMHQdxuqWmKx7NhZofQ1nw2V
asciinema play fs:/ipfs/QmcdXYJp6e4zNuimuGeWPwNMHQdxuqWmKx7NhZofQ1nw2V

Available options:
-w, --max-wait=<sec> - Reduce replayed terminal inactivity to max seconds

NOTE: it is recommended to run asciinema play in a terminal of dimensions not smaller than the one used for recording as there’s no “transcoding” of control sequences for new terminal size.

Upload recorded asciicast to asciinema.org site

This command uploads given asciicast (as recorded by rec command) to asciinema.org for further playback in a web browser.

asciinema rec demo.json + asciinema play demo.json + asciinema upload demo.json is a nice combo for when you want to review an asciicast before publishing it on asciinema.org.

Manage recordings on asciinema.org account

If you want to manage your recordings on asciinema.org (set title/description, delete etc) you need to authenticate. This command displays the URL you should open in your web browser to do that.

On every machine you run asciinema recorder, you get a new, unique API token. If you’re already logged in on asciinema.org website and you run asciinema auth from a new computer then this new device will be linked to your account.

You can synchronize your config file (which keeps the API token) across the machines so all of them use the same token, but that’s not necessary. You can assign new tokens to your account from as many machines as you want.
Nara: Here

Aug 28, 2017

Fundamentals of ASP.Net programming vs. PHP programming

It's actually a vast unwanted debate between PHP and ASP.NET, the battle continues between the supporters of these two programming languages, with no clear conclusion coming out. Both of these programming languages can be used to develop the same type of projects, the difference is just cost, platform independency, security etc.
Hyper-text-pre-processor (PHP) and Active-server-pages (ASP)
Hyper-text-pre-processor (PHP) and Active-server-pages (ASP).
Hyper-text-pre-processor (PHP) and Active-server-pages (ASP) are the two standard programming languages for website application development and more significantly when it comes to produce database-driven websites to interrelating hugely with databases. PHP is an open-source programming language which is derived from lots of different languages. On the other hand ASP is such kind of programming languages which preferring Microsoft product mostly.

Both programming languages PHP and ASP are used to develop dynamic database oriented websites. Active Server Pages (ASP) is normally from Microsoft and is used only with Internet Information Server (IIS) that runs on Microsoft Servers also. But on the other hand you can say PHP is platform independent programming languages and can connect with several kinds of databases.

There are a lot of differences between ASP and PHP.

Expenditure

To run ASP.net programs first need to install IIS on a Windows server platform, this is not a free package. PHP programs can run on Linux, which is free package. Even the database connectivity is expensive for ASP, because it require MS-SQL product of Microsoft that needs to be acquired. Same time on the other hand PHP generally uses MySQL for database connectivity, which is freely accessible.

The Simplicity in Coding

PHP codes itself are very light in weight, a contract programmer who begins his career into PHP, does not felt any pressure to look the source code to understand. Whereas In ASP codes are not so easy to quick understand.

Database Compatibility

PHP generally being extremely flexible as it uses MySQL for database connectivity, which is freely accessible. Same time on the other hand Database compatibility is expensive for ASP, because it require MS-SQL product of Microsoft that needs to be acquired.

General Run Time

If we evaluate the running speed of PHP and ASP then PHP should gets the upper hand. Normally it is viewed that PHP code runs quicker than ASP code. Due to COM based architecture, ASP uses server space to run while PHP code runs on its own inbuilt memory space.

Background Language Support

ASP has a similar like Visual Basic type of syntax that also linked to Microsoft products as well. On the other hand PHP codes are based on generally C++ language and the syntax, which is used in PHP, is quite similar to C/C++ syntax. C/C++ is still considered by maximum software programmer is the finest programming language and people who love C++ language would certainly feel more relaxed with the PHP syntax.

Running Platform Connectivity

PHP codes can run on different platforms like UNIX, Solaris, Linux, and Windows whereas ASP codes are mostly linked with Windows platforms. Though, ASP programs can run on a Linux platform with the help of ASP-Apache installed on the server.

Further Tools Cost

Several tools used in PHP are mostly free of cost in the market and as PHP is open source a lot of codes can be available in open source forums and blogs. PHP has inbuilt attributes like ftp, encryption methods, even email also from a web page but in ASP such attributes are not obtainable and for this reason only some more features are required which are not free that increase the total cost as well.

Larger Applications Support

PHP is just as protected as ASP from coding level. The main difference is only for private data like “social security numbers”; “PIN numbers” etc. ASP is more practicable option. Organizations like government firms normally don’t have much stipulated commercial budgets and looking for required security, they really helpful ASP.net.

At the end, we can make a conclusion that both programming languages have their advantages and disadvantages specific to user requirement. It can be said that both the programming languages have their own significance depending upon the user's requirements and budgets. It is viewed that in any discussion board, ASP.net is similarly capable but many of them suggesting PHP for small business owners those who have a fixed budget and does not required superb security support. PHP cannot provide e-commerce application developmentFeature Articles, only for them ASP.net will be the best choice.

Aug 27, 2017

PaperAdmin Template With Angular JS

A flat admin dashboard using Angular JS 2/4

PaperAdmin

PaperAdmin is a bootstrap single page dashboard developed using Angular JS 4. PaperAdmin features built-in components to make dashboard development easy. It features custom components such as calendars, list views with CRUD(Create, Read, Update, Delete) functionality, pie charts with status and custom cards to display relevant information.

Development server

Run ng serve for a dev server. Navigate to http://localhost:4200/. The app will automatically reload if you change any of the source files.

Build

Run ng build to build the project. The build artifacts will be stored in the dist/ directory. Use the -prod flag for a production build.
PaperAdmin Template For Admin Developers With Angular JS
Template.
PaperAdmin Template For Admin Developers With Angular JS
Template.

SecGen: Security Scenario Generator is Open Source

Create randomly insecure VMs

Summary

SecGen creates vulnerable virtual machines so students can learn security penetration testing techniques. Boxes like Metasploitable2 are always the same, this project uses Vagrant, Puppet, and Ruby to quickly create randomly vulnerable virtual machines that can be used for learning or for hosting CTF events.

Introduction

Computer security students benefit from engaging in hacking challenges. Practical lab work and pre-configured hacking challenges are common practice both in security education and also as a pastime for security-minded individuals. Competitive hacking challenges, such as capture the flag (CTF) competitions have become a mainstay at industry conferences and are the focus of large online communities. Virtual machines (VMs) provide an effective way of sharing targets for hacking, and can be designed in order to test the skills of the attacker. Websites such as Vulnhub host pre-configured hacking challenge VMs and are a valuable resource for those learning and advancing their skills in computer security. However, developing these hacking challenges is time consuming, and once created, essentially static. That is, once the challenge has been "solved" there is no remaining challenge for the student, and if the challenge is created for a competition or assessment, the challenge cannot be reused without risking plagiarism, and collusion.

Security Scenario Generator (SecGen) generates randomised vulnerable systems. VMs are created based on a scenario specification, which describes the constraints and properties of the VMs to be created. For example, a scenario could specify the creation of a system with a remotely exploitable vulnerability that would result in user-level compromise, and a locally exploitable flaw that would result in root-level compromise. This would require the attacker to discover and exploit both randomly selected vulnerabilities in order to obtain root access to the system. Alternatively, the scenario that is defined can be more specific, specifying certain kinds of services (such as FTP or SMB) or even exact vulnerabilities (by CVE).

SecGen is a Ruby application, with an XML configuration language. SecGen reads its configuration, including the available vulnerabilities, services, networks, users, and content, reads the definition of the requested scenario, applies logic for randomising the scenario, and leverages Puppet and Vagrant to provision the required VMs.

Installation

SecGen is developed and tested on Ubuntu Linux. In theory, SecGen should run on Mac or Windows, if you have all the required software installed.

You will need to install the following:
On Ubuntu these commands will get you up and running Install all the required packages:
Copy SecGen to a directory of your choosing, such as /home/user/bin/SecGen, then:
cd /home/user/bin/SecGen
bundle install

Optional software requirements

EWF image creation

To generate forensic images in the EWF image format FTK Imager command line is required. Download link for FTK Imager command line: https://accessdata.com/product-download/debian-and-ubuntu-x64-3.1.1
Note: The FTK Imager executable needs to be added to the PATH environment variable.
VM Security On Github
https://github.com/anhmeee/SecGen/blob/master/lib/resources/images/readme_gifs/secgen_default_scenario_run.gif
SecGen Security Generator For Linux Open Source
https://github.com/anhmeee/SecGen/blob/master/lib/resources/images/readme_gifs/secgen_default_scenario_run_vm.gif


AdBlock Detected!

Like this blog? Keep us running by whitelisting this blog in your ad blocker.

This is how to whitelisting this blog in your ad blocker.

Thank you!

×