Showing posts with label Tools. Show all posts

Oct 19, 2017

DumpsterFire Toolset - Security Incidents In A Box!

The DumpsterFire Toolset is a modular, menu-driven, cross-platform tool for building repeatable, time-delayed, distributed security events. Easily create custom event chains for Blue Team drills and sensor / alert mapping. Red Teams can create decoy incidents, distractions, and lures to support and scale their operations. Turn paper tabletop exercises into controlled "live fire" range events. Build event sequences ("narratives") to simulate realistic scenarios and generate corresponding network and filesystem artifacts.
The toolset is designed to be dynamically extensible, allowing you to create your own Fires (event modules) to add to the included collection of toolset Fires. Just write your own Fire module and drop it into the FireModules directory. The DumpsterFire toolset will auto-detect your custom Fires at startup and make them available for use.

Accountability

DumpsterFire creates a date-time stamped event log so that Red- and Blue teams can coordinate and track events, correlating them to what was detected (or not detected) by your sensors, which alerts did or did not trigger, etc. It also allows teams to confirm which events were part of your operation / exercise, keeping everyone out of trouble. All date-time tracking is performed in UTC, so your global operations can be easily correlated without worrying about conversions between timezones and international date lines.
The auto-generated date-time stamped event logs also provide an effortless value add to your engagements. Generate a collection of DumpsterFires for your client engagements, tailored to their attack surfaces. At the end of your operations you can hand over the logs as a bonus Purple Team deliverable to your client for post-engagement analysis.

Overview

The DumpsterFire toolset workflow is designed to be user-friendly and robust. Everything can be done from within the menu-driven dumpsterFireFactory.py script. Launch the script and the tool will guide you as you go. You can start by browsing the existing Fire modules and saved DumpsterFires. When you're ready to create your own DumpsterFires, the tool will lead through the workflow to get the job done. Finally it will be time to ignite your DumpsterFire. After selecting the DumpsterFire of your choice, you'll review the DumpsterFire's Fire modules and settings. If everything looks good, light it up!

When you're building a DumpsterFire, after you've chosen all of the Fire modules you wish to include, the tool will loop through the list of Fires. If a Fire has options for custom settings, the tool will call that Fire's Configure() method to present you with prompts for its settings (e.g. a target network's IP address).

Once all of the Fires have been configured, you'll then be given the option to assign individual time delays to your Fires. This allows the DumpsterFire to better mimic real operations when executing its chain of events. For example, the first Fire may visit various hacking Websites, the next Fire then downloads a few common hacking tools before launching the third Fire which starts scanning the local network. If this all happened within seconds of each other, no SOC analyst is going to believe it was a human. By adding several minutes or even hours between those events, you create a more realistic chain of events.

After all of the Fires have been configured and optional individual Fire delays assigned, you'll be asked to name your DumpsterFire. Do not use spaces or odd special characterse, just stick to letters, numbers, underscores, and hyphens.

Voila! You have now created your first DumpsterFire. Time to light one up!

When you're ready to ignite a DumpsterFire, the tool will first show you the DumpsterFire's settings. If everything looks good, you'll be asked if you want to assign a date-time delay before igniting. All date-time processing is done in UTC to ensure consistent execution regardless of your DumpsterFire's location of execution. Otherwise you can decline the date-time delay and execution will begin immediately after you give final confirmation.

As the DumpsterFire executes, you'll be given regular date-time stamped feedback on each Fire's status and critical events. This not only helps you track progress, but also provides a chronological record of your DumpsterFire's activities - critical in coordinating and deconflicting your events from the general background noise that floods every SOC. You can also hand over the chronological record to your external clients after your operations are complete, as a value-added record of your activites that they can use to review their sensor and alert settings. All with no extra effort on your part.

Shenanigans

April 1st happens! So do cyber wargames or your best friend's birthday. Some circumstances call for a little extra something. Finally infiltrate your opponent's perimeter in that net wars competition? Celebrate with Shenanigans while locking in your victory! Best friend leave their screen unlocked on game night? Sharing is caring! DumpsterFire's Shenanigans let you add some flavor to your operation.
Want to open the system's default browser and stream all of that Rick Astley awesomeness? After setting their system volume to maximum? How about opening any URL you choose? Or setting the system's shell aliases to pretend the filesystem is corrupted?

Files & Directories

dumpsterFireFactory.py - Menu-driven tool for creating, configuring, scheduling, and executing DumpsterFires

FireModules/ - Directory that contains subdirectories of Fires, each subdirectory is a specific Category of Fires to keep your Fire modules organized. Fires are added to a DumpsterFire to create a chain of events and actions.

DumpsterFires/ - Directory containing your collection of DumpsterFires

igniteDumpsterFire.py - Headless script, invoked at command line with the filename of the DumpsterFire you wish to execute. Useful for igniting distributed DumpsterFires.

testFireModule.py - Utility script for unit testing the Class methods of your custom Fire modules, without the hassle of running through the entire DumpsterFire Factory process to debug. Also useful for running a single Fire to check your settings. testFireModule.py will prompt you for configuration settings were applicable.

__init__.py files - Required to make Python treat directories as containing Python packages, allows DumpsterFire toolset to find and load Fire modules.

Requirements

Python 2.7.x

Run DumpsterFire Factory

./dumpsterFireFactory.py

Customizing Your Dumpster Fires

DumpsterFire's modular design gives you flexibility to create any number of event-chain narratives. Fire modules that have configurable settings allow you to set target networks or system, etc. There are a few Fire modules, however, that give you immediate flexibility to greatly expand your DumpsterFire event sequences.

Without creating any new FireModule classes, you can use these existing "custom" Fire modules to leverage and extend your DumpsterFires:
  • FireModules/Websurfing/custom_url.py
  • FireModules/FileDownloads/download_custom_url.py
  • FireModules/OSCommand/os_linux_unix_command.py
  • FireModules/OSCommand/os_win_cmd_command.py
  • FireModules/OSCommand/os_osx_applescript_command.py
You can add any number of these to your DumpsterFire, each with its own custom actions. For example, you could chain together a dozen 'custom_url.py' Fire modules to build a complete, tailored browsing narrative. You could then have various 'OSCommand/' Fire instances that execute system commands to further reinforce your desired narrative of events. The 'OSCommand/' Fires in particular give you incredible flexbility. Each individual Fire in your DumpsterFire event chain takes any shell commands that are appropriate for the host's OS:

Example: Linux/Unix (& OSX terminal)
find /home -name '*.bash_history' -exec cat {} ; ; echo "Never gonna give you up" > rickroll.txt ; wall rickroll.txt
Sep 30, 2017

CipherScan - find out which SSL Cipher Suites

SSL Cipher Suites
Cipherscan tests the ordering of the SSL/TLS ciphers on a given target, for all major versions of SSL and TLS. It also extracts some certificates informations, TLS options, OCSP stapling and more. Cipherscan is a wrapper above the openssl s_client command line.

Cipherscan is meant to run on all flavors of unix. It ships with its own built of OpenSSL for Linux/64 and Darwin/64. On other platform, it will use the openssl version provided by the operating system (which may have limited ciphers support), or your own version provided in the -o command line flag.

Examples

Basic test:

$ ./cipherscan google.com
...................
Target: google.com:443

prio  ciphersuite                  protocols                    pfs                 curves
1     ECDHE-RSA-CHACHA20-POLY1305  TLSv1.2                      ECDH,P-256,256bits  prime256v1
2     ECDHE-RSA-AES128-GCM-SHA256  TLSv1.2                      ECDH,P-256,256bits  prime256v1
3     ECDHE-RSA-AES128-SHA         TLSv1.1,TLSv1.2              ECDH,P-256,256bits  prime256v1
4     ECDHE-RSA-RC4-SHA            SSLv3,TLSv1,TLSv1.1,TLSv1.2  ECDH,P-256,256bits  prime256v1
5     AES128-GCM-SHA256            TLSv1.2                      None                None
6     AES128-SHA256                TLSv1.2                      None                None
7     AES128-SHA                   TLSv1.1,TLSv1.2              None                None
8     RC4-SHA                      SSLv3,TLSv1,TLSv1.1,TLSv1.2  None                None
9     RC4-MD5                      SSLv3,TLSv1,TLSv1.1,TLSv1.2  None                None
10    ECDHE-RSA-AES256-GCM-SHA384  TLSv1.2                      ECDH,P-256,256bits  prime256v1
11    ECDHE-RSA-AES256-SHA384      TLSv1.2                      ECDH,P-256,256bits  prime256v1
12    ECDHE-RSA-AES256-SHA         SSLv3,TLSv1,TLSv1.1,TLSv1.2  ECDH,P-256,256bits  prime256v1
13    AES256-GCM-SHA384            TLSv1.2                      None                None
14    AES256-SHA256                TLSv1.2                      None                None
15    AES256-SHA                   SSLv3,TLSv1,TLSv1.1,TLSv1.2  None                None
16    ECDHE-RSA-AES128-SHA256      TLSv1.2                      ECDH,P-256,256bits  prime256v1
17    ECDHE-RSA-DES-CBC3-SHA       SSLv3,TLSv1,TLSv1.1,TLSv1.2  ECDH,P-256,256bits  prime256v1
18    DES-CBC3-SHA                 SSLv3,TLSv1,TLSv1.1,TLSv1.2  None                None

Certificate: trusted, 2048 bit, sha1WithRSAEncryption signature
TLS ticket lifetime hint: 100800
OCSP stapling: not supported
Cipher ordering: server

Testing STARTTLS:

$ ./cipherscan --curves -starttls xmpp jabber.ccc.de:5222
................................
Target: jabber.ccc.de:5222

prio  ciphersuite                  protocols              pfs                 curves
1     ECDHE-RSA-AES256-GCM-SHA384  TLSv1.2                ECDH,P-256,256bits  prime256v1
2     ECDHE-RSA-AES256-SHA384      TLSv1.2                ECDH,P-256,256bits  prime256v1
3     ECDHE-RSA-AES256-SHA         TLSv1,TLSv1.1,TLSv1.2  ECDH,P-256,256bits  prime256v1
4     DHE-RSA-AES256-GCM-SHA384    TLSv1.2                DH,1024bits         None
5     DHE-RSA-AES256-SHA256        TLSv1.2                DH,1024bits         None
6     DHE-RSA-AES256-SHA           TLSv1,TLSv1.1,TLSv1.2  DH,1024bits         None
7     DHE-RSA-CAMELLIA256-SHA      TLSv1,TLSv1.1,TLSv1.2  DH,1024bits         None
8     AES256-GCM-SHA384            TLSv1.2                None                None
9     AES256-SHA256                TLSv1.2                None                None
10    AES256-SHA                   TLSv1,TLSv1.1,TLSv1.2  None                None
11    CAMELLIA256-SHA              TLSv1,TLSv1.1,TLSv1.2  None                None
12    ECDHE-RSA-AES128-GCM-SHA256  TLSv1.2                ECDH,P-256,256bits  prime256v1
13    ECDHE-RSA-AES128-SHA256      TLSv1.2                ECDH,P-256,256bits  prime256v1
14    ECDHE-RSA-AES128-SHA         TLSv1,TLSv1.1,TLSv1.2  ECDH,P-256,256bits  prime256v1
15    DHE-RSA-AES128-GCM-SHA256    TLSv1.2                DH,1024bits         None
16    DHE-RSA-AES128-SHA256        TLSv1.2                DH,1024bits         None
17    DHE-RSA-AES128-SHA           TLSv1,TLSv1.1,TLSv1.2  DH,1024bits         None
18    DHE-RSA-SEED-SHA             TLSv1,TLSv1.1,TLSv1.2  DH,1024bits         None
19    DHE-RSA-CAMELLIA128-SHA      TLSv1,TLSv1.1,TLSv1.2  DH,1024bits         None
20    AES128-GCM-SHA256            TLSv1.2                None                None
21    AES128-SHA256                TLSv1.2                None                None
22    AES128-SHA                   TLSv1,TLSv1.1,TLSv1.2  None                None
23    SEED-SHA                     TLSv1,TLSv1.1,TLSv1.2  None                None
24    CAMELLIA128-SHA              TLSv1,TLSv1.1,TLSv1.2  None                None

Certificate: UNTRUSTED, 2048 bit, sha1WithRSAEncryption signature
TLS ticket lifetime hint: None
OCSP stapling: not supported
Cipher ordering: client
Curves ordering: server
Curves fallback: False

Exporting to JSON with the -j command line option:

$ ./cipherscan --curves -j www.ebay.com | j
{
    "curves_fallback": "False",
    "serverside": "True",
    "target": "www.ebay.com:443",
    "utctimestamp": "2015-04-03T14:54:31.0Z",
    "ciphersuite": [
        {
            "cipher": "AES256-SHA",
            "ocsp_stapling": "False",
            "pfs": "None",
            "protocols": [
                "TLSv1",
                "TLSv1.1",
                "TLSv1.2"
            ],
            "pubkey": [
                "2048"
            ],
            "sigalg": [
                "sha1WithRSAEncryption"
            ],
            "ticket_hint": "None",
            "trusted": "True"
        },
        {
            "cipher": "ECDHE-RSA-DES-CBC3-SHA",
            "curves": [
                "prime256v1",
                "secp384r1",
                "secp224r1",
                "secp521r1"
            ],
            "curves_ordering": "server",
            "ocsp_stapling": "False",
            "pfs": "ECDH,P-256,256bits",
            "protocols": [
                "TLSv1",
                "TLSv1.1",
                "TLSv1.2"
            ],
            "pubkey": [
                "2048"
            ],
            "sigalg": [
                "sha1WithRSAEncryption"
            ],
            "ticket_hint": "None",
            "trusted": "True"
        }
    ]
}

Analyzing configurations

The motivation behind cipherscan is to help operators configure good TLS on their endpoints. To help this further, the script analyze.py compares the results of a cipherscan with the TLS guidelines from https://wiki.mozilla.org/Security/Server_Side_TLS and output a level and recommendations.
$ ./analyze.py -t jve.linuxwall.info
jve.linuxwall.info:443 has intermediate tls

Changes needed to match the old level:
* consider enabling SSLv3
* add cipher DES-CBC3-SHA
* use a certificate with sha1WithRSAEncryption signature
* consider enabling OCSP Stapling

Changes needed to match the intermediate level:
* consider enabling OCSP Stapling

Changes needed to match the modern level:
* remove cipher AES128-GCM-SHA256
* remove cipher AES256-GCM-SHA384
* remove cipher AES128-SHA256
* remove cipher AES128-SHA
* remove cipher AES256-SHA256
* remove cipher AES256-SHA
* disable TLSv1
* consider enabling OCSP Stapling
In the output above, analyze.py indicates that the target jve.linuxwall.info matches the intermediate configuration level. If the administrator of this site wants to reach the modern level, the items that failed under the modern tests should be corrected.

analyze.py does not make any assumption on what a good level should be. Sites operators should now what level they want to match against, based on the compatibility level they want to support. Again, refer to https://wiki.mozilla.org/Security/Server_Side_TLS for more information.

Note on Nagios mode: analyse.py can be ran as a nagios check with --nagios. The exit code will then represent the state of the configuration:
  • 2 (critical) for bad tls
  • 1 (warning) if it doesn't match the desired level
  • 0 (ok) if it matches. cipherscan can take more than 10 seconds to complete. To alleviate any timeout issues, you may want to run it outside of nagios, passing data through some temporary file.

OpenSSL

Cipherscan uses a custom release of openssl for linux 64 bits and darwin 64 bits. OpenSSL is build from a custom branch maintained by Peter Mosmans that includes a number of patches not merged upstream. It can be found here: https://github.com/PeterMosmans/openssl

You can build it yourself using following commands:
git clone https://github.com/PeterMosmans/openssl.git --depth 1 -b 1.0.2-chacha
cd openssl
./Configure zlib no-shared experimental-jpake enable-md2 enable-rc5 \
enable-rfc3779 enable-gost enable-static-engine linux-x86_64
make depend
make
make report
The statically linked binary will be apps/openssl.

Sep 25, 2017

OpenPuff – Professional Steganography Tool

Professional Steganography Tool
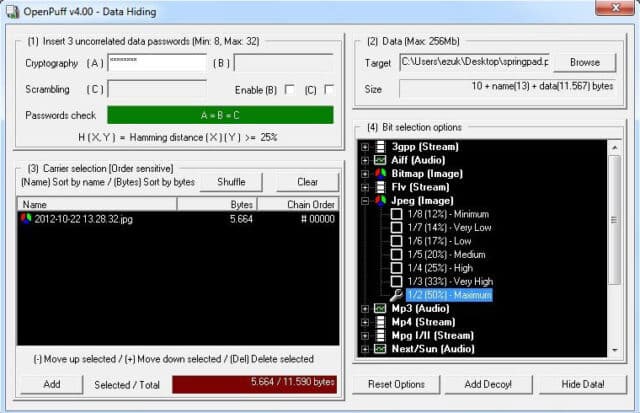
OpenPuff is a professional steganography tool, with unique features you won’t find among any other free or commercial software. OpenPuff is 100% free and suitable for highly sensitive data covert transmission.

The tool contains deniable steganography, carrier chains, unique layers of security and obfuscation, multiple carrier formats, is portable and is freeware (ad-free).

Features of OpenPuff Steganography Tool

  • Carrier chains – Data is split among many carriers. Only the correct carrier sequence enables unhiding. Moreover, up to 256Mb can be hidden, if you have enough carriers at disposal. Last carrier will be filled with random bits in order to make it undistinguishable from others.
  • Supported formats – Images, audios, videos, flash, adobe.
  • Layers of security – Data, before carrier injection, is encrypted (1), scrambled (2), whitened (3) and encoded (4).
  • Extra security (Deniable steganography) – Top secret data can be protected using less secret data as a decoy.
  • Source code – This program relies on the libObfuscate system-independent open-source library.

Details of OpenPuff Steganography Tool

  • HW seeded random number generator (CSPRNG)
  • Deniable steganography
  • Carrier chains (up to 256Mb of hidden data)
  • Carrier bits selection level
  • Modern multi-cryptography (16 algorithms)
  • Multi-layered data obfuscation (3 passwords)
  • X-squared steganalysis resistance
  • 256bit+256bit symmetric-key cryptography (with KDF4 password extension)
  • 256bit symmetric-key data scrambling (CSPRNG-based shuffling)
  • 256bit symmetric-key data whitening (CSPRNG-based noise mixing)
  • Adaptive non-linear carrier bit encoding
  • Images (BMP, JPG, PCX, PNG, TGA)
  • Audio support (AIFF, MP3, NEXT/SUN, WAV)
  • Video support (3GP, MP4, MPG, VOB)
  • Flash-Adobe support (FLV, SWF, PDF)
  • Native portable structure (no installation, registry keys, .ini files)
  • Runs in user mode with DEP on
  • Multithread support (up to 16 CPUs) = Faster processing
  • Spyware/adware-free
  • Fully redistributable
  • OpenSource core crypto-library (libObfuscate)

Sep 22, 2017

AWSBucketDump - Security Tool to Look For Interesting Files in S3 Buckets

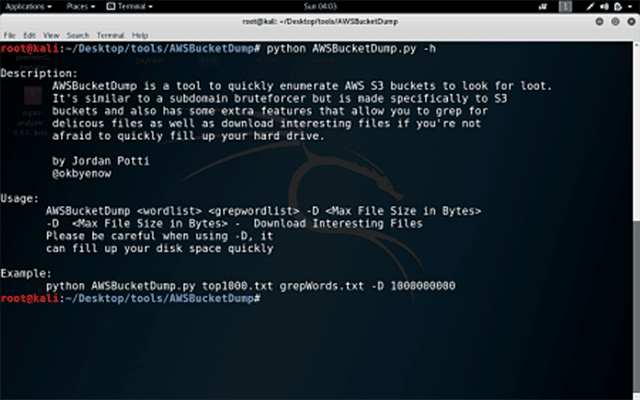
AWSBucketDump is a tool to quickly enumerate AWS S3 buckets to look for loot. It's similar to a subdomain bruteforcer but is made specifically for S3 buckets and also has some extra features that allow you to grep for delicious files as well as download interesting files if you're not afraid to quickly fill up your hard drive.
AWSBucketDump

Pre-Requisites

  • Non-Standard Python Libraries:
  • xmltodict
  • requests
  • argparse
  • Created with Python 3.6

General

This is a tool that enumerates Amazon S3 buckets and looks for interesting files.

I have example wordlists but I haven't put much time into refining them.

https://github.com/danielmiessler/SecLists will have all the word lists you need. If you are targeting a specific company, you will likely want to use jhaddix's enumall tool which leverages recon-ng and Alt-DNS.

https://github.com/jhaddix/domain && https://github.com/infosec-au/altdns

As far as word lists for grepping interesting files, that is completely up to you. The one I provided has some basics and yes, those word lists are based on files that I personally have found with this tool.

Using the download feature might fill your hard drive up, you can provide a max file size for each download at the command line when you run the tool. Keep in mind that it is in bytes.

I honestly don't know if Amazon rate limits this, I am guessing they do to some point but I haven't gotten around to figuring out what that limit is. By default there are two threads for checking buckets and two buckets for downloading.

Sep 14, 2017

Smith - A client/server style agent meant for testing

smith

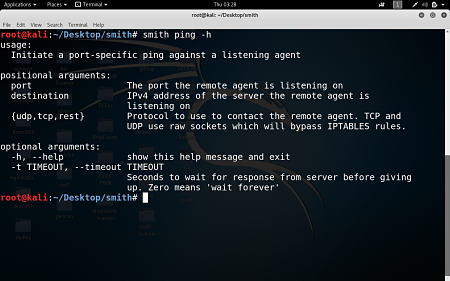
A client/server style agent meant for testing connectivity to and from a machine on a network.
client/server style agent meant for testing

Installation

python setup.py install or pip install . should install smith. Note: If you want to use the tcp/udp protocol options, you'll need to install scapy and it's dependencies. Ubuntu has 'apt-get install python-scapy'. You can also pip install scapy, but I don't know if that installs all dependencies on all OS's. I didn't include scapy in the requires because the 'rest' option doesn't utilize it, and is sufficient for a lot of usecases on its own.

listen

$: smith listen -h
usage:
 Server-side: listen for incoming ping requests from remote client.

positional arguments:
  port            The port the remote client is pinging
  {TCP,UDP,REST}  Protocol to use to contact the remote agent.TCP and UDP use
                  raw sockets which will bypass IPTABLES rules.

optional arguments:
 '-t', '--timeout'Seconds to wait for request from client before giving up. Zero (default) means 'wait forever'
  -h, --help      show this help message and exit

FIR - Fast Incident Response

What is FIR? Who is it for?

FIR (Fast Incident Response) is an cybersecurity incident management platform designed with agility and speed in mind. It allows for easy creation, tracking, and reporting of cybersecurity incidents.

FIR is for anyone needing to track cybersecurity incidents (CSIRTs, CERTs, SOCs, etc.). It's was tailored to suit our needs and our team's habits, but we put a great deal of effort into making it as generic as possible before releasing it so that other teams around the world may also use it and customize it as they see fit.
Fast Incident Response

Installation

There are two ways to install FIR. If you want to take it for a test-drive, just follow the instructions for setting up a development environment in the Wiki.

If you like it and want to set it up for production, here's how to do it.

A dockerfile for running a dev-quality FIR setup is also available in docker/Dockerfile.

Deploy to Heroku via fir/heroku_settings.py

Technical specs

FIR is written in Python (but you probably already knew that), using Django 1.9. It uses Bootstrap 3 and some Ajax and d3js to make it pretty. We use it with a MySQL back-end, but feel free to use any other DB adaptor you might want - as long as it's compatible with Django, you shouldn't run into any major issues.

FIR is not greedy performance-wise. It will run smoothly on a Ubuntu 14.04 virtual machine with 1 core, a 40 GB disk and 1 GB RAM.

Downloads Source

Sep 13, 2017

SigThief - Stealing Signatures and Making One Invalid Signature at a Time

Stealing Signatures and Making One Invalid Signature at a Time
SigThief.
I've noticed during testing against Anti-Virus over the years that each is different and each prioritize PE signatures differently, whether the signature is valid or not. There are some Anti-Virus vendors that give priority to certain certificate authorities without checking that the signature is actually valid, and there are those that just check to see that the certTable is populated with some value. It's a mess.

In short it will rip a signature off a signed PE file and append it to another one, fixing up the certificate table to sign the file. Of course it's not a valid signature and that's the point!

How to use

Usage


Usage: sigthief.py [options]

Options:
  -h, --help            show this help message and exit
  -i FILE, --file=FILE  file still signature from
  -r, --rip             rip signature off inputfile
  -a, --add             add signautre to targetfile
  -o OUTPUTFILE, --output=OUTPUTFILE
                        output file
  -s SIGFILE, --sig=SIGFILE
                        binary signature from disk
  -t TARGETFILE, --target=TARGETFILE
                        file to append signature too
  -c, --checksig        file to check if signed; does not verify signature
  -T, --truncate        truncate signature (i.e. remove sig)
Take a Signature from a binary and add it to another binary

$ ./sigthief.py -i tcpview.exe -t x86_meterpreter_stager.exe -o /tmp/msftesting_tcpview.exe
Output file: /tmp/msftesting_tcpview.exe
Signature appended.
FIN.
Save Signature to disk for use later

$ ./sigthief.py -i tcpview.exe -r                                                       
Ripping signature to file!
Output file: tcpview.exe_sig
Signature ripped.
FIN.
Use the ripped signature

$ ./sigthief.py -s tcpview.exe_sig -t x86_meterpreter_stager.exe                             
Output file: x86_meterpreter_stager.exe_signed
Signature appended.
FIN.

Truncate (remove) signature

This has really interesting results actually, can help you find AVs that value Signatures over functionality of code. Unsign putty.exe ;)

$ ./sigthief.py -i tcpview.exe -T   
Inputfile is signed!
Output file: tcpview.exe_nosig
Overwriting certificate table pointer and truncating binary
Signature removed.
FIN.
Check if there is a signature (does not check validity)

$ ./sigthief.py -i tcpview.exe -c
Inputfile is signed!

Downloads

BARF : Binary Analysis and Reverse engineering Framework

Binary Analysis and Reverse engineering Framework
BARF.
The analysis of binary code is a crucial activity in many areas of the computer sciences and software engineering disciplines ranging from software security and program analysis to reverse engineering. Manual binary analysis is a difficult and time-consuming task and there are software tools that seek to automate or assist human analysts. However, most of these tools have several technical and commercial restrictions that limit access and use by a large portion of the academic and practitioner communities. BARF is an open source binary analysis framework that aims to support a wide range of binary code analysis tasks that are common in the information security discipline. It is a scriptable platform that supports instruction lifting from multiple architectures, binary translation to an intermediate representation, an extensible framework for code analysis plugins and interoperation with external tools such as debuggers, SMT solvers and instrumentation tools. The framework is designed primarily for human-assisted analysis but it can be fully automated.

The BARF project includes BARF and related tools and packages. So far the project is composed of the following items:
  • BARF : A multiplatform open source Binary Analysis and Reverse engineering Framework
  • PyAsmJIT : A JIT for the Intel x86_64 and ARM architecture.
  • Tools built upon BARF:
  • BARFgadgets : Lets you search, classifiy and verify ROP gadgets inside a binary program.
  • BARFcfg : Lets you recover the control-flow graph of the functions of a binary program.
  • BARFcg : Lets you recover the call graph of the functions of a binary program.
For more information, see:
  • BARF: A multiplatform open source Binary Analysis and Reverse engineering Framework (Whitepaper) [en]
  • BARFing Gadgets (ekoparty2014 presentation)
Downloads Master.zip | Demo Install

Quickstart

This is a very simple example which shows how to open a binary file and print each instruction with its translation to the intermediate language (REIL).
from barf import BARF

# Open binary file.
barf = BARF("examples/bin/x86/branch1")

# Print assembly instruction.
for addr, asm_instr, reil_instrs in barf.translate():
    print("0x{addr:08x} {instr}".format(addr=addr, instr=asm_instr))

    # Print REIL translation.
    for reil_instr in reil_instrs:
        print("{indent:11s} {instr}".format(indent="", instr=reil_instr))
We can also recover the CFG and save it to a .dot file.
# Recover CFG.
cfg = barf.recover_cfg()

# Save CFG to a .dot file.
cfg.save("branch1_cfg")
We can check restrictions on code using a SMT solver. For instance, suppose you have the following code:
 80483ed:       55                      push   ebp
 80483ee:       89 e5                   mov    ebp,esp
 80483f0:       83 ec 10                sub    esp,0x10
 80483f3:       8b 45 f8                mov    eax,DWORD PTR [ebp-0x8]
 80483f6:       8b 55 f4                mov    edx,DWORD PTR [ebp-0xc]
 80483f9:       01 d0                   add    eax,edx
 80483fb:       83 c0 05                add    eax,0x5
 80483fe:       89 45 fc                mov    DWORD PTR [ebp-0x4],eax
 8048401:       8b 45 fc                mov    eax,DWORD PTR [ebp-0x4]
 8048404:       c9                      leave
 8048405:       c3                      ret
And you want to know what values you have to assign to memory locations ebp-0x4, ebp-0x8 and ebp-0xc in order to obtain a specific value in eax register after executing the code.

First, we add the instructions to the analyzer component.
from barf import BARF

# Open ELF file
barf = BARF("examples/bin/x86/constraint1")

# Add instructions to analyze.
for addr, asm_instr, reil_instrs in barf.translate(0x80483ed, 0x8048401):
    for reil_instr in reil_instrs:
        barf.code_analyzer.add_instruction(reil_instr)
Then, we generate expressions for each variable of interest
# Get smt expression for eax and ebp registers
eap = barf.code_analyzer.get_register_expr("eax")
ebp = barf.code_analyzer.get_register_expr("ebp")

# Get smt expressions for memory locations (each one of 4 bytes)
a = barf.code_analyzer.get_memory_expr(ebp-0x8, 4)
b = barf.code_analyzer.get_memory_expr(ebp-0xc, 4)
c = barf.code_analyzer.get_memory_expr(ebp-0x4, 4)

And add the desired restrictions on them.
# Set range for variables
barf.code_analyzer.set_preconditions([a >= 2, a <= 100])
barf.code_analyzer.set_preconditions([b >= 2, b <= 100])

# Set desired value for the result
barf.code_analyzer.set_postcondition(c == 13)

Finally, we check is the restrictions we establish can be resolved.
# Check satisfiability.
if barf.code_analyzer.check() == 'sat':
    print("SAT!")

    # Get concrete value for expressions.
    eax_val = barf.code_analyzer.get_expr_value(eax)
    a_val = barf.code_analyzer.get_expr_value(a)
    b_val = barf.code_analyzer.get_expr_value(b)
    c_val = barf.code_analyzer.get_expr_value(c)

    # Print values.
    print("eax : 0x{0:%08x} ({0})".format(eax_val))
    print("ebp : 0x{0:%08x} ({0})".format(ebp_val))
    print("  a : 0x{0:%08x} ({0})".format(a_val))
    print("  b : 0x{0:%08x} ({0})".format(b_val))
    print("  c : 0x{0:%08x} ({0})".format(c_val))
else:
    print("UNSAT!")
You can see these and more examples in the examples directory.


AdBlock Detected!

Like this blog? Keep us running by whitelisting this blog in your ad blocker.

This is how to whitelisting this blog in your ad blocker.

Thank you!

×